


Getting started with Kubernetes can feel confusing at first. There are many new terms, and Pods are often the first one that raises questions.
Kubernetes Pods are the smallest units that run applications inside a cluster, but that short definition rarely feels clear to beginners.
Many people search for this topic because they want to understand how apps run, scale, and connect in Kubernetes.
Without that basic idea, the rest of the system feels hard to follow. In this guide, you’ll learn what pods are, what they are used for, and how they work behind the scenes.
You will also learn the pros and cons, common issues, and how pods fit with containers and nodes.
By the end, you should feel more confident reading Kubernetes docs and working with pods in projects.
What Is a Kubernetes Pod?
A Kubernetes Pod is the smallest unit you can create and manage in Kubernetes. It holds one or more containers that run together and share the same network and storage.
Think of a pod as a wrapper that keeps related containers working as one.
A pod is the smallest deployable unit in Kubernetes, which means Kubernetes does not manage containers by itself. Instead, it works with pods.
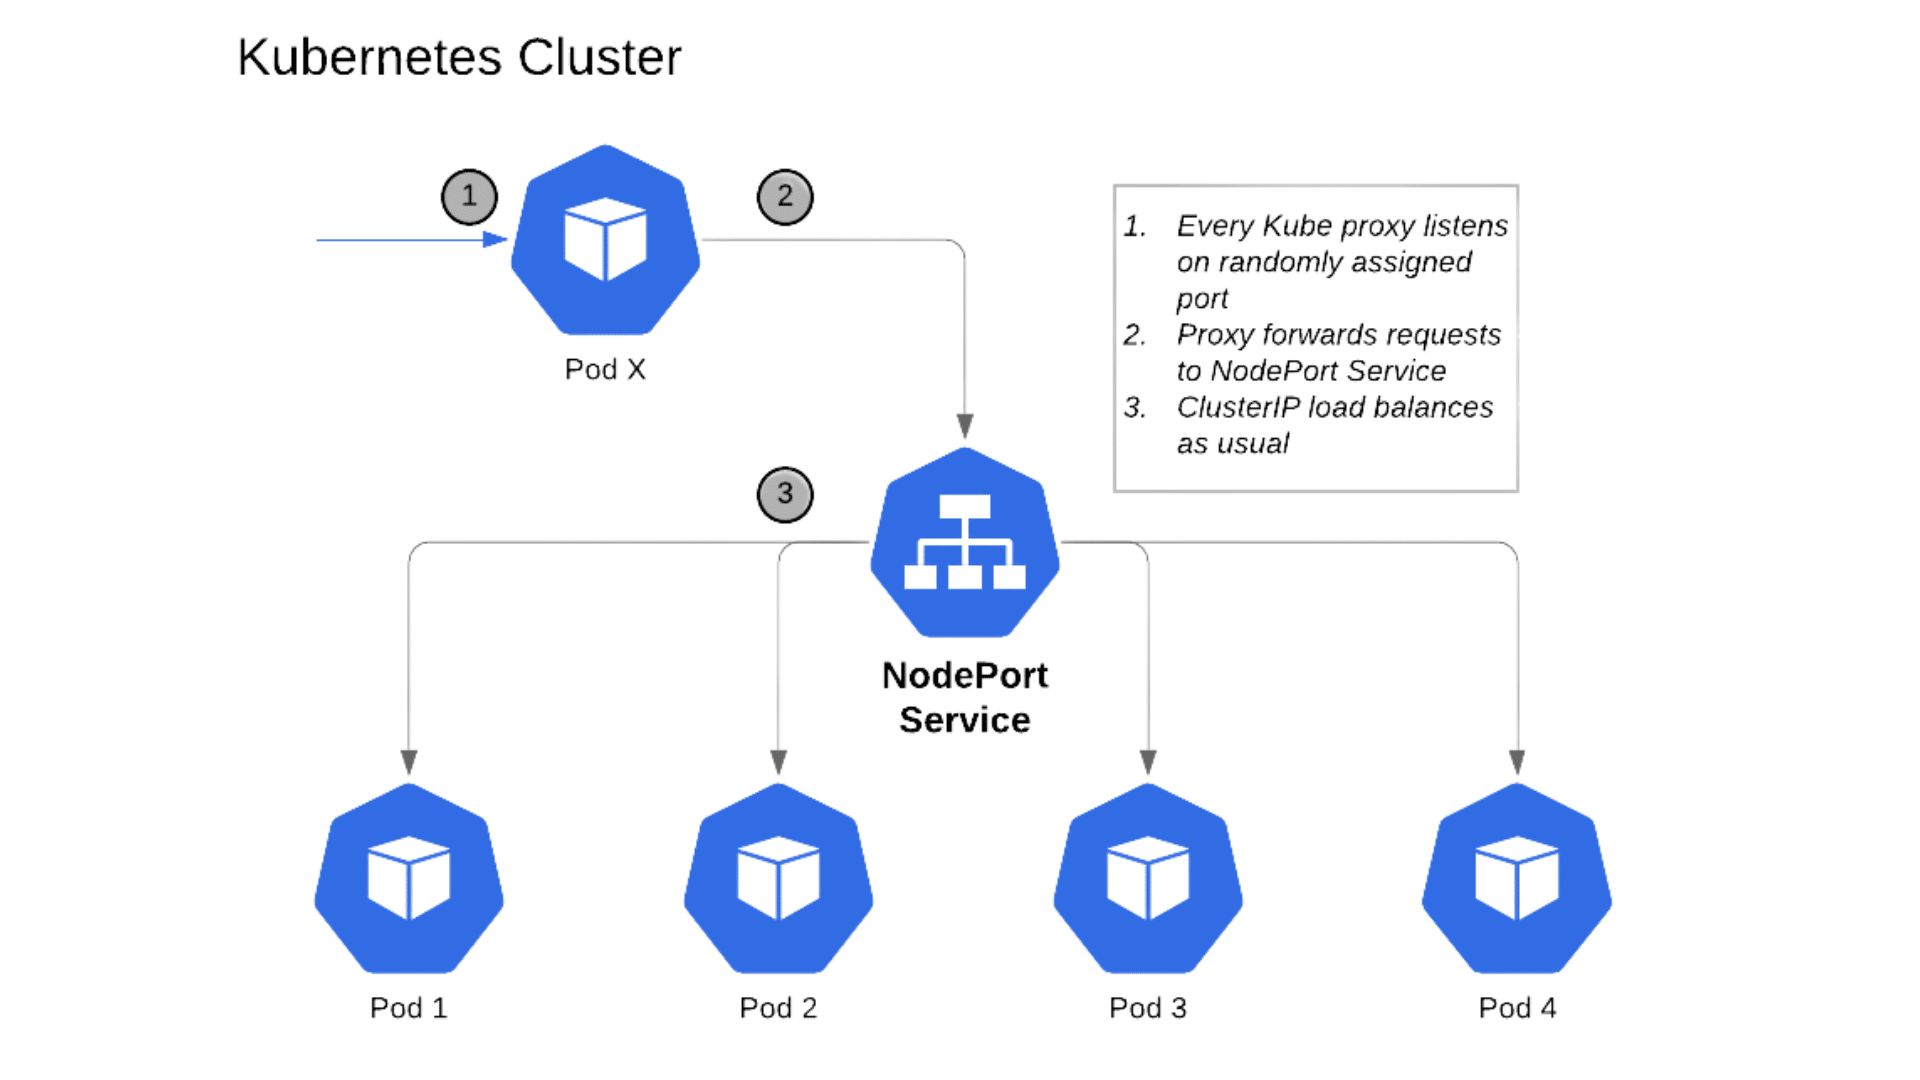
Each pod runs on a node, which is a machine inside the cluster. The node provides the CPU, memory, and disk space the pod needs.
Containers inside a pod can talk to each other easily because they share the same IP address.
Pods connect containers to nodes, making sure apps run in the right place and stay organized.
How Kubernetes Pods Work?
Pods follow a clear lifecycle from creation to removal. Kubernetes manages each step to keep applications running smoothly.
1. Pod Creation
A pod is created when you apply a configuration file or start a deployment. This file tells Kubernetes what containers to run, what images to use, and what resources are needed.
Kubernetes does not run the pod right away. It first checks the request and validates the settings.
Once approved, the pod is added to the system and waits for placement. This step ensures the pod meets basic rules before it runs.
2. Pod Scheduling
After creation, Kubernetes decides where the pod should run. The scheduler looks for a node with enough CPU, memory, and space.
It also checks rules like node limits and placement preferences.
Once a match is found, the pod is assigned to that node. This process helps spread workloads evenly and avoids overloading a single node.
Scheduling happens automatically without manual input in most cases.
3. Pod Execution
Once scheduled, the pod starts running on its assigned node. Kubernetes pulls the container images and starts the containers in the right order.
All containers inside the pod share the same network and storage.
If a container fails, Kubernetes may restart it based on the pod rules. This helps keep the app available. At this stage, the pod handles live traffic and performs its assigned tasks.
4. Pod Termination and Removal
Pods are removed when they are no longer needed or when they fail.
Kubernetes may stop a pod during scaling, updates, or node issues. Before removal, it gives the pod time to shut down cleanly.
This helps avoid broken connections or lost data.
Once stopped, the pod is deleted and does not come back. If needed, Kubernetes creates a new pod to replace it.
Pros and Cons of Kubernetes Pods
Pods make it easier to run and manage applications in Kubernetes. They offer helpful features, but also come with limits you should understand.
| Pros | Cons |
| Easy to scale apps up or down as demand changes | Pods are temporary and can be removed anytime |
| Flexible design supports many app setups | Pod management can feel complex for beginners |
| Shared network and storage ease container communication | Pods cannot be updated directly once running |
| Works well with rolling updates and deployments | Debugging pod issues may take extra effort |
| Helps keep apps available with automatic restarts | Misconfigured pods can affect app performance |
Best Practices for Working with Pods
Small habits make pod management easier and more reliable. These tips help keep applications stable as they grow.
- Use controllers instead of standalone pods: Create pods through deployments or replica sets so Kubernetes can restart and replace them automatically.
- Set resource limits and requests: Define CPU and memory values to prevent pods from using too many resources or starving others.
- Avoid manual pod changes: Update pods through deployments rather than editing running pods, which can cause inconsistency.
- Keep pods simple: Run only closely related containers together to reduce complexity and make debugging easier.
- Monitor pod health: Use readiness and liveness checks to detect issues early and keep traffic flowing correctly.
- Clean up unused pods: Remove old or failed pods to keep the cluster organized and easier to manage.
What Are Pods Used For?
Pods are used to run and manage applications inside Kubernetes. They group containers so apps can run, connect, and scale the right way.
1. Running Application Containers
Pods are mainly used to run one or more containers together. Each pod shares the same network and storage, which helps the app run as a single unit.
This setup makes it easier for containers to talk to each other without extra steps.
In most cases, one pod runs one main container, which keeps things simple.
Kubernetes then handles where the pod runs and restarts it if something goes wrong. This helps keep apps stable and available.
2. Managing Related Services Together
Pods are useful when parts of an app need to work closely together.
For example, a main app container may need a helper container for logging or data syncing. Putting them in the same pod lets them share files and network access.
This keeps communication fast and reliable. The key benefit here is shared resources, which reduces setup work.
It also keeps related services tightly connected without extra configuration.
3. Scaling and Updating Applications
Pods make it easier to scale apps up or down based on demand.
Kubernetes can create more pods when traffic increases and remove them when it drops. This helps apps stay responsive without manual work.
Pods are also replaced during updates instead of being changed directly.
This means fewer errors and smoother rollouts. The replace-not-edit approach helps keep deployments clean and predictable over time.
Common Pod Issues and Fixes
Pods can run into problems during setup or while running. Knowing common issues helps you fix them faster and keep apps stable.
- CrashLoopBackOff: The container keeps stopping and restarting. Check logs to find errors and confirm environment variables and app settings are correct.
- ImagePullBackOff: Kubernetes cannot download the container image. Verify the image name, tag, and registry access or credentials.
- Pending State: The pod is not scheduled on any node. Check if nodes have enough CPU, memory, or available space.
- Failed Container Start: The container does not start properly. Review startup commands and ensure required files exist.
- Out of Memory Error: The pod uses more memory than allowed. Increase memory limits or optimize the app’s usage.
- Network Connection Issues: Services cannot reach the pod. Confirm service settings and pod labels match correctly.
Conclusion
Understanding Kubernetes pods makes the rest of Kubernetes feel far less confusing. Once you know that pods are the basic units where containers run, the bigger pieces start to make sense.
You’ve seen how pods are created, scheduled, run, and removed, along with when to use single or multi-container setups.
You also learned about common issues and simple ways to fix them, which can save time later.
These basics give you a solid starting point, even if you are just testing things out.
As you keep learning Kubernetes, try applying these ideas in small projects or test clusters. Hands-on practice builds confidence fast.
If you’ve worked with pods before or just started, share your experience or questions in the comments below.