


Your WordPress site holds everything you’ve worked hard to build: your content, images, customer data, and design.
But what happens if something goes wrong? A failed update, hacker attack, or server crash could wipe it all out in seconds. That’s why backing up your WordPress site isn’t optional; it’s essential.
The good news is that making backups can be simple and stress-free. In this guide, we will walk you through beginner-friendly ways to back up your site, step by step.
You’ll also learn how often to back up, where to store your backups safely, and common mistakes to avoid. Let’s protect your website today.
How to Backup WordPress Site
A complete WordPress backup protects everything on your site. Understanding what gets backed up and how often to do it helps you choose the right method. Here’s what you need to know to keep your website safe and recoverable.
What a Full WordPress Backup Includes:
- Files: All your images, themes, plugins, and WordPress core software that make your site look and function the way it does.
- Database: Your posts, pages, comments, user accounts, and site settings. This is where all your content and configurations are stored.
Best Backup Methods
- Backup Plugins (Recommended): Automatic, beginner-friendly tools that handle everything for you. They back up files and the database together without technical knowledge required.
- Manual Backups: For advanced users who want full control. Requires accessing your hosting control panel and downloading files and the database separately.
Backup Frequency
- Weekly Backups: Perfect for small sites with minimal updates. Good for personal blogs or websites that don’t change often throughout the week.
- Daily Backups: Essential for active sites, online stores, or blogs with frequent posts. Ensures you never lose more than one day’s work.
Choose a backup method that matches your skill level and set it up today to avoid disaster tomorrow.
Method 1: Backup WordPress Site Using a Plugin (Recommended)
Backup plugins are the smartest choice for most WordPress users. They eliminate the guesswork and handle all the technical stuff behind the scenes, so anyone can protect their site without needing coding skills or server access.
How to Backup WordPress Site Using UpdraftPlus (Step-by-Step)
UpdraftPlus is one of the most popular backup plugins because it’s free, reliable, and super easy to use. Here’s exactly how to create your first backup:
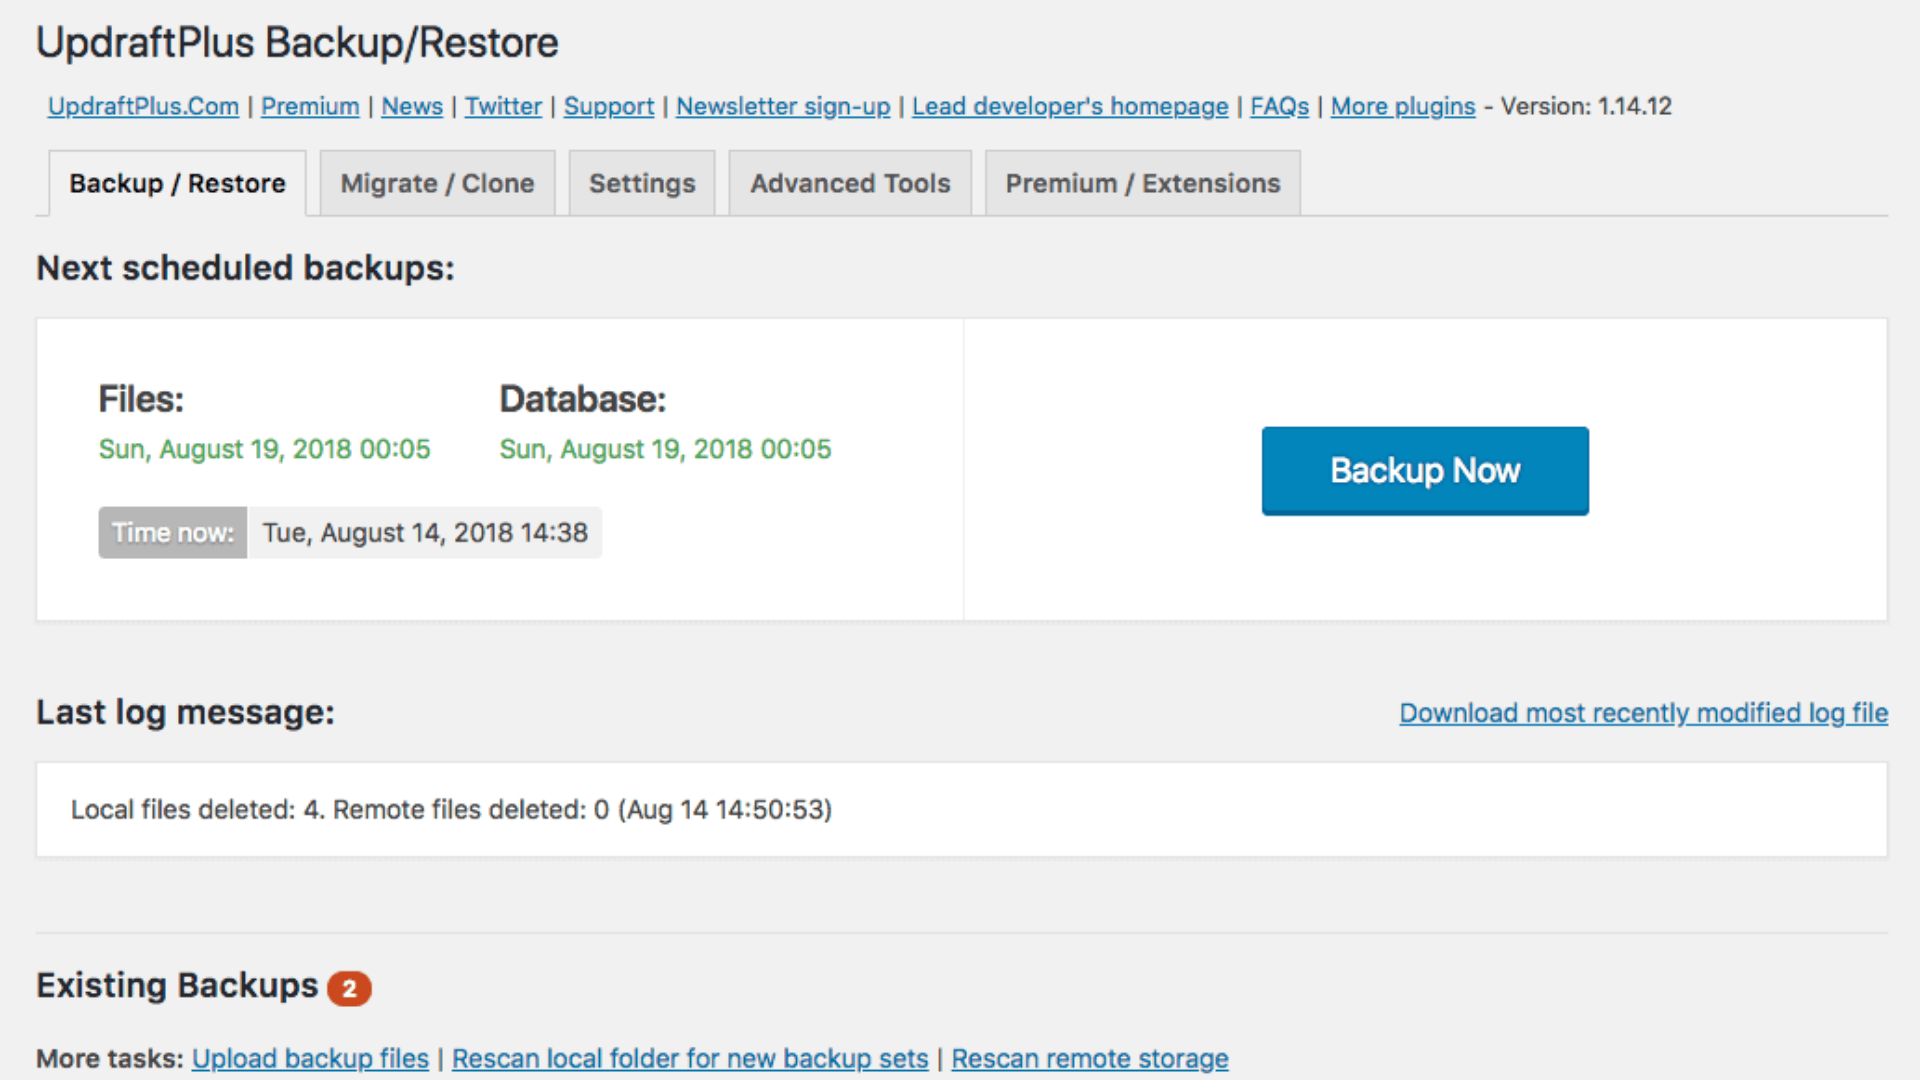
Step 1: Log in to your WordPress dashboard and go to Plugins → Add New. Search for “UpdraftPlus” and click Install Now, then Activate.
Step 2: Navigate to Settings → UpdraftPlus Backups in your WordPress menu. You’ll see the main backup dashboard.
Step 3: Click the blue Backup Now button at the top of the page. A pop-up window will appear with backup options.
Step 4: Make sure both checkboxes are selected:
- Include your files in the backup (themes, plugins, uploads)
- Include your database in the backup (posts, pages, settings)
Step 5: Click Backup Now at the bottom of the pop-up. The plugin will start creating your backup, and you’ll see a progress bar. Once it’s done, your backup files will appear in the “Existing Backups” section below.
That’s it! You’ve just created a complete backup of your WordPress site.
Set Up Automatic Scheduled Backups
Manual backups are great, but automatic scheduled backups are even better. They run on their own, so you never forget to back up your site.
Choose your backup schedule based on how often your site changes. If you post daily or run an online store, set backups to run daily. For smaller sites that update once or twice a week, weekly backups are usually enough.
Connect remote storage to save your backups safely off-site. UpdraftPlus works with popular cloud services:
- Google Drive: Free storage and easy access from anywhere
- Dropbox: Simple setup and reliable syncing
- OneDrive: Great if you already use Microsoft services
Why Off-Site Storage Matters
If your hosting server gets hacked, crashes, or goes offline, your backups stored on that same server disappear too.
Cloud storage keeps copies in a completely separate location, so you can always recover your site no matter what happens to your host.
To set this up, go to the Settings tab in UpdraftPlus, choose your backup schedule, select your preferred cloud storage, and follow the connection steps. The plugin will handle the rest automatically.
Alternative Backup Plugins
UpdraftPlus isn’t the only option. Here are other solid backup plugins worth considering:
- Duplicator is perfect if you plan to migrate or clone your site. It creates backup packages that make moving to a new host incredibly easy.
- BackWPup offers advanced features for tech-savvy users. You get more control over what gets backed up and where it goes.
- Jetpack Backup (VaultPress) provides real-time backups and premium support. It’s a paid option that’s great for business sites that need instant protection.
Each plugin has its strengths, but they all accomplish the same goal: keeping your WordPress site safe and recoverable.
Here’s that section written in simple, conversational language with a mix of formats:
Method 2: How to Backup WordPress Site Manually
Manual backups give you complete control over what gets saved and where it goes. This method is perfect for advanced users who are comfortable working with hosting control panels like cPanel.
While it takes more effort than using a plugin, manual backups help you understand exactly what’s happening behind the scenes.
What You Must Back Up
A complete WordPress backup requires two separate components. Miss either one, and your backup won’t work properly if you ever need to restore your site.
| Component | What It Includes | Why It Matters |
|---|---|---|
| WordPress Files | wp-content folder, themes, plugins, uploads, and wp-config.php | These make your site look and function. Without them, you lose all design and functionality. |
| WordPress Database | Posts, pages, comments, user data, site settings | This is your actual content. Without it, your site becomes an empty shell with no information. |
WordPress Files You Need:
- wp-content: The most important folder containing everything unique to your site
- Themes: Your site’s design and layout files
- Plugins: All functionality and features you’ve added
- Uploads: Every image, video, and media file you’ve uploaded
- wp-config.php: Critical configuration file with database connection details
WordPress Database Contains:
- Posts and pages: All your written content and published materials
- Comments: Reader interactions and engagement on your posts
- User accounts: Login credentials and user information
- Settings: Site configurations, permalinks, and customization options
Both parts work together like two halves of a whole. Files without a database are useless, and a database without files won’t display anything.
Step 1: Backup WordPress Files Using cPanel
Most hosting providers give you access to cPanel, a control panel that makes file management easier. Here’s how to download all your WordPress files safely.
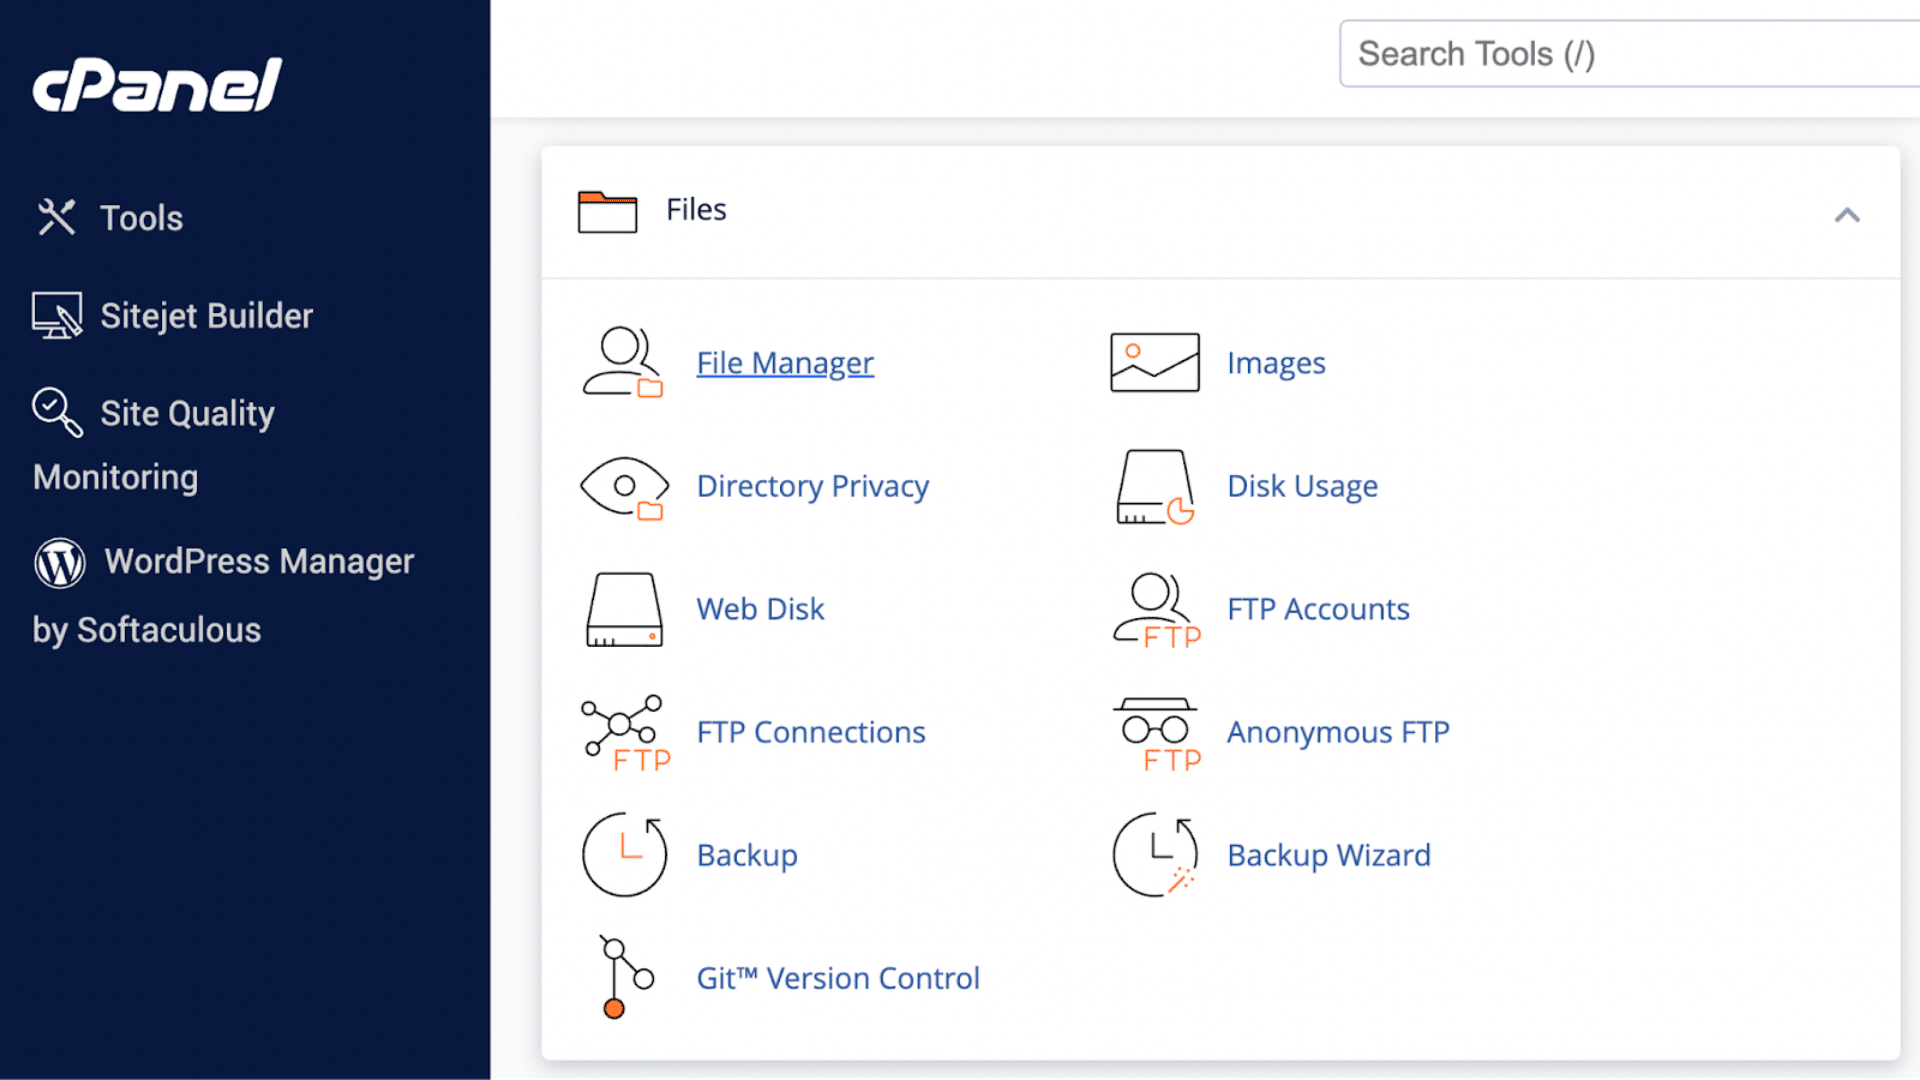
Step 1: Open your web browser and log in to your hosting account. Look for the cPanel icon or link, usually found in your hosting dashboard.
Step 2: Once inside cPanel, scroll down to the Files section and click on File Manager. This opens a window showing all the files on your hosting account.
Step 3: Navigate to the folder where WordPress is installed. This is usually called public_html or www. Click to open it, and you’ll see all your WordPress files and folders.
Step 4: Select everything inside your WordPress installation. You can click the checkbox at the top to select all files at once, or hold Ctrl (Windows) or Command (Mac) while clicking individual items.
Step 5: Right-click on the selected files and choose Compress. A pop-up will appear asking you to choose a compression format, select ZIP Archive, and give it a name like wordpress-backup-feb-2026.zip.
Step 6: Once the compression finishes, right-click on the newly created ZIP file and select Download. The file will save to your computer, usually in your Downloads folder.
This ZIP file now contains everything that makes your WordPress site look and work the way it does.
Step 2: Backup WordPress Database Using phpMyAdmin
Your database holds all the content and settings that make your site unique. Backing it up requires a different tool called phpMyAdmin.
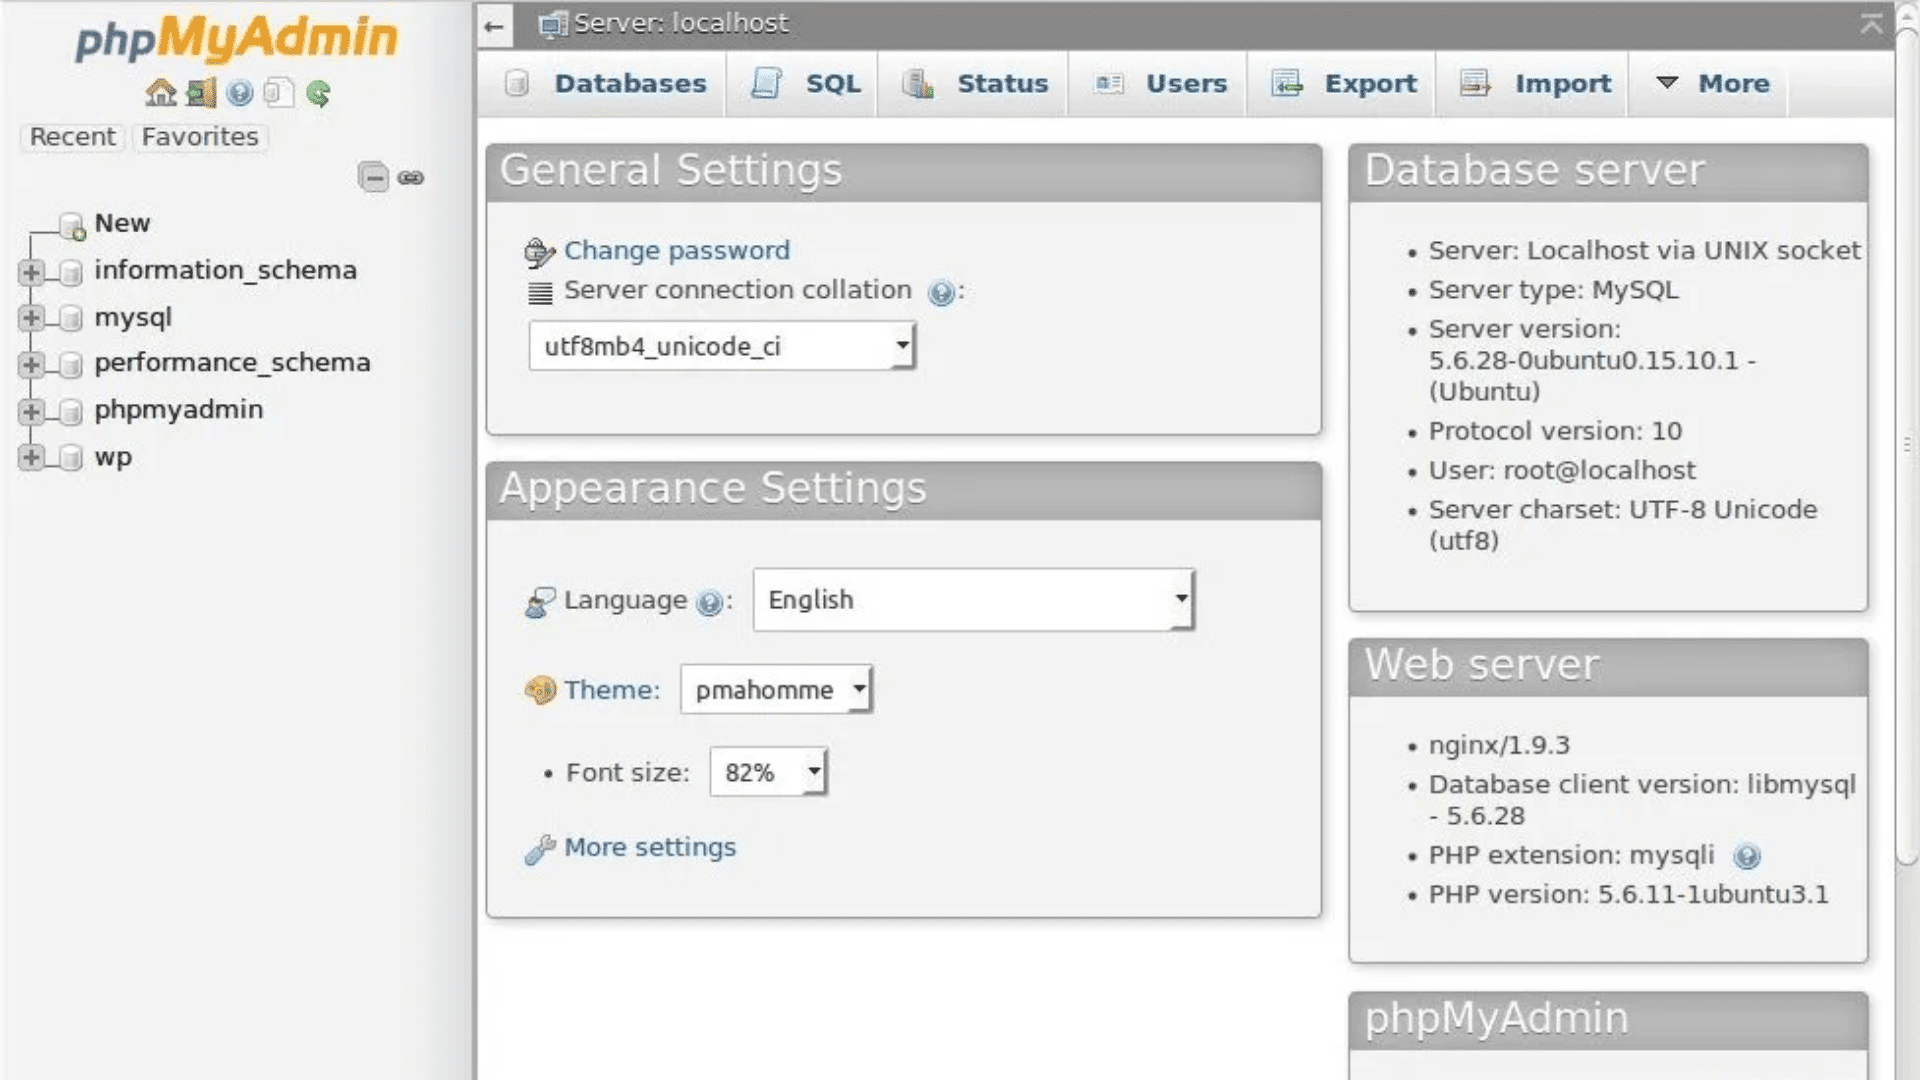
Step 1: Go back to your cPanel dashboard and scroll to the Databases section. Click on phpMyAdmin to open the database management tool.
Step 2: On the left sidebar, you’ll see a list of databases. Click on your WordPress database name. If you’re not sure which one it is, check your wp-config.php file for the database name, or ask your hosting support.
Step 3: Once the database is selected, click the Export tab at the top of the page. This is where you’ll create a downloadable copy of your database.
Step 4: Choose your export settings:
| Setting | What to Choose |
|---|---|
| Export Method | Quick (easier and faster for most sites) |
| Format | SQL (standard database backup format) |
Leave all other settings at their defaults unless you have a specific reason to change them.
Step 5: Click the Go button in the bottom-right corner. Your browser will download a .sql file with a name like your-database-name.sql. This file contains all your posts, pages, comments, and settings.
Save this file in the same location as your WordPress files backup, so everything stays organized together.
Recommended Backup Order (Best Practice)
The order in which you create backups actually matters for smooth restoration later. Following the right sequence prevents conflicts and makes recovery faster.
Here’s the best approach:
- Back up The Database First: Start here because your database is smaller and faster to download. If something goes wrong during the file backup, you’ll at least have your content safe.
- Backup Files Second: Once the database is safely downloaded, move on to backing up all your WordPress files through File Manager.
- Store Both Together as One Backup Set: Create a folder on your computer labeled with the date (like “WP-Backup-Feb-09-2026”) and put both the ZIP file and SQL file inside it.
- Keep Them Paired: Never separate the database backup from its matching file backup. They’re created at the same moment in time and need to be restored together.
Why This Matters for Clean Restores
If you restore files from March but a database from January, your site will have mismatched content and settings. Plugins might expect files that don’t exist, or your theme might look for database entries that aren’t there.
Keeping backup pairs together ensures everything lines up perfectly when you need to recover your site.
Store your complete backup sets in multiple locations, your computer, an external hard drive, and cloud storage like Google Drive. That way, you’re covered no matter what disaster strikes.
Common WordPress Backup Mistakes
Here are some of the common mistakes that happen while taking wordpress backups. Keep them in mind to avoid hassle later.
| Backup Mistake | Why It’s a Problem | What to Do Instead |
|---|---|---|
| Backing up files only (missing database) | Your site may look complete, but important content and settings can be missing when you try to restore. | Back up both: site files and the database, and keep them together as one backup set. |
| Storing backups on the same server | If something happens to the server, your backups can be lost along with your site. | Save a copy off-site, like cloud storage and/or a local drive. |
| Not testing backups | You might not know the backup is broken until you actually need it. | Do a simple test restore on a staging site or local setup once in a while. |
| Relying only on hosting backups | Hosting backups may be limited, hard to access, or not available when you need them most. | Keep your own backups in addition to any host-provided backups. |
Final Thoughts
Backing up your WordPress site might seem like extra work, but it’s the smartest investment you can make in your website’s future.
Even if you choose the convenience of backup plugins, the control of manual backups, or rely on your hosting provider’s tools, the important thing is that you start backing up today.
Remember to set up automatic backups so you never forget, store copies in multiple locations like cloud storage, and test your backups occasionally to make sure they actually work.
A few minutes spent setting up backups now can save you weeks of stress and lost work later.
Don’t wait until disaster strikes. Take action right now, install a backup plugin, schedule your first backup, and sleep better knowing your hard work is protected and recoverable no matter what happens.
Ready to protect your website? Choose your backup method and set it up in the next 10 minutes.