





Your SSD boots fast and opens files without trouble. Then a monitoring tool flags a lower health score, an unusual temperature, or a warning you have never seen before.
Which reading should you trust? And does a “healthy” label really mean your important files are safe?
I have spent years reading storage reports, and mixed results confuse almost everyone at first. A number that looks alarming in one app can look fine in another.
This guide shows you quick ways to check SSD health on Windows and Mac. You will also learn to read wear data, spot real warning signs, and sort out conflicting results.
By the end, you will know what your drive is actually telling you.
How to Check SSD Health Quickly
Both Windows and Mac can report basic SSD health without any extra software. You can get a first read in under a minute. Here is the fastest way for each system.
1. Windows Quick Check
BrenTech demonstrates the quickest method of checking your SSD drive health on your Windows system:
Open Settings> System > Storage > Advanced storage settings > Disks & volumes. Pick your SSD and open Properties.
The drive health section sits near the top. Windows built-in readings focus on NVMe drives, so this works best there.
You may see estimated remaining life, available spare capacity, current temperature, and any critical warnings. That covers the essentials at a glance.
Own a SATA SSD? Windows often skips these health details for those drives, so you will likely need a separate utility.
2. Mac Quick Check
Macintosh Weekly also gives a pretty concise process of verifying your SSD status on you Mac in this video below:
Open Disk Utility from Applications > Utilities. In the menu bar, choose View > Show All Devices.
Now select the physical SSD, not the volume or container listed under it. Then click Info or open its information panel.
Disk Utility reads SMART health from many supported drives and shows a plain status line. You are looking for a simple, verified, or failing result.
This quick check confirms if the drive reports a hardware fault. It does not break down wear or lifetime writes.
3. When Another Tool is Needed
Reach for a dedicated tool when the built-in check falls short. That happens more often than people expect. Use your system only; it shows a basic pass/fail. It also helps when SMART reads as unsupported, or when wear-and-error data stays hidden.
smartmontools is a free, trusted option. It reads SMART details from many SATA and NVMe drives on both Windows and macOS.
With it, you can see the wear percentage, written data, error counts, and temperature history. That is the depth a status line alone cannot give you.
Check SSD Health on Windows
Windows gives you three ways to check a drive without downloading anything. Each one suits a different need.
The Settings panel is quickest for a glance. PowerShell adds a clear pass or fail across every disk. Manufacturer and third-party tools go deepest.
Here is how each method works.
1. Windows Storage Settings
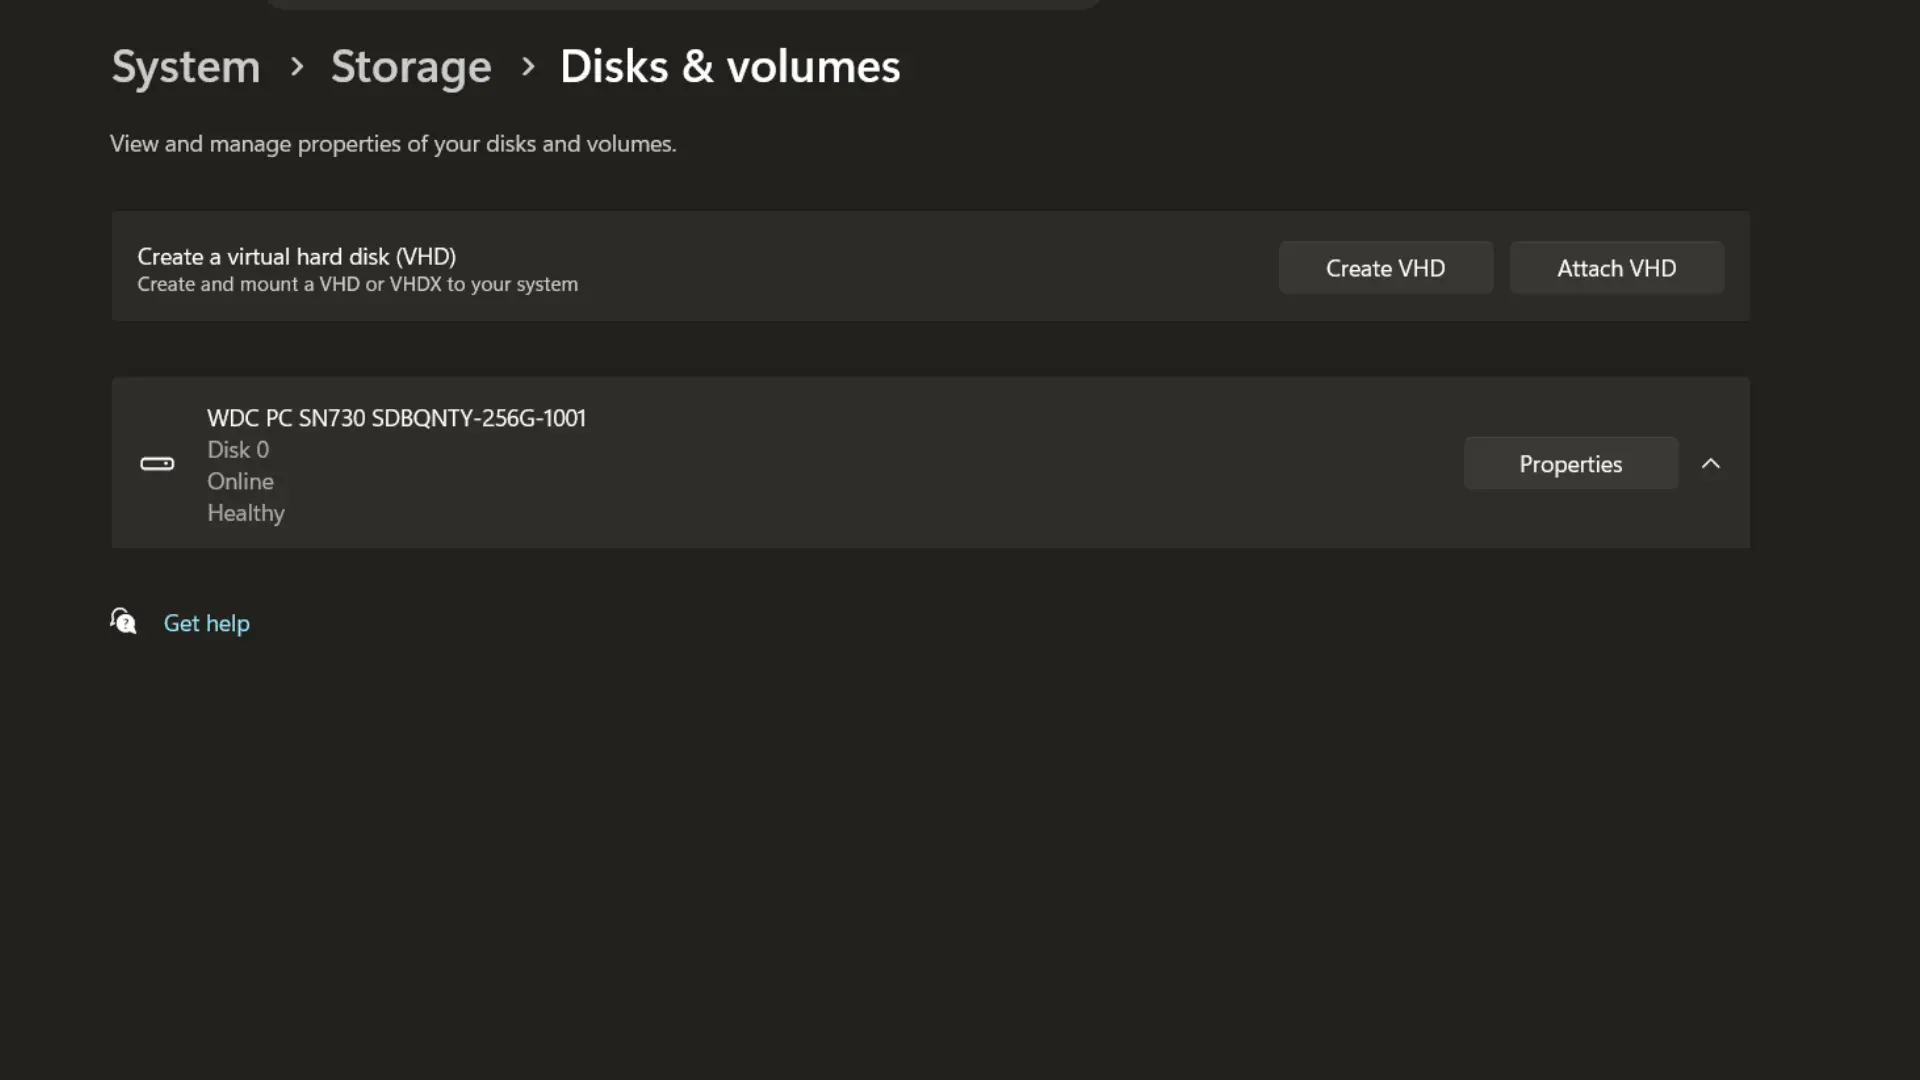
Open Settings > System > Storage > Advanced storage settings > Disks & volumes. Select your SSD and click Properties.
The health section appears near the top of that page. On NVMe drives, data is read directly from the controller.
Look for these readings:
- Drive health status: a plain summary of the drive’s condition
- Estimated remaining life, shown as a percentage
- Available spare, the backup flash the drive keeps in reserve
- Current temperature, measured live
- Critical warnings, flags for serious problems
Together, these tell you if the drive needs attention today. A single glance is usually enough.
2. PowerShell Health Status
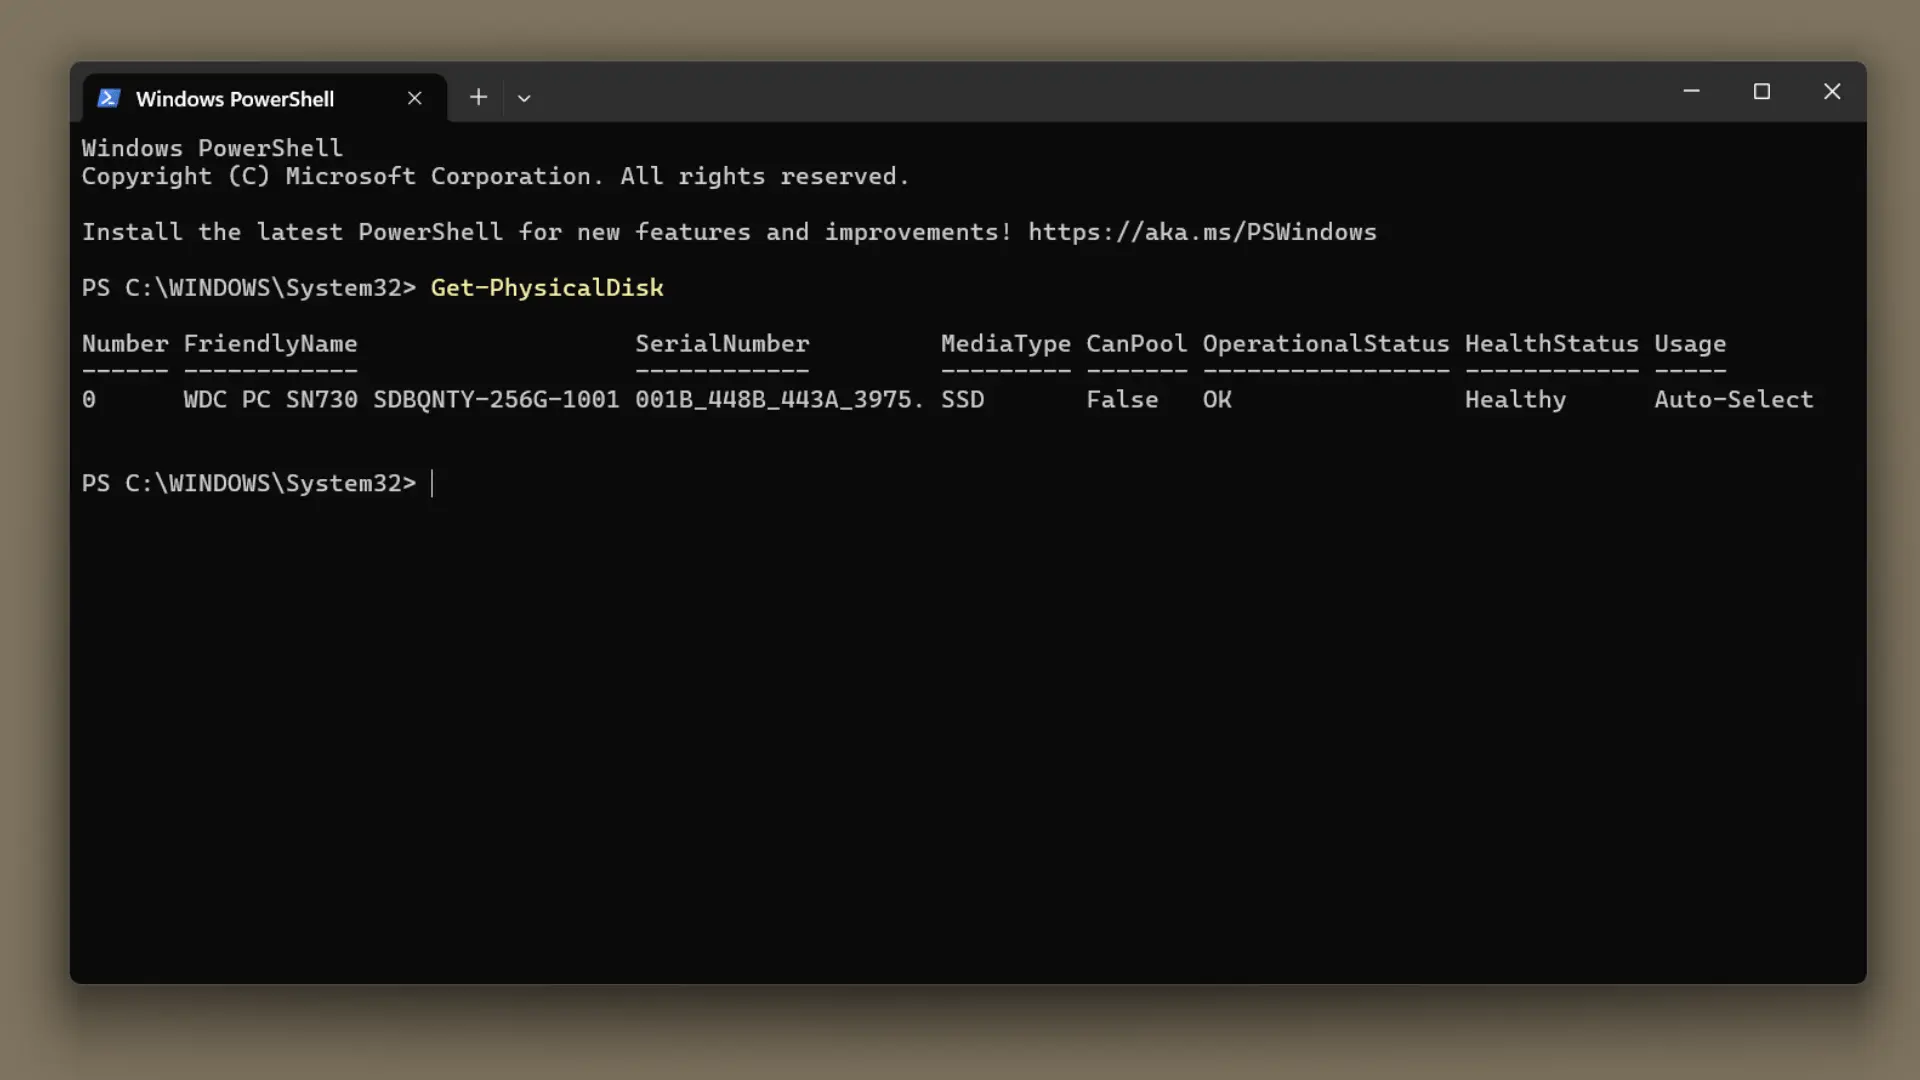
Prefer a command line? PowerShell reports drive health in seconds.
Right-click the Start button and open PowerShell as administrator. Then type this and press Enter:
Get-PhysicalDisk
The output lists every physical disk Windows can see. Find your SSD by its model name in the FriendlyName column.
Two fields matter most here. HealthStatus should read Healthy, and OperationalStatus should read OK. Anything else is worth a closer inspection with a fuller tool.
3. Detailed PowerShell Output
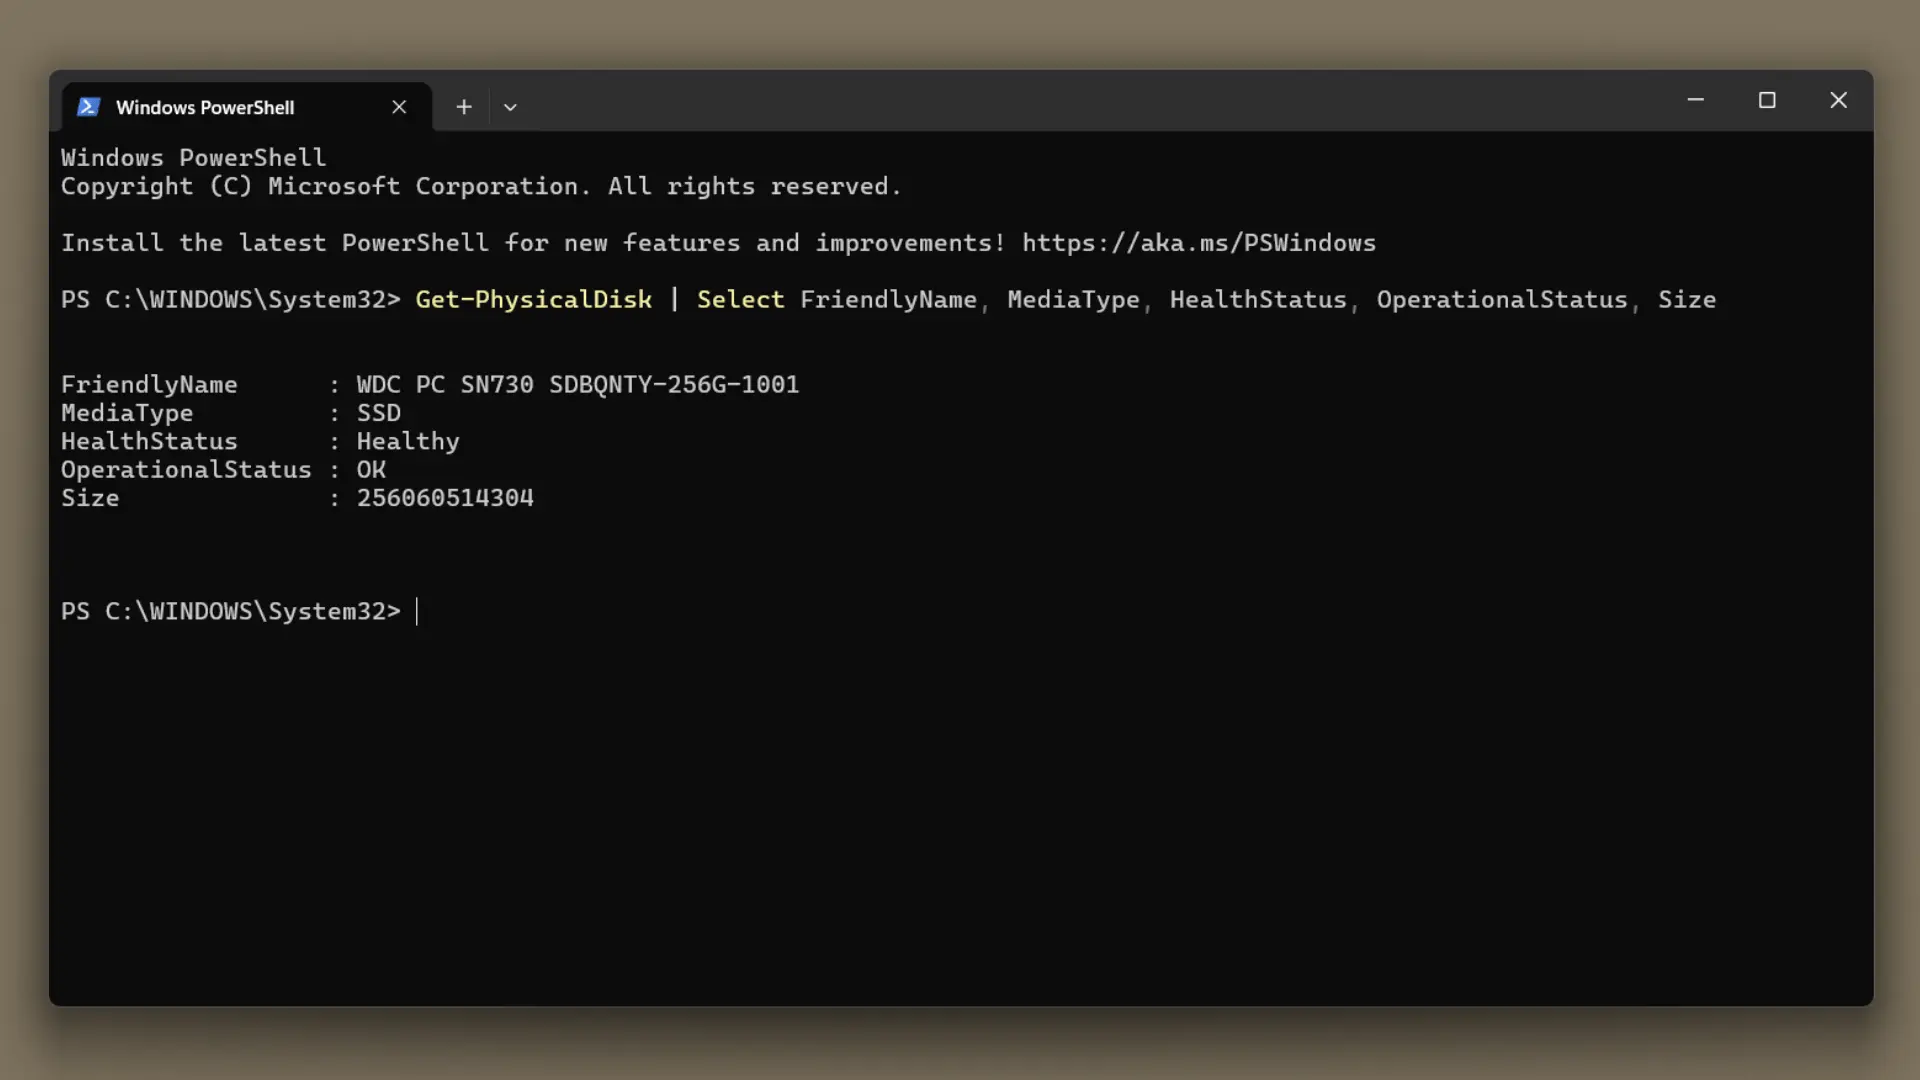
The basic command can be hard to scan. This version trims it to the columns that matter:
Get-PhysicalDisk | Select FriendlyName, MediaType, HealthStatus, OperationalStatus, Size
Each column has a clear job. FriendlyName is the model, and MediaType confirms it is an SSD.
HealthStatus and OperationalStatus return the same pass/fail as before. Size helps you tell two similar drives apart.
Keep in mind this is a summary, not a full SMART report. It flags trouble but will not show wear percentage or error logs.
4. Manufacturer SSD Software
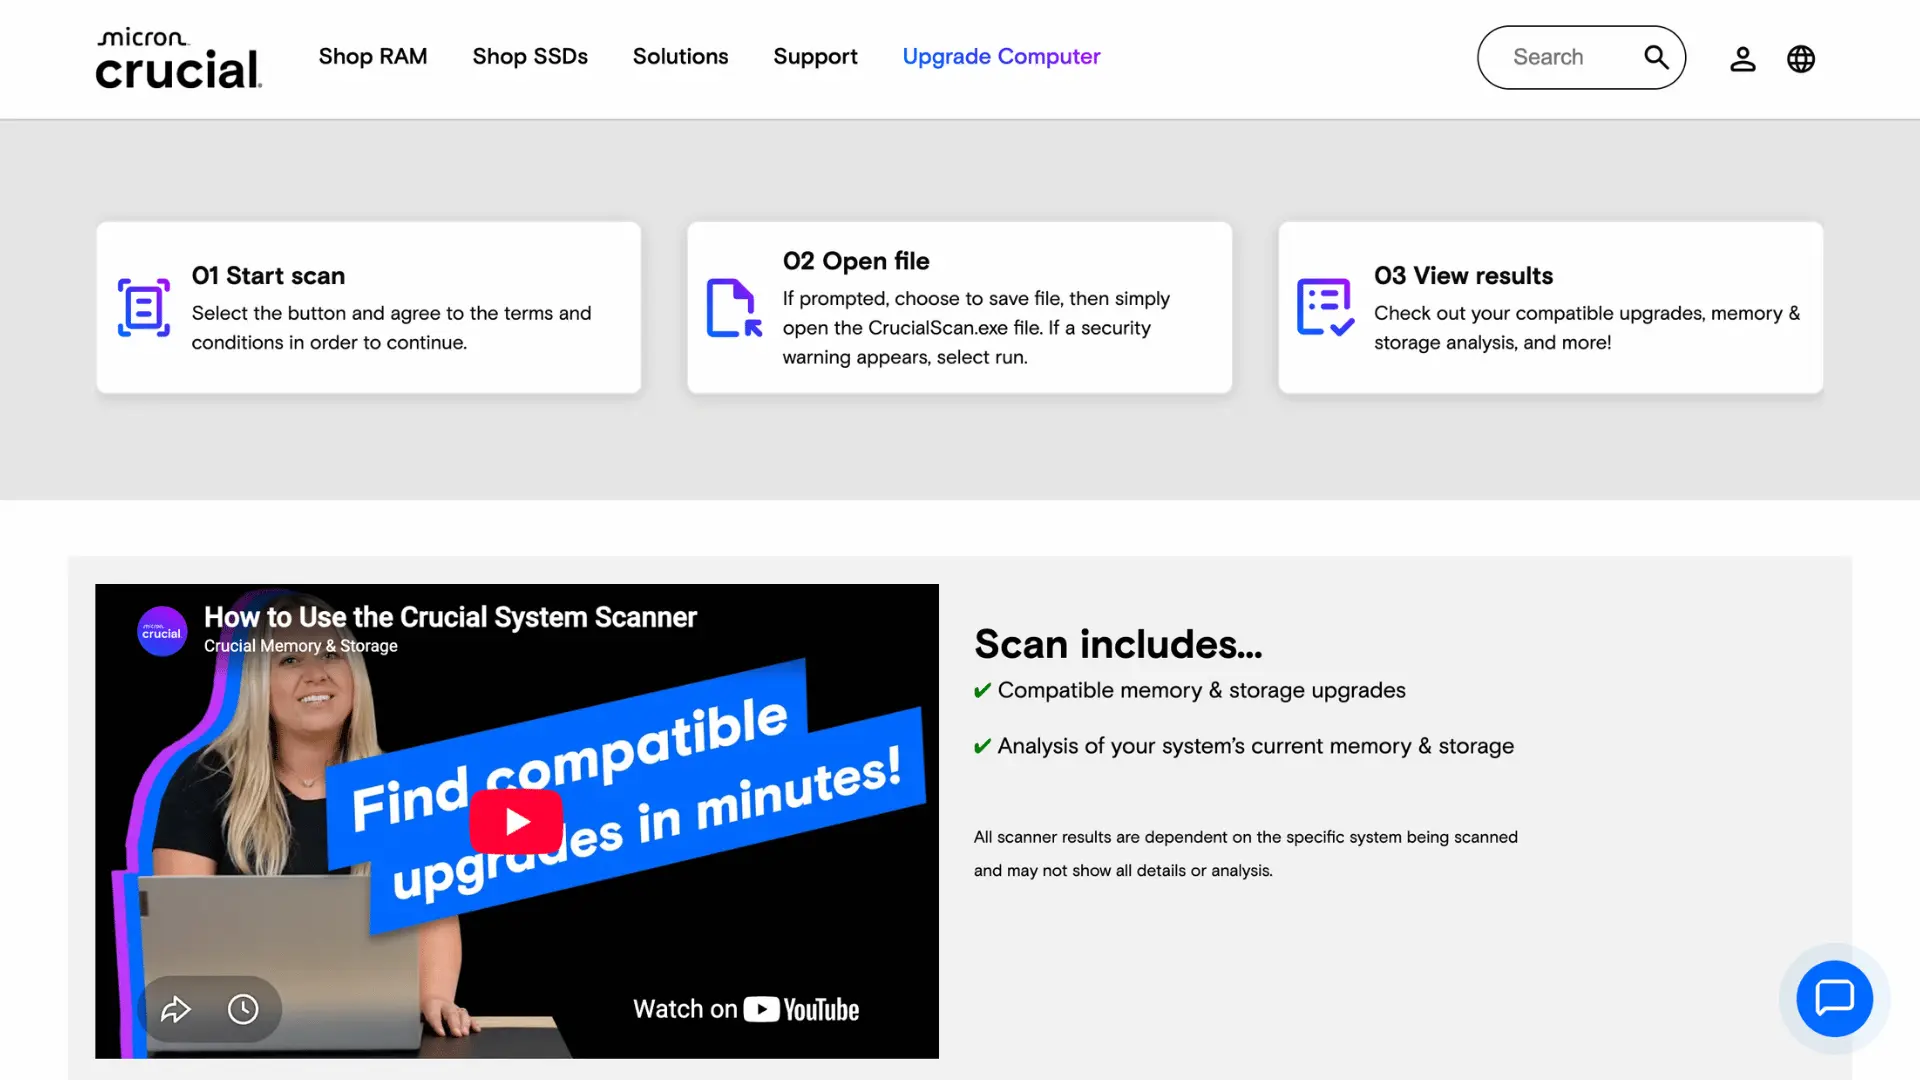
The drive maker’s own app often beats every built-in option. Samsung, Crucial, WD, and others each offer one.
Reach for it when you want more than a pass or fail. These tools tend to show:
- Wear percentage and estimated endurance used
- Firmware updates for your exact model
- Live temperature monitoring
- Built-in diagnostic scans
- Warranty status and registration
- Drive-specific SMART attributes
The readings match your hardware because the maker built both. That accuracy is the main reason to install one.
5. Third-Party SMART Tools
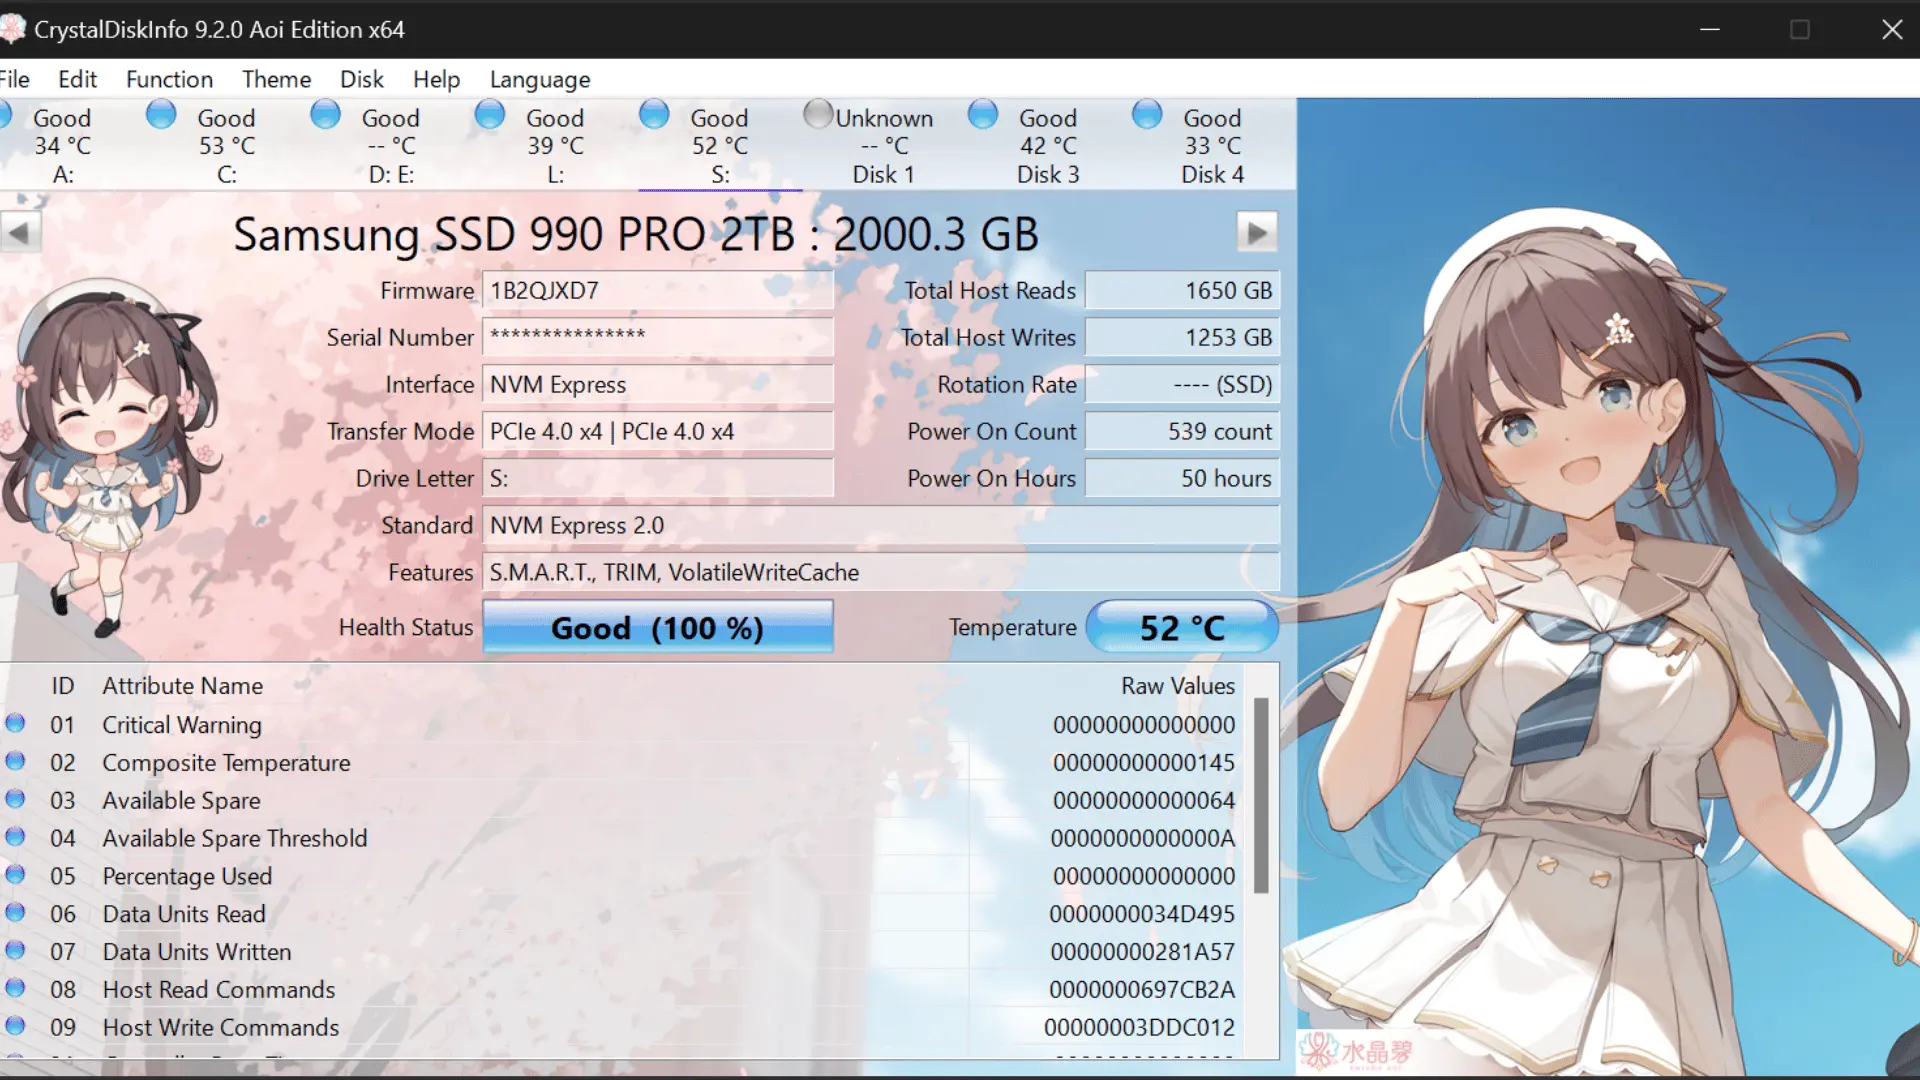
No official app for your drive? A third-party SMART reader fills the gap. A tool that ticks these boxes will serve you for years. One that skips them may misread newer drives.
- CrystalDiskInfo: The most popular freeware for PCs. It provides a highly visual interface with color-coded health (Blue for good, Yellow for caution, Red for bad) and tracks metrics like power-on hours and bad sectors.
- HDDScan: A portable freeware tool that analyzes S.M.A.R.T. attributes and lets you run read and verify tests to predict drive degradation.
- PassMark DiskCheckup:Provides current S.M.A.R.T. values and uses them to predict the specific date a drive might cross failure thresholds.
6. External SSD Checks
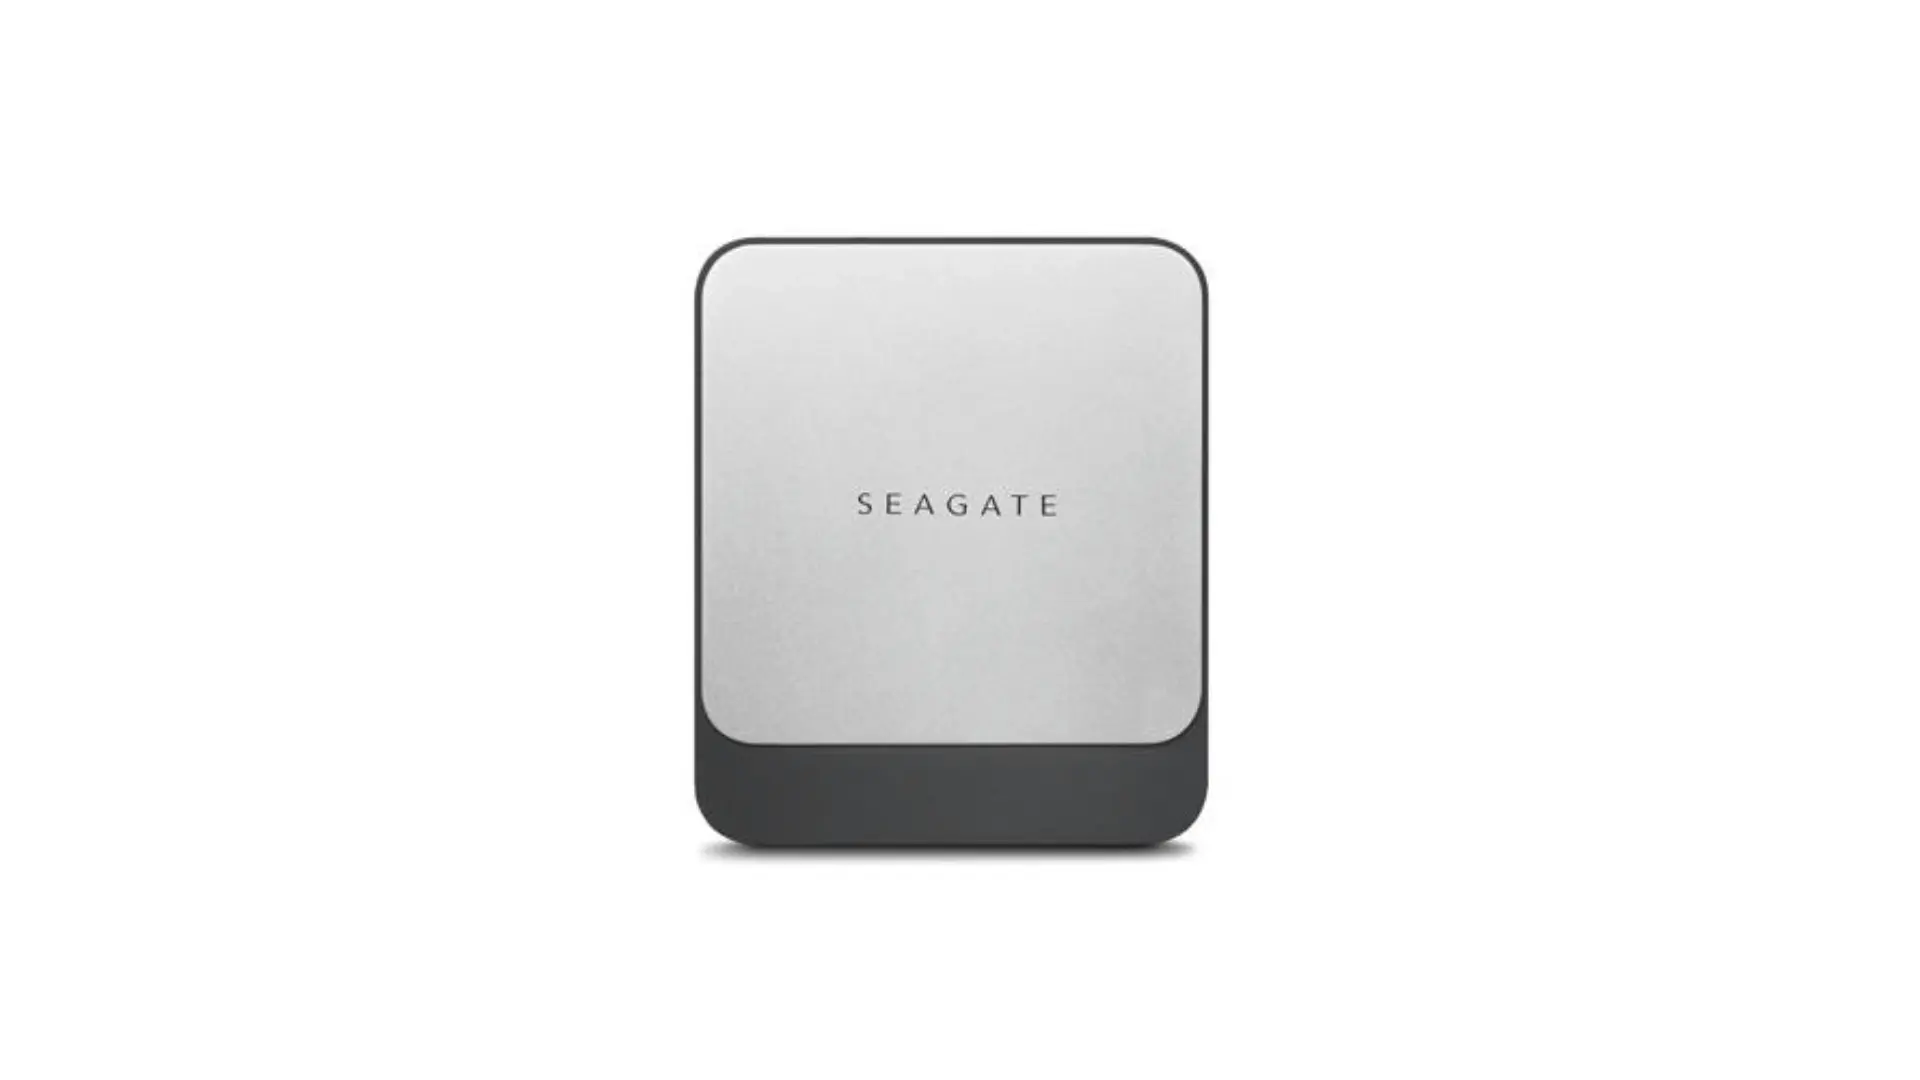
External SSDs are trickier to read. The problem is rarely the drive itself.
Many USB adapters, docks, and enclosures block SMART data from passing through. Windows then sees the storage but not its health details.
If your external drive shows no readings, the enclosure is the usual cause. Testing the same SSD in another enclosure, or connected directly, confirms it.
Check SSD Health on Mac
Macs handle storage health a little differently. There is no Settings panel, but the tools are just as reliable.
Disk Utility gives a fast SMART status through a clean interface. First Aid checks the file system. For real wear data, Terminal is your route.
Here is how each option works and where each one stops.
1. Disk Utility SMART Status
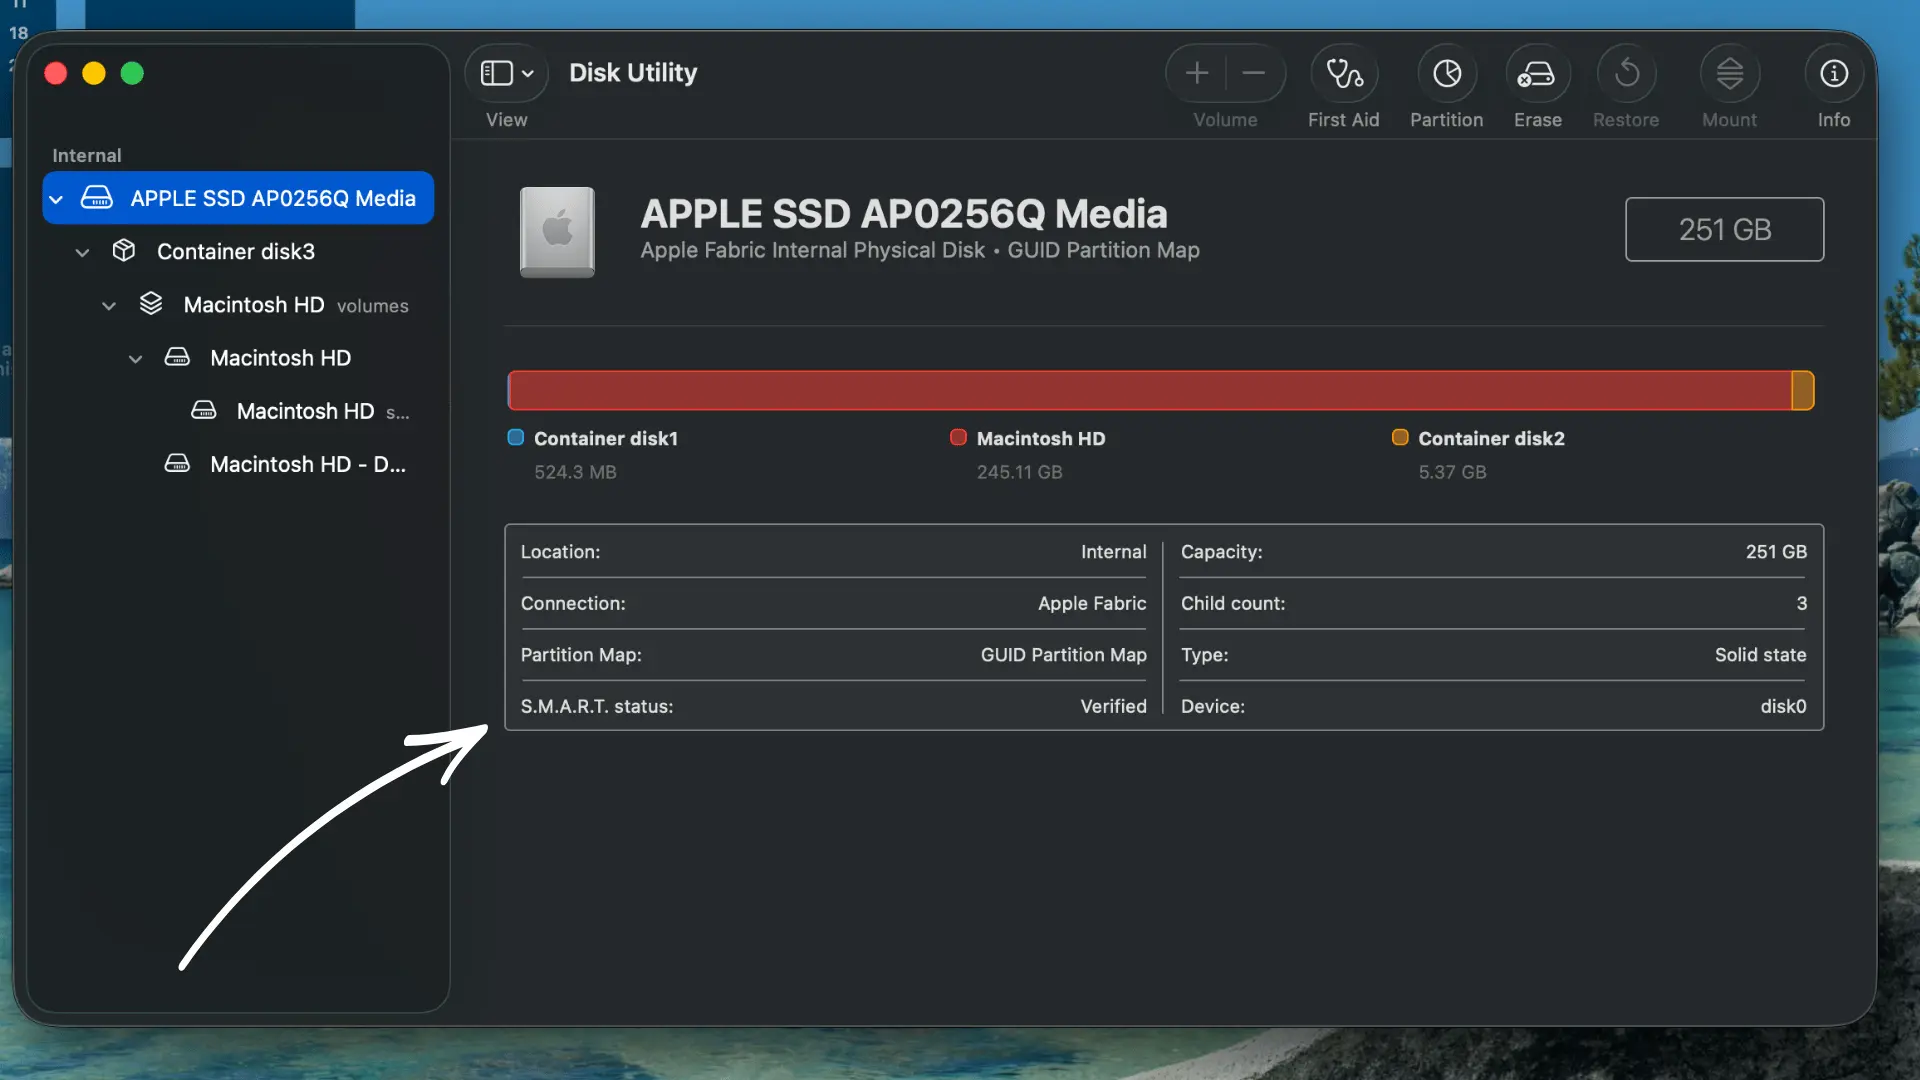
Open Disk Utility, then choose View > Show All Devices from the menu bar. This step matters more than it looks.
Select the physical device, not the APFS volume or container nested beneath it. The volume hides the S.M.A.R.T reading you actually want.
Once the drive is selected, its status shows near the bottom of the window. Common results include:
- Verified, meaning no problem has been triggered
- Failing is a clear sign to back up now
- Not supported when the connection blocks SMART
- No hardware error reported, a healthy pass
That single line tells you if the drive flags a fault today.
2. Disk Utility First Aid
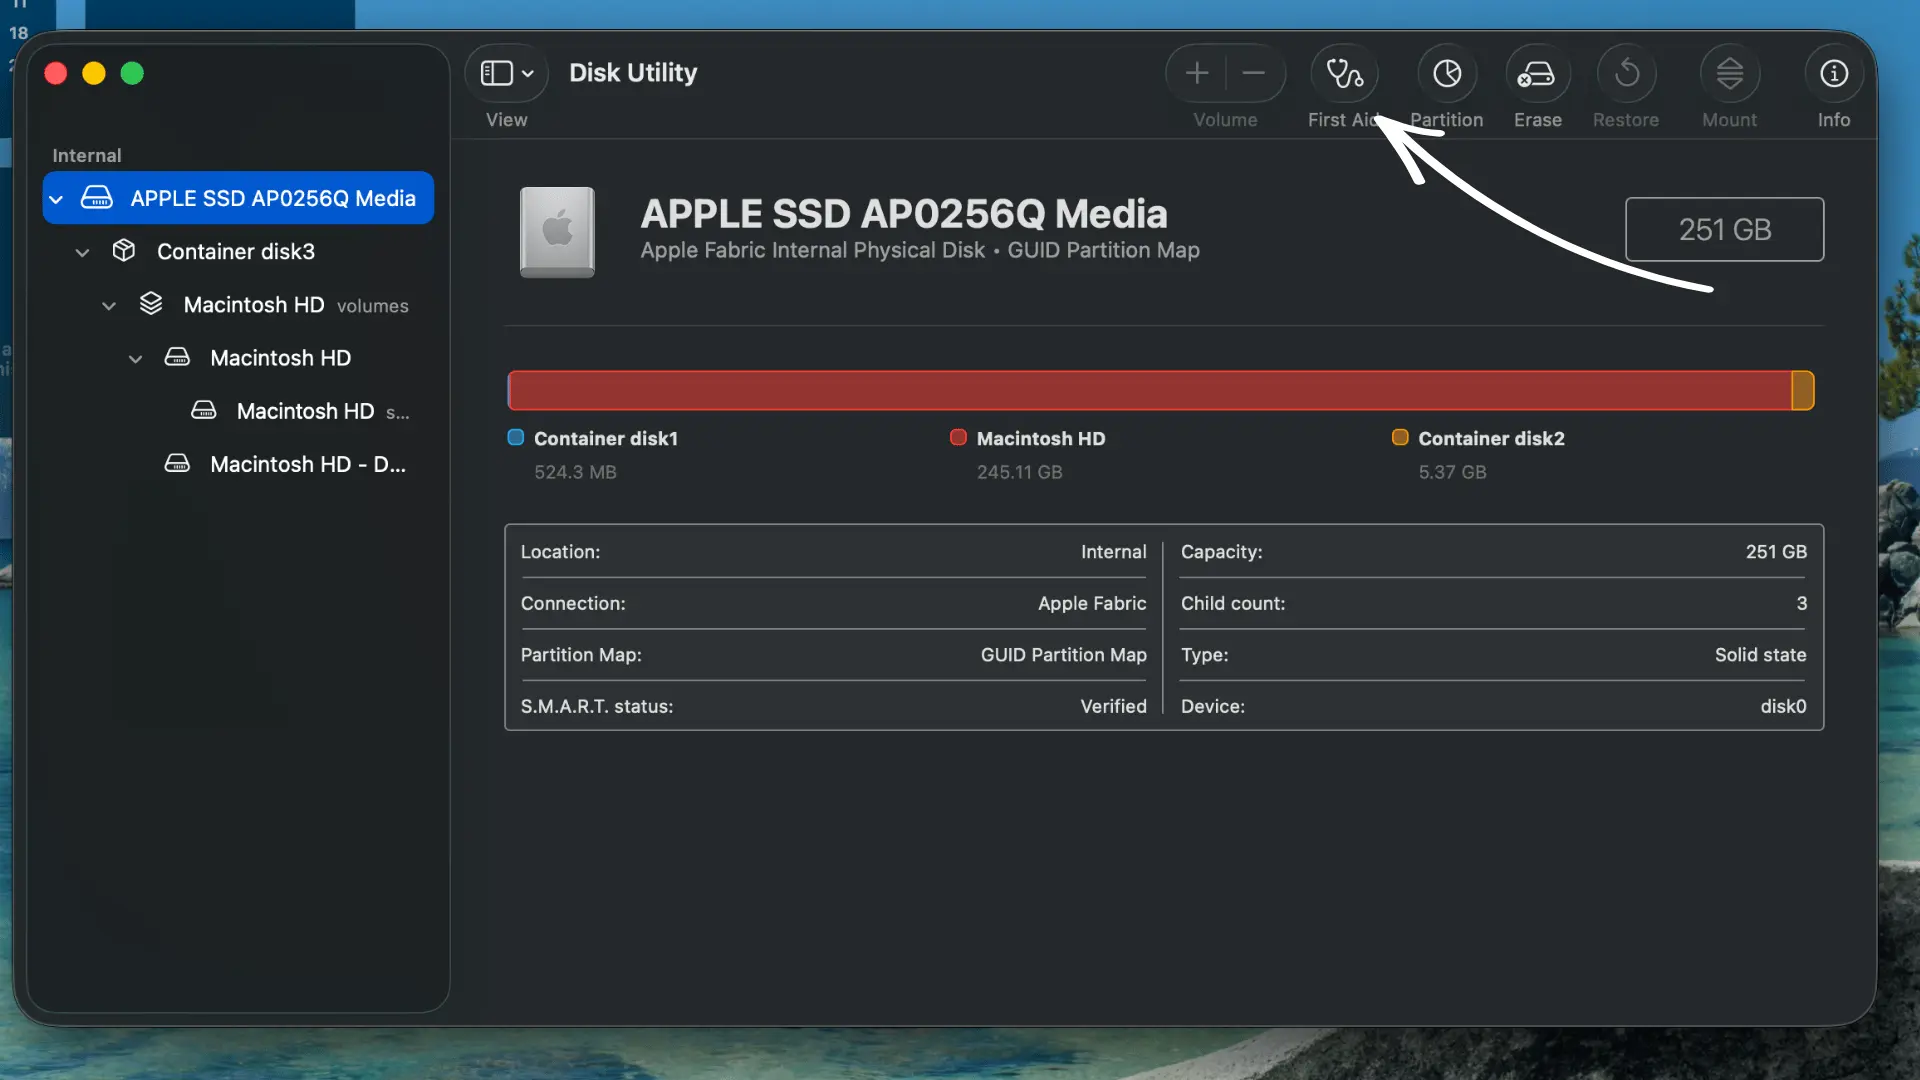
First Aid is easy to misread as a health test. It is not one.
It scans and repairs the file system and directory structure. Think of it as fixing how files are organized, not the flash they sit on.
So, First Aid can fix a drive that mounts oddly or throws errors. It cannot measure how worn the SSD is, and it will not repair failing memory cells.
Run it to clear file-system faults. Look elsewhere for wear and endurance numbers.
3. Terminal SMART Reports
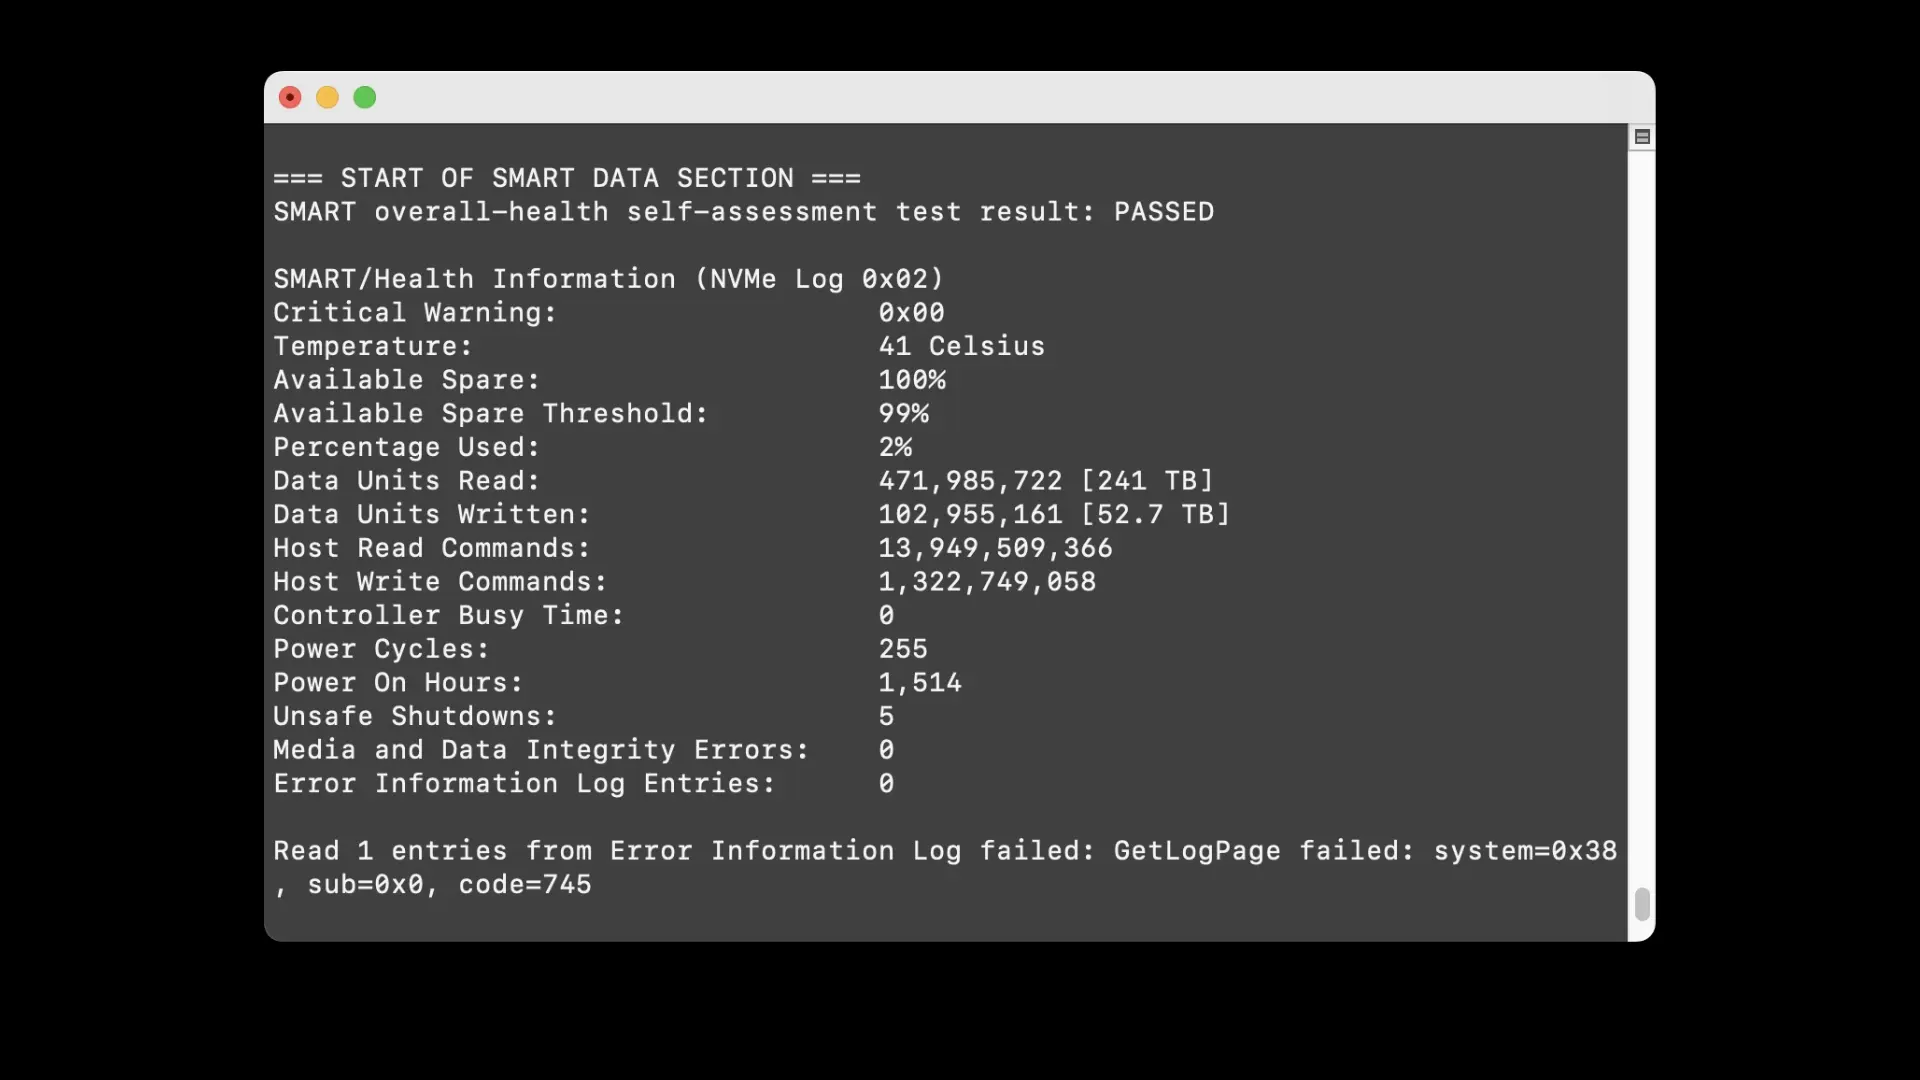
When you need the full view, smartctl delivers it. This command-line tool ships with smartmontools: 1. Install Homebrew (if you don’t have it)
Homebrew is the easiest way to install the smartctl utility on a Mac. Open Terminal and paste this command:/bin/bash -c "$(curl -fsSL https://githubusercontent.com)" 2. Install smartmontools
Once Homebrew is installed, run the following command to download and install the disk diagnostic tool:brew install smartmontools3. Identify your Disk’s Identifier
To check a specific drive, you need to find its identifier (e.g., disk0 or disk1). Run this command:diskutil list
Look for the internal drive (often called “Apple SSD” or “APPLE HDD”) and take note of its identifier, which usually starts with disk followed by a number.4. Generate the SMART Report
Run the smartctl Command targeting your specific drive identifier. Replace [identifier] with your actual disk number (e.g., /dev/disk0): smartctl -a /dev/disk[identifier]
4. Missing Health Details

Sometimes macOS shows only a general SMART result. No endurance figure, no lifetime writes.
This usually comes down to how the drive reports data. Some controllers expose only a basic pass, holding back the detailed attributes.
The connection method plays a part too. A drive that shares full data over one interface may share far less over another.
When details are missing, a dedicated SMART tool often pulls more than the built-in status can.
Read the Health Report

A health report only helps once you know what each line means. The same drive can read fine or alarming depending on which value you check.
Here is every reading you are likely to see, and what it tells you:
- Overall Health Status: Healthy or passed means no threshold tripped, but never guarantees the drive won’t fail.
- Percentage Used: NVMe drives show spent life as an estimate; watch the trend, not one number.
- Life Remaining: Some apps flip the value, so 8% used equals 92% health.
- Total Data Written: Compare lifetime writes against the drive’s rated endurance, not the raw figure.
- Available Spare: Reserve flash that replaces worn cells; a falling value signals real wear.
- Media and Integrity Errors: A few mean little, but counts rising between checks matter.
- Temperature: No universal safe limit; check against your drive’s operating specifications.
- Unsafe Shutdowns: Rise after power loss or unsafe unplugging, rarely a fault by itself.
- Power-On Hours and Cycles: Give usage context but cannot confirm failure alone.
Read these together, not one at a time. When you check SSD health, I find the changes between reports far more telling than any single score. Save your first report so you always have a baseline.
Choose the Right Health Tool

No single tool fits every drive. Match the tool to your SSD type and how it connects.
| Setup | Best Tool | What to Know |
| NVMe SSDs | Native tools (Settings, PowerShell, Disk Utility, smartctl) | Report rich data easily; add a SMART utility only for deep attributes. |
| SATA SSDs | Maker’s app or dedicated SMART reader | Windows built-in health skips SATA drives; Macs read them through Disk Utility. |
| Internal Drives | Any native or SMART tool | Direct motherboard link passes SMART data cleanly, so readings stay reliable. |
| External Drives | SMART tool plus a compatible enclosure | The enclosure’s bridge chip decides what passes; cheap adapters often block SMART. |
| Prebuilt Computers | Manufacturer diagnostic software | Makers may lock firmware; Dell, HP, and Lenovo often bundle a storage tool. |
Start with the row that matches your drive. When a reading looks blocked, the connection is usually the cause, not the SSD.
Community Discussion On Troubleshooting Your SSD
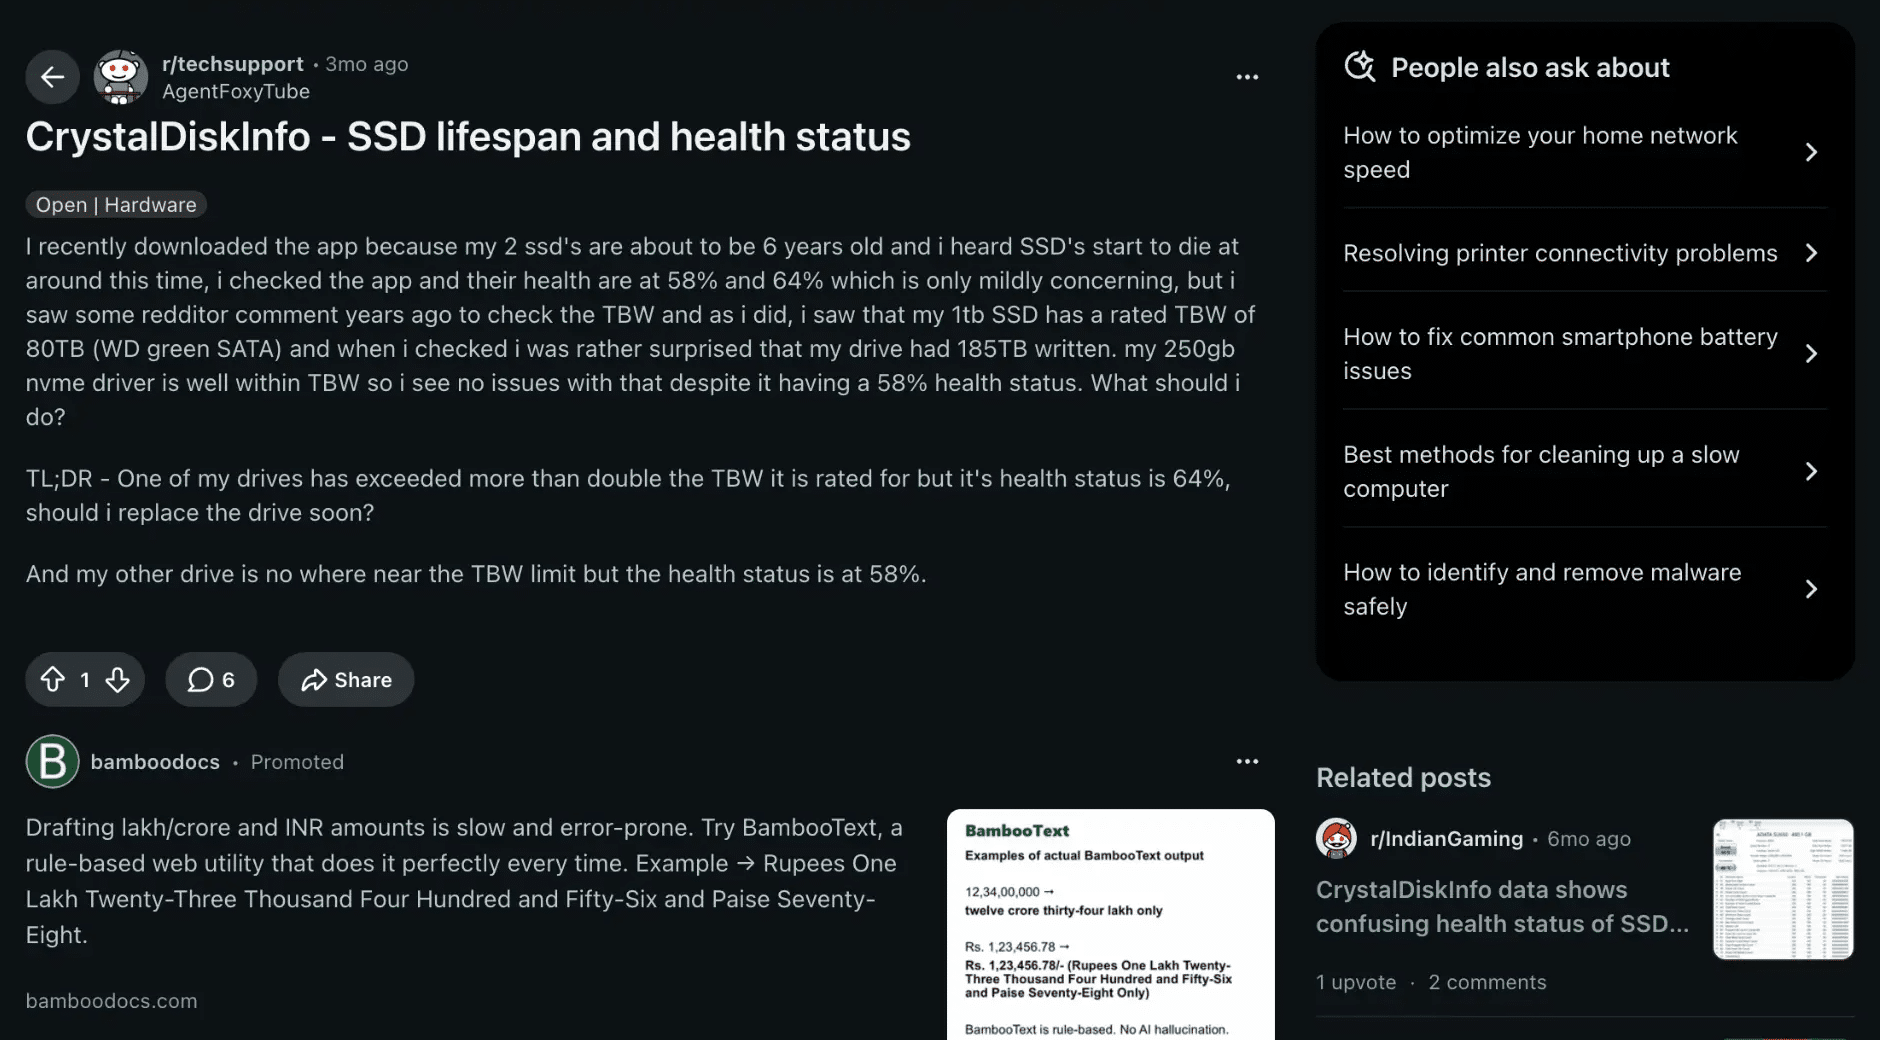
Spend an hour in PC forums, and one pattern stands out. People trust each other’s hard-won drive advice more than any spec sheet.
Here’s what keeps coming up when someone asks how to check SSD health.
1. The Tool Users Reach For First
Ask any forum how to check SSD health, and the answer arrives fast: CrystalDiskInfo. It’s free, reads your drive’s built-in SMART data, and shows a plain health status you can read at a glance.
One user on r/buildapc called it the first thing to install on any fresh PC. Others point to maker tools like Samsung Magician, Crucial Storage Executive, or WD Dashboard.
Those add firmware updates and temperature readings that the generic apps sometimes skip.
2. S.M.A.R.T Numbers Worth Watching
SMART is your drive quietly reporting on itself. A handful of values matter far more than the rest.
Communities tend to agree on which figures signal real wear. These are the ones that come up again and again:
- Percentage Used (or Media Wearout Indicator) shows how much of the drive’s rated write life has already been used.
- Wear Leveling Count – tracks how evenly writes get spread across the memory cells.
- Total Bytes Written – the lifetime data total, weighed against what the drive was rated to handle.
- Available Spare – the pool of backup blocks the controller swaps in once cells start failing.
A steady reading across several months means little to worry about. A number sliding fast is the real warning.
3. Why Backups Keep Coming Up
Here’s the advice no thread skips: back up before you trust any health reading.
Old hard drives often warn you first with clicks or slow spins. SSDs rarely give that courtesy.
One person on r/techsupport put it bluntly: a “Good” status today is no promise about tomorrow. The cells wear silently, and a controller fault can take the whole drive at once.
I treat SMART as an early flag, not a guarantee. It tells you plenty, but never everything.
4. What a Read-Only Drive Means
If your SSD suddenly stops accepting new files, forum regulars take it as a bad sign.
Once a drive has burned through its spare blocks, the firmware can lock it in read-only mode. You can still copy files off. You just can’t write anything new.
The community take is consistent: pull your data now, then plan a replacement. Some try clearing it with disk commands, but that only works when the cause is a setting, not worn-out flash.
Warning Signs to Take Seriously
Most odd readings are harmless. A few are not, and these deserve action rather than another scan.
The signs below point to a drive that may be failing or about to fail. When you see one, back up first and investigate second.
- Read-Only Mode: The SSD opens files but blocks new saves or transfers, so back up the data and replace the drive.
- Rising Error Counts: Errors that increase across repeated checks can signal growing wear and possible failure.
- File Corruption: Repeatedly damaged files, failed installs, or transfer errors call for an immediate backup and drive test.
- Freezes and Startup Problems: Slow boots, system stalls, or a disappearing drive may point to an SSD or connection problem.
- Frequent Disconnections: Test the cable, port, enclosure, and power source before deciding the SSD is faulty.
- Persistent High Temperatures: Ongoing heat may shorten drive life, so check airflow, thermal pads, and the maker’s limits.
- Critical Health Warnings: Low spare capacity, reduced reliability, or read-only status means back up files and prepare a replacement.
What to do When Health is Low

A low health reading is not a moment to panic, but it is a moment to act. Work through these steps in order, because the sequence matters as much as the actions.
Here is what to do, from the first move to the last:
- Back Up First: Copy important data before any benchmark, firmware change, or repeated scan. Apple advises backing up and replacing a drive that has been reported as failing.
- Confirm With Another Tool: Check the result against the maker’s utility or a trusted SMART reader before making any decisions.
- Save the Health Report: Keep screenshots or exported logs to track changes and support a future warranty claim.
- Check Firmware: Update it only with a current backup and stable power, since interruptions can brick the drive.
- Review the Warranty: Gather the model number, serial number, purchase record, health report, and error details together.
- Replace the SSD: Stop monitoring and swap the drive once the signs turn serious.
When I check SSD health and see a critical warning, I treat it as a backup-first event. Further testing only matters once the files are safe.
Finishing Touches
Checking your drive does not need to be a guessing game. Start with the built-in tools on Windows or Mac for a quick read.
When you need more, a maker’s app or SMART reader fills in the wear numbers. Read those values together, since one figure rarely tells the full story.
The habit that matters most is simple. Save your first health report, then compare future ones against it. Changes over time reveal far more than any single score.
Watch for the serious signs too. Read-only mode, rising errors, or a critical warning all mean back up now, then replace.
Do not wait for a failure to start paying attention. Check SSD health today, keep a separate backup, and your files stay safe whatever your drive decides to do next.
Frequently Asked Questions
Is 98% SSD Health Good?
Yes, 98% is excellent. It means only 2% of the drive’s estimated lifetime has been used, so your SSD is close to brand new.
Is a 10-Year-Old SSD Still Good?
It can be. Age alone does not decide it. Check the wear percentage and total data written, since real usage matters far more than years.
Can BIOS or UEFI Show SSD Health?
Some can. Many modern boards display a basic SMART status or drive model details, but they rarely show the full wear and error data.
Does Encryption Affect Health Readings?
No. Encryption changes how your data is stored, not the drive’s SMART counters. Wear, spare capacity, and temperature readings all stay accurate either way.