





Obsidian is easiest to learn when you start with one vault, one useful note, and one link to a second note.
Download the app, create a vault, write in Markdown or Live Preview, and connect related notes with double brackets.
Use search and broad folders before adding templates or community plugins. Keep a separate backup because sync is not a backup.
When I first opened Obsidian, I began with one vault, a few folders, and simple daily notes. That small setup helped me understand links, tags, search, and templates without changing settings I did not need.
This Obsidian tutorial shows how to use Obsidian from installation through basic workflows, device sync, and backups.
What is Obsidian and How does it Work?
Obsidian is a note-taking app that saves your notes as simple Markdown files on your device. This local-first setup means your files stay under your control and can remain available without an internet connection.
Your notes are stored in a vault, the main folder for notes, images, and other related files. Most beginners only need one vault, since creating several too early can make information harder to manage.
Obsidian works for personal notes, study material, work records, journals, research, and project planning.
It is free for personal, commercial, nonprofit, educational, and government use. Sync and Publish remain optional paid services.
Notion vs Obsidian: What is the Difference?
Notion and Obsidian both organize notes, but they suit different working styles and storage preferences.
| Feature | Notion | Obsidian |
|---|---|---|
| Storage | Cloud-based workspace | Local Markdown files |
| Best for | Teams and project planning | Personal knowledge management |
| Setup | Easy for beginners | Requires more initial setup |
| Collaboration | Strong real-time sharing | Limited without extra tools |
| Customization | Templates and databases | Themes and community plugins |
| Offline use | Available with some limits | Strong local offline access |
| Linking | Page links and databases | Backlinks and visual graphs |
- Choose Notion for collaboration and structured projects
- Choose Obsidian for private notes, offline access, and flexible linking.
How to Download and Install Obsidian?
Start by downloading the Obsidian version that matches your device. The app works on Windows, macOS, Linux, Android, iPhone, and iPad.
- On Windows, download the installer from the official website, open the file, follow the prompts, and launch the app.
- On macOS, download the correct version, open it, move Obsidian into the Applications folder, and start the program.
- For mobile devices, install it from the Apple App Store or Google Play Store. I recommend opening the app right away and creating one simple vault.
You can continue without an account unless you plan to use paid services.
How to Create Your ‘First’ Obsidian Vault
Your first vault gives you one clear place to store and manage all your notes.
1. Install Obsidian & Create a Vault
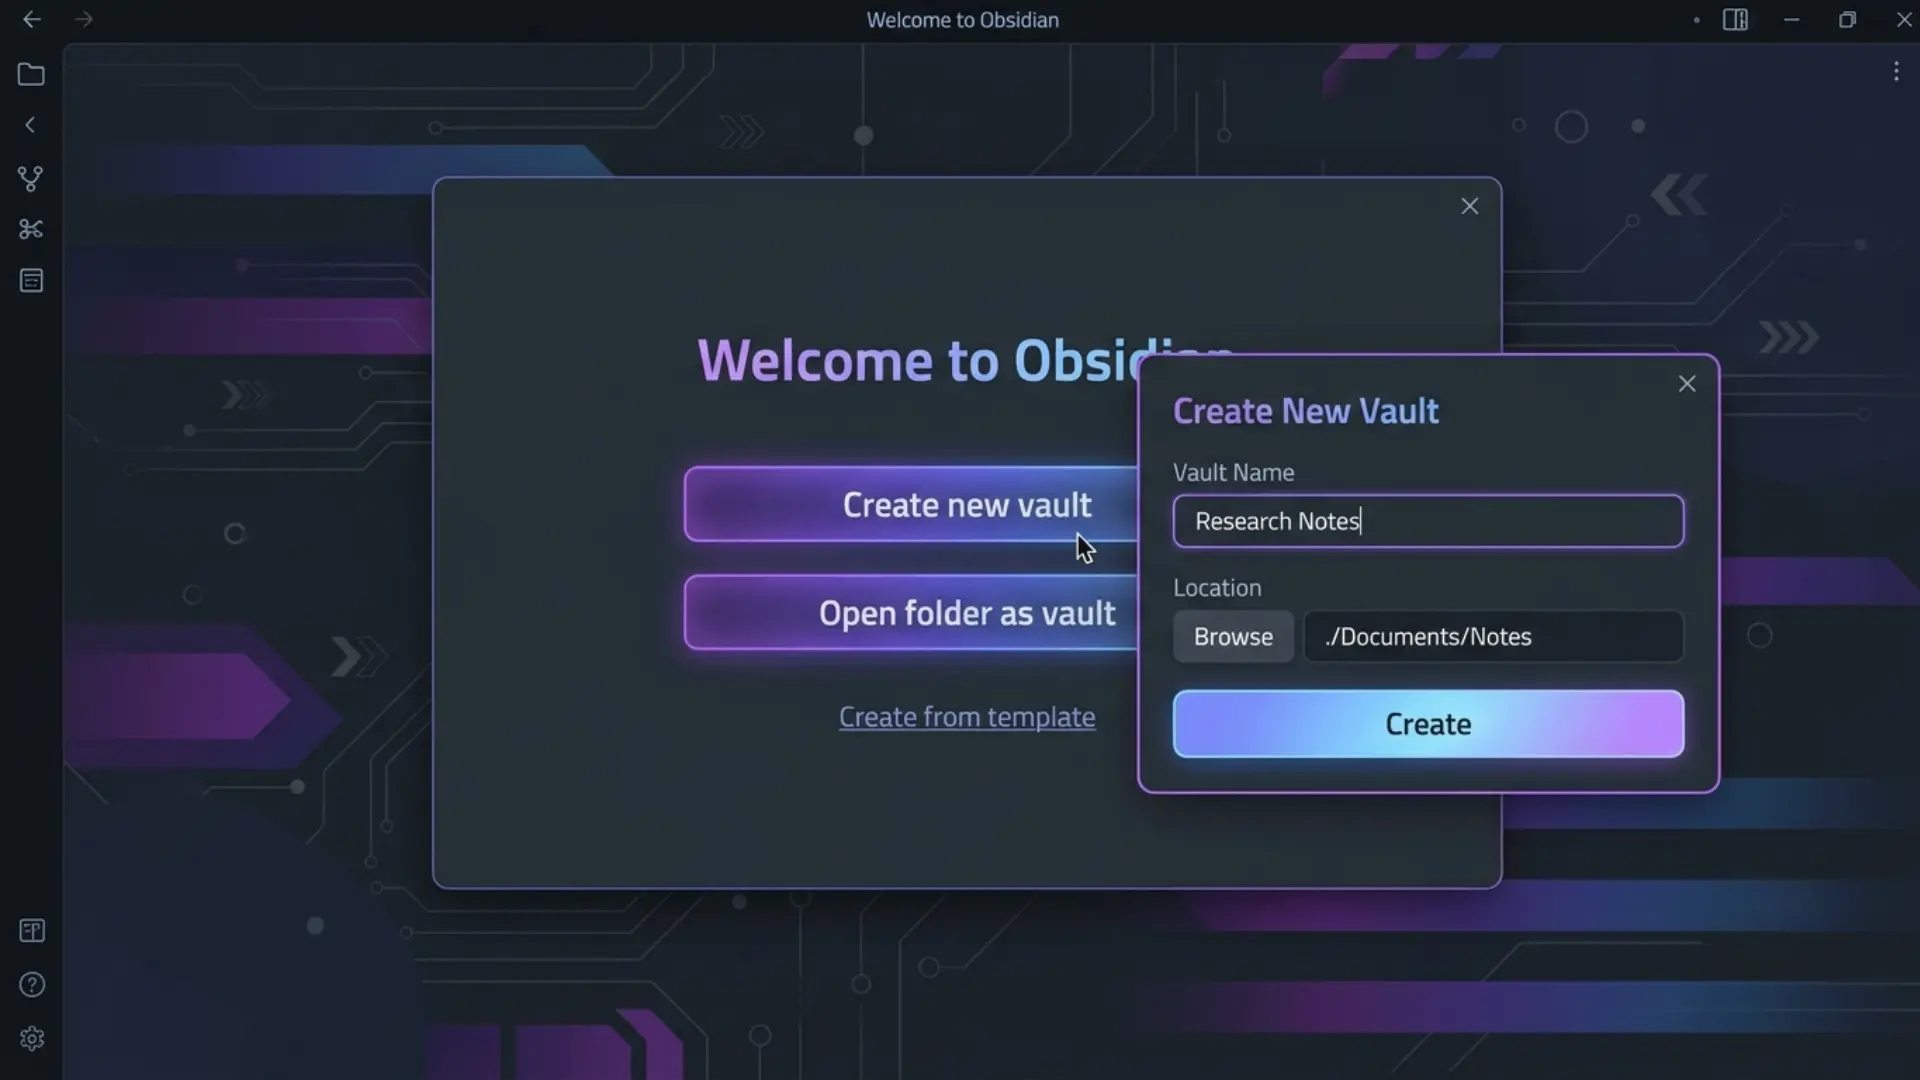
Download Obsidian from the official website and install it on your computer. Open the app and select Create New Vault.
Give the vault a clear name, such as Research Notes or Weekly Work Tasks. Choose a folder where the vault will be stored, then click Create.
Obsidian will open the new vault and show its main workspace.
2. Create a Folder for Sources & One for Notes
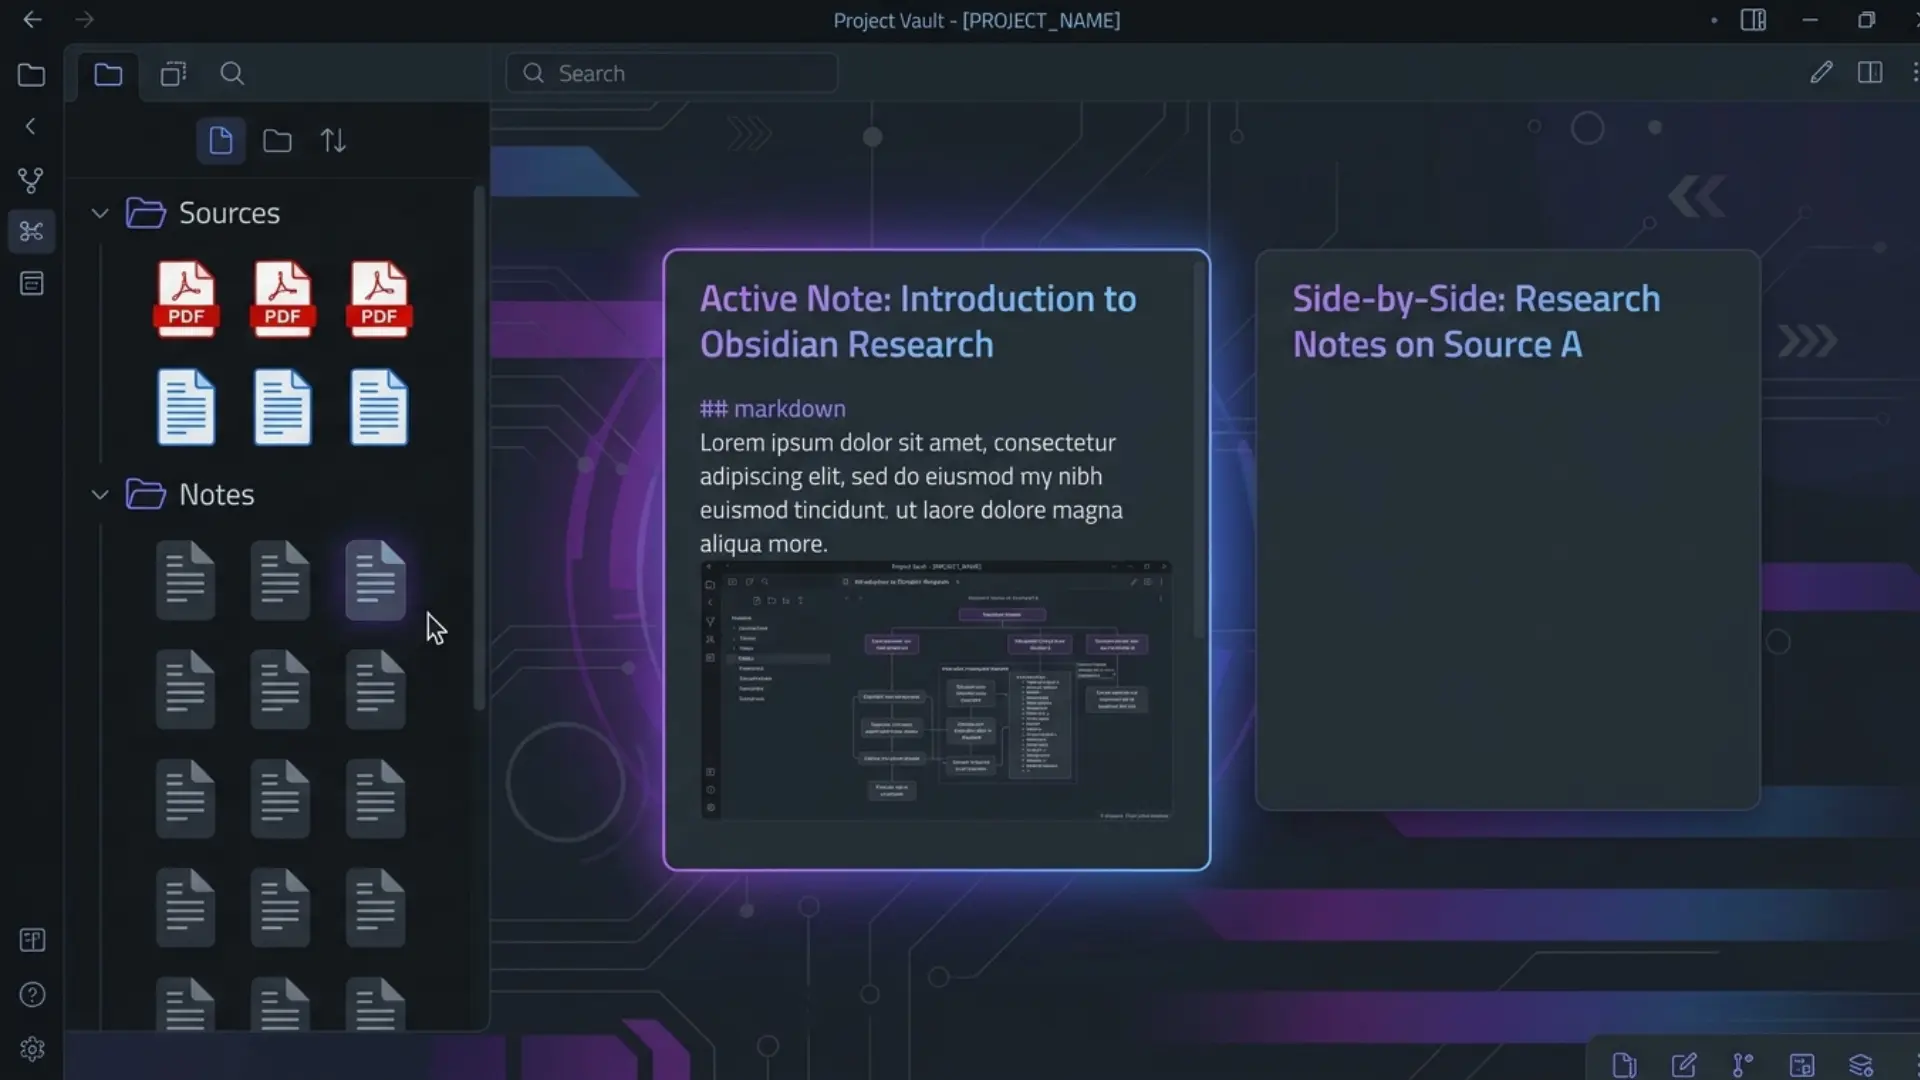
Create two main folders in the File Explorer. Name one Sources and use it for PDFs, websites, papers, lecture files, and reference material.
Name the second Notes and use it for your own summaries, ideas, and topic pages.
Keeping source material separate from your writing makes files easier to find, review, link, and organize as the vault grows.
3: Install the Editing Toolbar Plugin
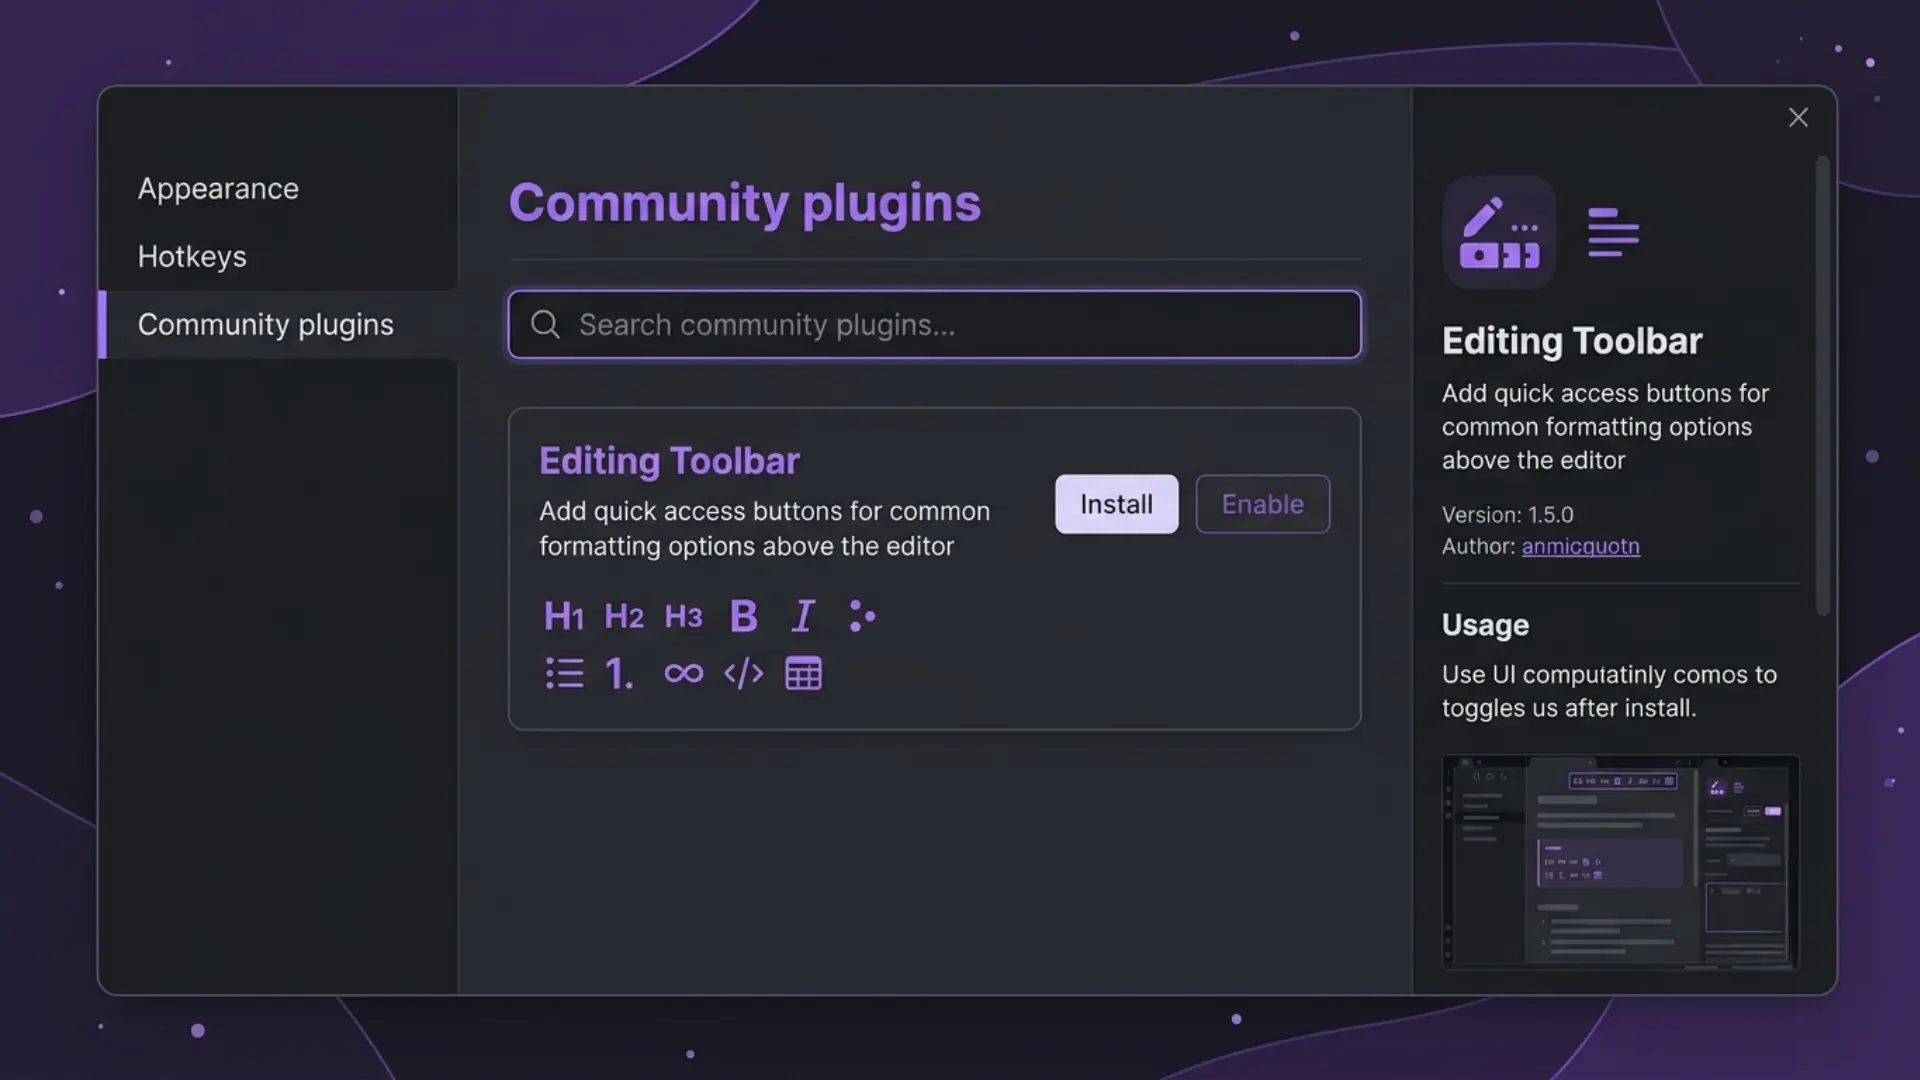
Open Settings, select Community Plugins, and turn off Restricted Mode when prompted. Choose Browse, search for Editing Toolbar, and install the plugin.
Enable it after installation. The toolbar adds familiar buttons for headings, bold text, lists, links, and other formatting.
It will help you write clearly without having to remember every Markdown symbol or formatting command.
4. Import a Paper, Lecture, or Any Other Source
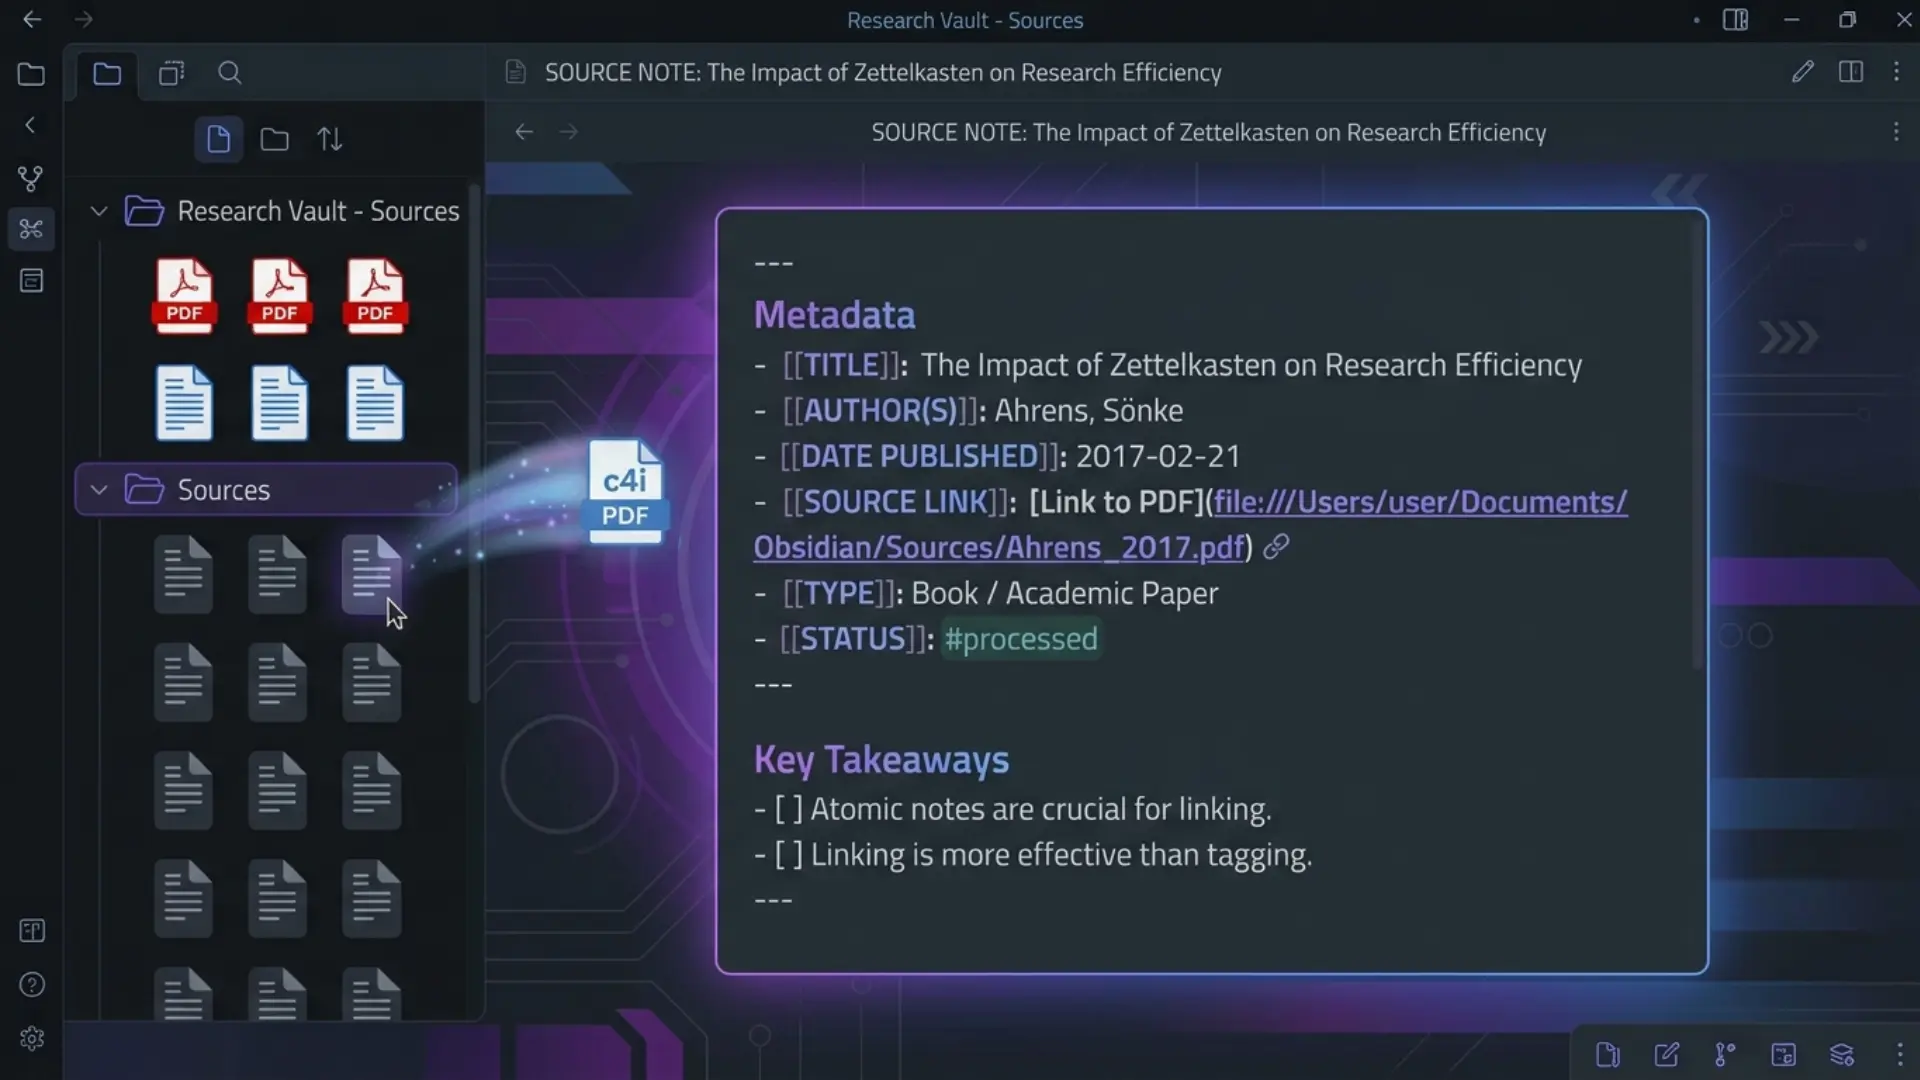
Create a new note inside the Sources folder and name it after the paper, lecture, website, or book you are using. Drag a PDF or other file into the open note. Add the source title, author, date, and link when available.
This source note becomes one place where you can review the material and record useful reference details.
5. Add Topic Notes to Store Your Ideas
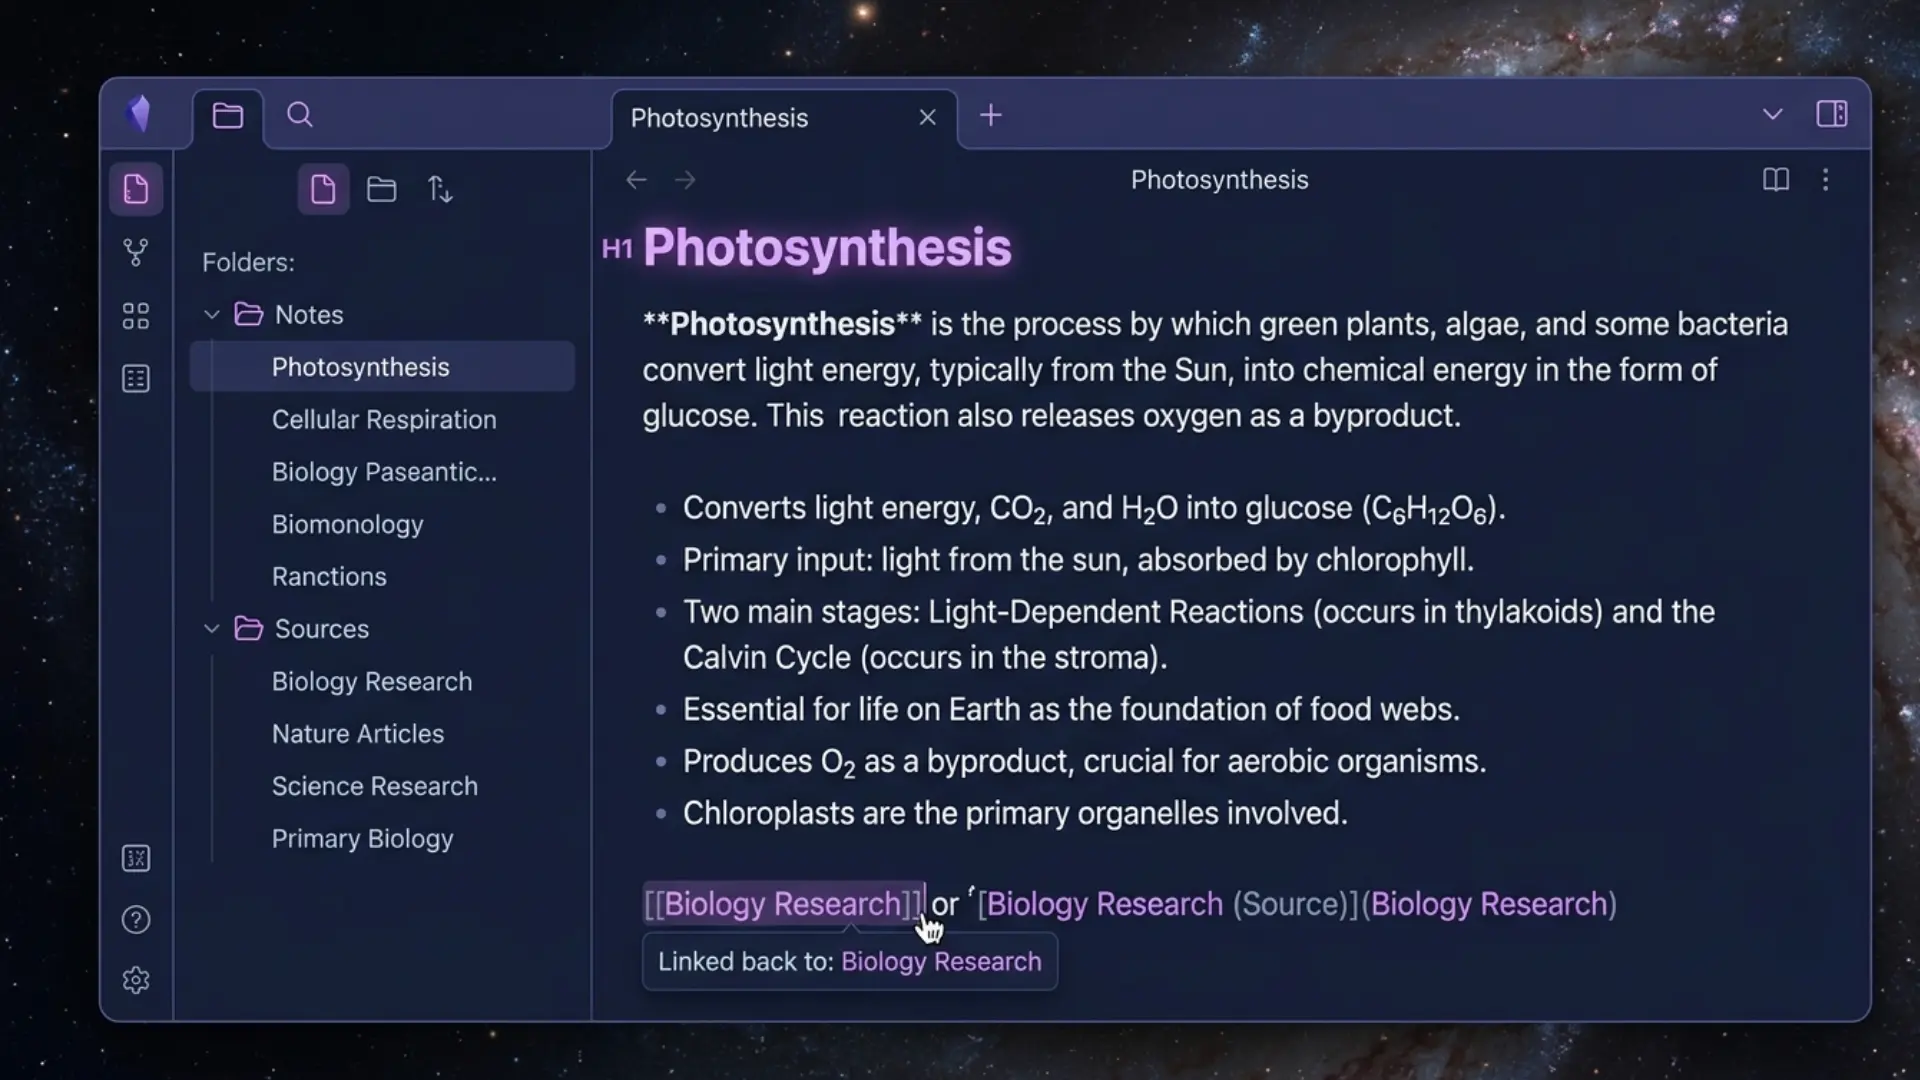
Create topic notes inside the Notes folder for ideas you want to remember. Use one clear subject per note, such as Photosynthesis, Project Planning, or Customer Research.
Write a short explanation in your own words and add useful points from the source. Include a link back to the related source note so you can check the original information later.
6. Create New Notes for Each Concept You Encounter
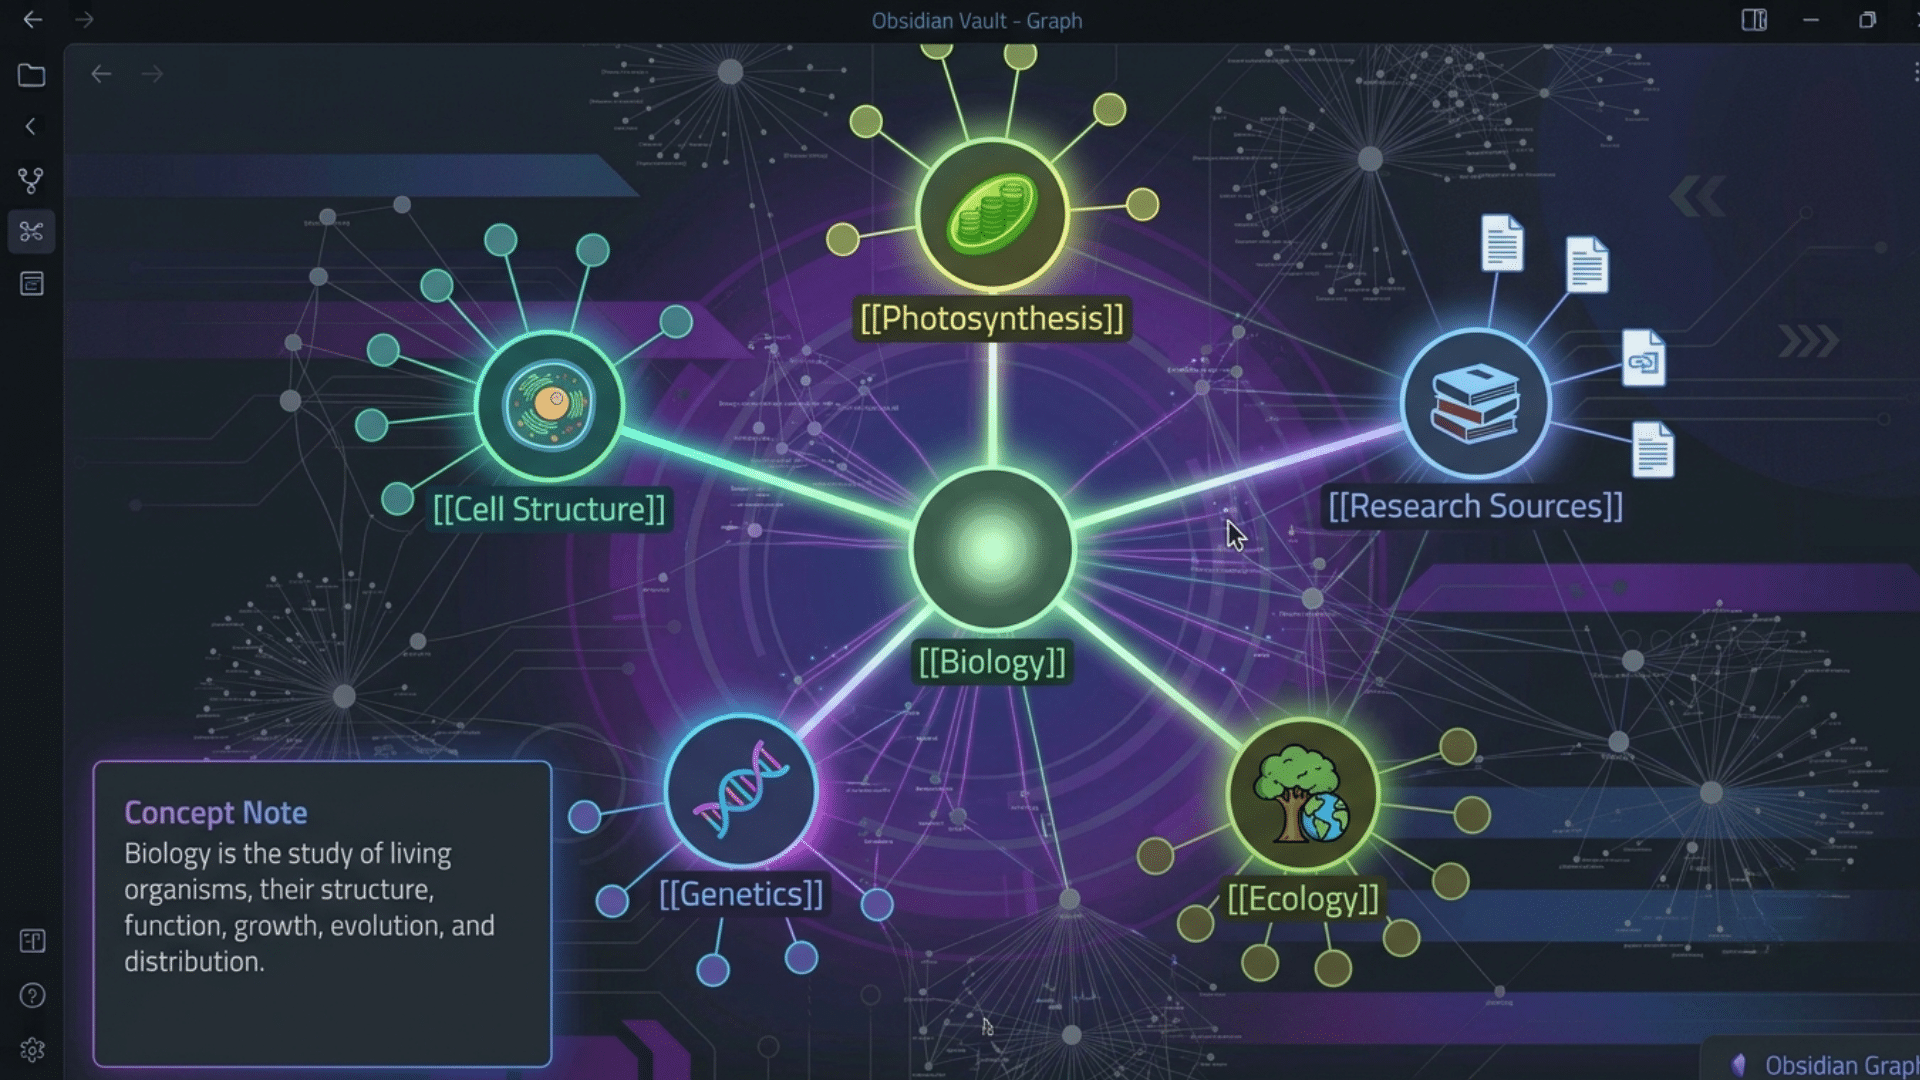
Whenever a source introduces an important concept, create a separate note for that concept. Give it a specific title and explain the idea in simple words.
Link it to the source note and other related topic notes using double brackets.
Over time, these links form a connected network that helps you compare ideas and understand how different subjects relate.
Create and Format Your First Note
A well-formatted first note helps you understand Obsidian’s editor and keeps information easy to read.
- Create a New Note: Click the new note icon in the File Explorer and give the note a clear, specific title.
- Add Headings: Type
#before a main heading and##before a smaller section heading. - Format Important Text: Use
**text**for bold words and*text*for italic text. - Create Lists: Type
-for bullet points or1.for numbered instructions. - Add Checkboxes: Type
- [ ]to create tasks that you can mark as completed. - Insert Links: Highlight descriptive text and add a relevant website or internal note link.
- Review the Note: Check the title, headings, spacing, and formatting before moving to another file.
Practicing these basic tools will help you create clear notes without learning every Markdown command at once.
How to Import Existing Notes and Save Web Pages to Obsidian?
Obsidian can open a folder of existing Markdown files as a vault. For notes from Notion, OneNote, Evernote, Apple Notes, or other apps, install the official Importer plugin and follow the matching migration guide.
Import a small sample first. Check headings, internal links, attachments, and dates before moving the full collection.
For articles and research pages, the official Web Clipper can save highlights and page content directly to a vault.
Choose a dedicated folder so clipped material does not crowd your own notes. Keep the source URL and author in properties.
Importing is a transfer step, not an organization plan. Review the new files and link only the ones you expect to use.
Internal Linking Notes With Obsidian
Internal links connect related notes and let you move between them without searching through folders.
- Type
[[Note Title]]to link the current note to another note in the vault. - Select an unresolved link to create a new note with the same title.
- Type
[[Note Title#Heading]]to open a specific heading in another note. - Type
[[Note Title|custom text]]when the full note title does not fit the sentence. - Add a link when the connection helps you find context or avoid repeating the same explanation.
Understand Backlinks and the Graph View
Backlinks show which notes mention the note you are currently viewing. They differ from regular links because regular links point outward, while backlinks reveal references coming in from other notes.
Open the Backlinks panel to review linked mentions, possible unlinked mentions, and the surrounding text for each connection. Graph View shows how linked notes relate visually.
The local graph focuses on connections around a single note, while the global graph displays links across the entire vault.
Graph View can help during reviews and reveal patterns, but clear note titles, useful links, and search should remain the main tools for finding information.
How to Organize Notes in Obsidian
Follow these steps to build a simple folder system that stays easy to manage.
- Create four main folders named Inbox, Notes, Projects, and Attachments.
- Set Inbox as the default location for new notes so unsorted files collect in one place.
- Move completed notes into Notes and place active work inside the relevant Projects folder.
- Open Settings, select Files and Links, and choose Attachments as the default folder for images and uploaded files.
- Use tags only for details that folders cannot show, such as status, priority, or note type.
- Add properties such as date, source, or due date only when you plan to filter or sort notes by them.
- Review the Inbox once a week and rename, move, or delete each file.’
Use Search, Daily Notes, and Templates in Obsidian
Once your vault contains more than a few notes, folders alone become slow. Use Search to locate content, Daily Notes for dated entries, and Templates for note types you create often.
1. Search (Find Any Note Faster)
Select the magnifying-glass icon to search every note in the vault. Enter a word, note title, or phrase. Add quotation marks around an exact phrase, such as "project deadline" .
Use Quick Switcher when you know part of the note title. Open it, type a few letters, and select the matching note.
Search finds text inside notes. Quick Switcher finds files by name. Use both before creating a new note to avoid duplicates.
2. Daily Notes (Record Each Day in One Place)
Open Settings > Core Plugins and enable Daily Notes. In the Daily Notes settings, choose a folder such as Daily Notes and use a clear date format such as YYYY-MM-DD .
Create today’s note from the left ribbon or Command Palette. Keep the layout limited to sections you will use, such as:
- tasks
- meetings
- notes
- follow up
Link project names or meeting topics to their main notes instead of repeating the full details.
3. Templates (Reuse the Same Note Format)
Create a folder named Templates , then add one note for each format you use repeatedly. A meeting template could contain:
- date
- attendees
- discussion notes
- decisions
- next actions
Open Settings > Core Plugins, enable Templates, and select the Templates folder.
When creating a new meeting or project note, run Insert template from the Command Palette and choose the correct file. Use placeholders such as {{date}} when the date should be added automatically.
Which Obsidian Core Plugins Enable What?
Core plugins are built into Obsidian and can be enabled under Settings.
| Plugin | Use It For |
|---|---|
| Daily Notes | Create dated pages for short records. |
| Templates | Insert a repeated note structure. |
| Backlinks | See which notes mention the open note. |
| Bookmarks | Save notes, headings, and searches you open often. |
| Outline | Move through headings in a long note. |
| File Recovery | Restore recent snapshots when available. |
| Bases | Create filtered table or card views from properties. |
Canvas is optional for visual planning. Enable one plugin, use it for a week, then decide if it supports your routine.
Adding Community Plugins on Obsidian (Exercise Caution)
Community plugins add extra features created by outside developers.
To install one, open Settings, select Community Plugins, turn off Restricted Mode when you feel comfortable, browse the available options, then install and enable the plugin you need.
Before installing anything, check the update date, documentation, reported issues, and the safety scorecard.
Community plugins can access local files and the internet, so install only code you trust. Read Obsidian’s plugin security guidance before turning off Restricted Mode.
Add plugins slowly because too many can create clutter, cause conflicts, and make problems harder to fix. A small setup is usually easier to manage.
How to Adjust Themes, Text Size, and Hotkeys in Obsidian
Open Settings using the cog icon, then change each option from its correct menu.
- Change the theme: Select Appearance, then choose Light, Dark, or Adapt to System under Base Color Scheme. To install another theme, select Manage beside Themes, choose a theme, and install it.
- Adjust the text size: Go to Settings > Appearance > Font Size and move the slider. Enable Quick Font Size Adjustment to resize text with Ctrl + Scroll on Windows or Cmd + Scroll on macOS. For shorter text lines, open Settings > Editor and enable Readable Line Length.
- Set a hotkey: Open Settings > Hotkeys, search for a command, select the plus icon, press your preferred key combination, and select Save. Start with commands you use often, such as Search, Quick Switcher, or Create New Note.
Sync Obsidian Across Devices
Syncing Obsidian lets you access updated notes on your computer, phone, and tablet. With Obsidian Sync, sign in to your account, choose a plan, create a remote vault, connect your local vault, and select the files and settings you want to sync.
Other compatible cloud or file-sync services may also work, but check device support before using them. Avoid running multiple sync services on the same vault, as this can cause conflicts.
Let syncing finish before closing the app, avoid editing the same offline note on multiple devices, and review storage limits. Keep a separate backup for added protection.
For my new Obsidian users: Sync keeps files current across devices, but a backup gives you a separate copy to restore. Save the full vault on another drive, date the folder, and test the copy by opening a few files.
Common Obsidian Mistakes Beginners Should Avoid
Most beginner problems start when the vault gains more structure than real notes.
| Mistake | Solution |
|---|---|
| Creating too many folders | Start with a few broad folders and add new ones only when a clear need appears. |
| Adding every popular plugin | Use the built-in features first, then install one plugin at a time when it solves a real problem. |
| Linking every repeated word | Add links only when two notes share a meaningful connection or useful context. |
| Ignoring file backups | Save regular copies of the vault in another secure location or backup service. |
Avoiding these mistakes keeps the vault easier to use and gives your note system room to grow naturally.
Final Thoughts
The best way to learn how to use Obsidian is to treat it as a writing tool first and an organizing system second.
I found that creating useful notes each day taught me more than changing themes, installing plugins, or copying someone else’s setup.
Begin with one vault, clear titles, broad folders, and links between related ideas. Add templates, tags, properties, and syncing only when they solve a real need.
Review your notes after a week, remove anything you do not use, and keep a separate backup of the full vault.
A simple system is easier to maintain and can change as your work grows. Return to this Obsidian tutorial after a week and keep only the features that support your work.
Which Obsidian feature will you try first? Share your experience, questions, or setup ideas in the comments below.
Frequently Asked Questions
Can You Import Notes from Another App into Obsidian?
Yes. You can import Markdown files directly, whereas notes from other apps may need to be converted first. Always review headings, links, images, and folder locations after moving your files.
Can Two People Work in the Same Obsidian Vault?
Yes. Obsidian Sync supports shared vaults. Simultaneous edits can still create conflicts, so agree on file ownership and review conflicts before replacing either version.
Can I use Obsidian as a planner?
With a few plugins, you can turn your Obsidian into a powerful helper for planning and tracking content, new ideas, and projects. Does Obsidian Work Well With Large Numbers of Notes?
Can You Print or Export Notes from Obsidian?
Yes. Notes can be printed or exported as PDF files from the app. Markdown files can also be opened in compatible editors, making long-term access and sharing easier.