


Resetting a Chromebook can help resolve performance issues, software glitches, login problems, and other system-related errors.
Depending on the situation, ChromeOS offers several reset options, including a simple restart, a Powerwash (factory reset), and Recovery Mode for more serious issues.
Each method serves a different purpose and affects your data differently, making it important to understand when and how to use them.
In this guide, I’ll explain the differences between restarting, Powerwashing, and using Recovery Mode, along with the situations where each option is most appropriate.
You’ll also learn how to reset a Chromebook without logging in, how managed Chromebooks work, and the precautions to take before beginning the reset process.
Things to Know Before Resetting Your Chromebook
Before resetting a Chromebook, it’s important to take a few precautions.
While the process is generally straightforward, failing to prepare properly can result in lost files, account access issues, or interruptions during the reset.
1. Back Up Important Files
A Chromebook reset, especially a Powerwash or factory reset, removes locally stored data. Before proceeding, back up any important files to avoid losing them permanently.
- Google Drive: Files synced to Google Drive are generally safe and can be accessed after signing back in.
- Downloads Folder: Items stored in the Downloads folder are saved locally and may be deleted during a reset. Move important files to cloud storage or an external device beforehand.
- External Storage Devices: Photos, documents, and other files can also be backed up to a USB flash drive, external hard drive, or SD card.
2. Ensure You Know Your Google Account Credentials
After resetting a Chromebook, you’ll need to sign back in with your Google account to restore settings, apps, and synced data.
Before starting the reset, verify that you know your account email address and password. If necessary, recover your credentials in advance to avoid setup issues later.
3. Understand What a Reset Removes
Not all reset methods affect a Chromebook in the same way.
A Powerwash removes local user accounts, downloaded files, and device settings, while Recovery Mode reinstalls ChromeOS and may erase additional system data.
Understanding what each method removes can help you choose the appropriate reset option and prepare accordingly.
4. Charge Your Chromebook Before Starting
Make sure the Chromebook has sufficient battery power before beginning the reset process.
Ideally, the device should be charged to at least 50% or connected to a power source. This helps prevent unexpected shutdowns that could interrupt the reset and potentially cause system issues.
What Happens When You Reset a Chromebook?
Resetting a Chromebook can help resolve software issues, improve performance, and prepare the device for a new user.
However, different reset methods affect your data and operating system in different ways.
Restart vs. Reset vs. Powerwash
Although these terms are often used interchangeably, they serve different purposes.
A restart simply reboots the Chromebook, while a Powerwash removes local data and restores factory settings. Recovery Mode goes a step further by reinstalling ChromeOS.
The table below highlights the key differences between a standard restart, a reset (Powerwash), and ChromeOS Recovery Mode.
| Action | Removes Data | Reinstalls ChromeOS | Recommended For |
|---|---|---|---|
| Restart | No | No | Temporary glitches, frozen apps, or minor performance issues |
| Powerwash (Factory Reset) | Yes, local data only | No | Selling the device, fixing persistent software problems, or starting fresh |
| Recovery Mode | Yes | Yes | Severe system errors, corrupted ChromeOS installations, or boot failures |
What Data is Deleted?
A Powerwash or factory reset removes data stored locally on the Chromebook, including:
- User accounts added to the device
- Files stored in the Downloads folder
- Saved settings and preferences
- Installed Android apps and app data
- Offline files and documents
- Locally cached browser data
If Recovery Mode is used, ChromeOS is reinstalled, which can remove additional system data and settings.
What Data Is Preserved?
Some information remains available after a reset, provided it has been synced to your Google account or stored externally.
| Data Type | Preserved After Reset? |
| Google Drive files | Yes |
| Gmail messages | Yes |
| Google Photos content | Yes |
| Chrome bookmarks (if synced) | Yes |
| Chrome extensions (if synced) | Usually restored after sign-in |
| Files on USB drives or SD cards | Yes |
| Downloads folder contents | No |
| Local app data | No |
After signing back into the Chromebook with the same Google account, most synced settings, bookmarks, and cloud data can be restored automatically.
Method 1: Factory Reset a Chromebook Using Powerwash
A Powerwash is the easiest way to factory reset a Chromebook. This process removes local accounts, settings, and files stored on the device, returning it to its default state.
Step 1: Open Chromebook Settings
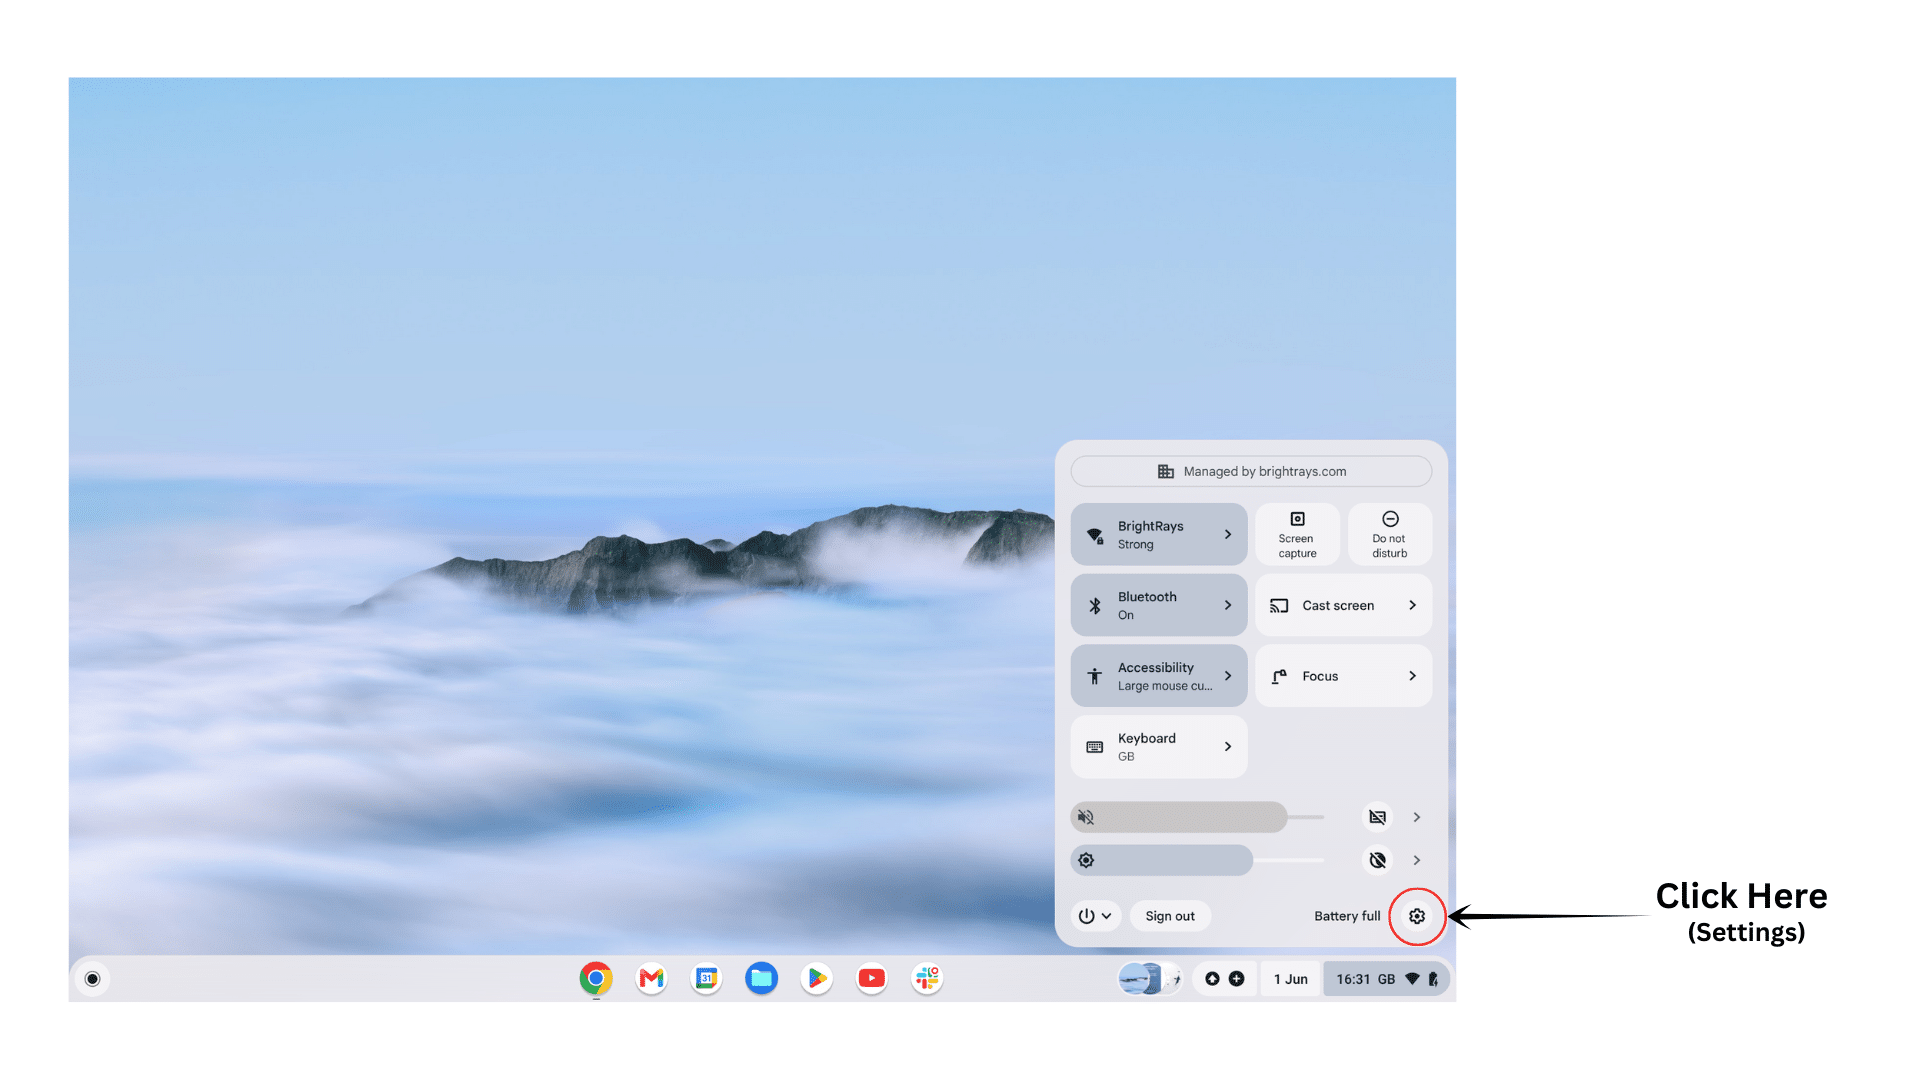
To begin the factory reset process, open the Chromebook’s Settings menu. Click the clock in the bottom-right corner of the screen to open the Quick Settings panel.
From there, select Settings to access the device configuration options. This menu contains various system controls, including the reset tools needed to perform a Powerwash.
Make sure any important files have been backed up before continuing with the reset process.
Step 2: Navigate to Reset Settings
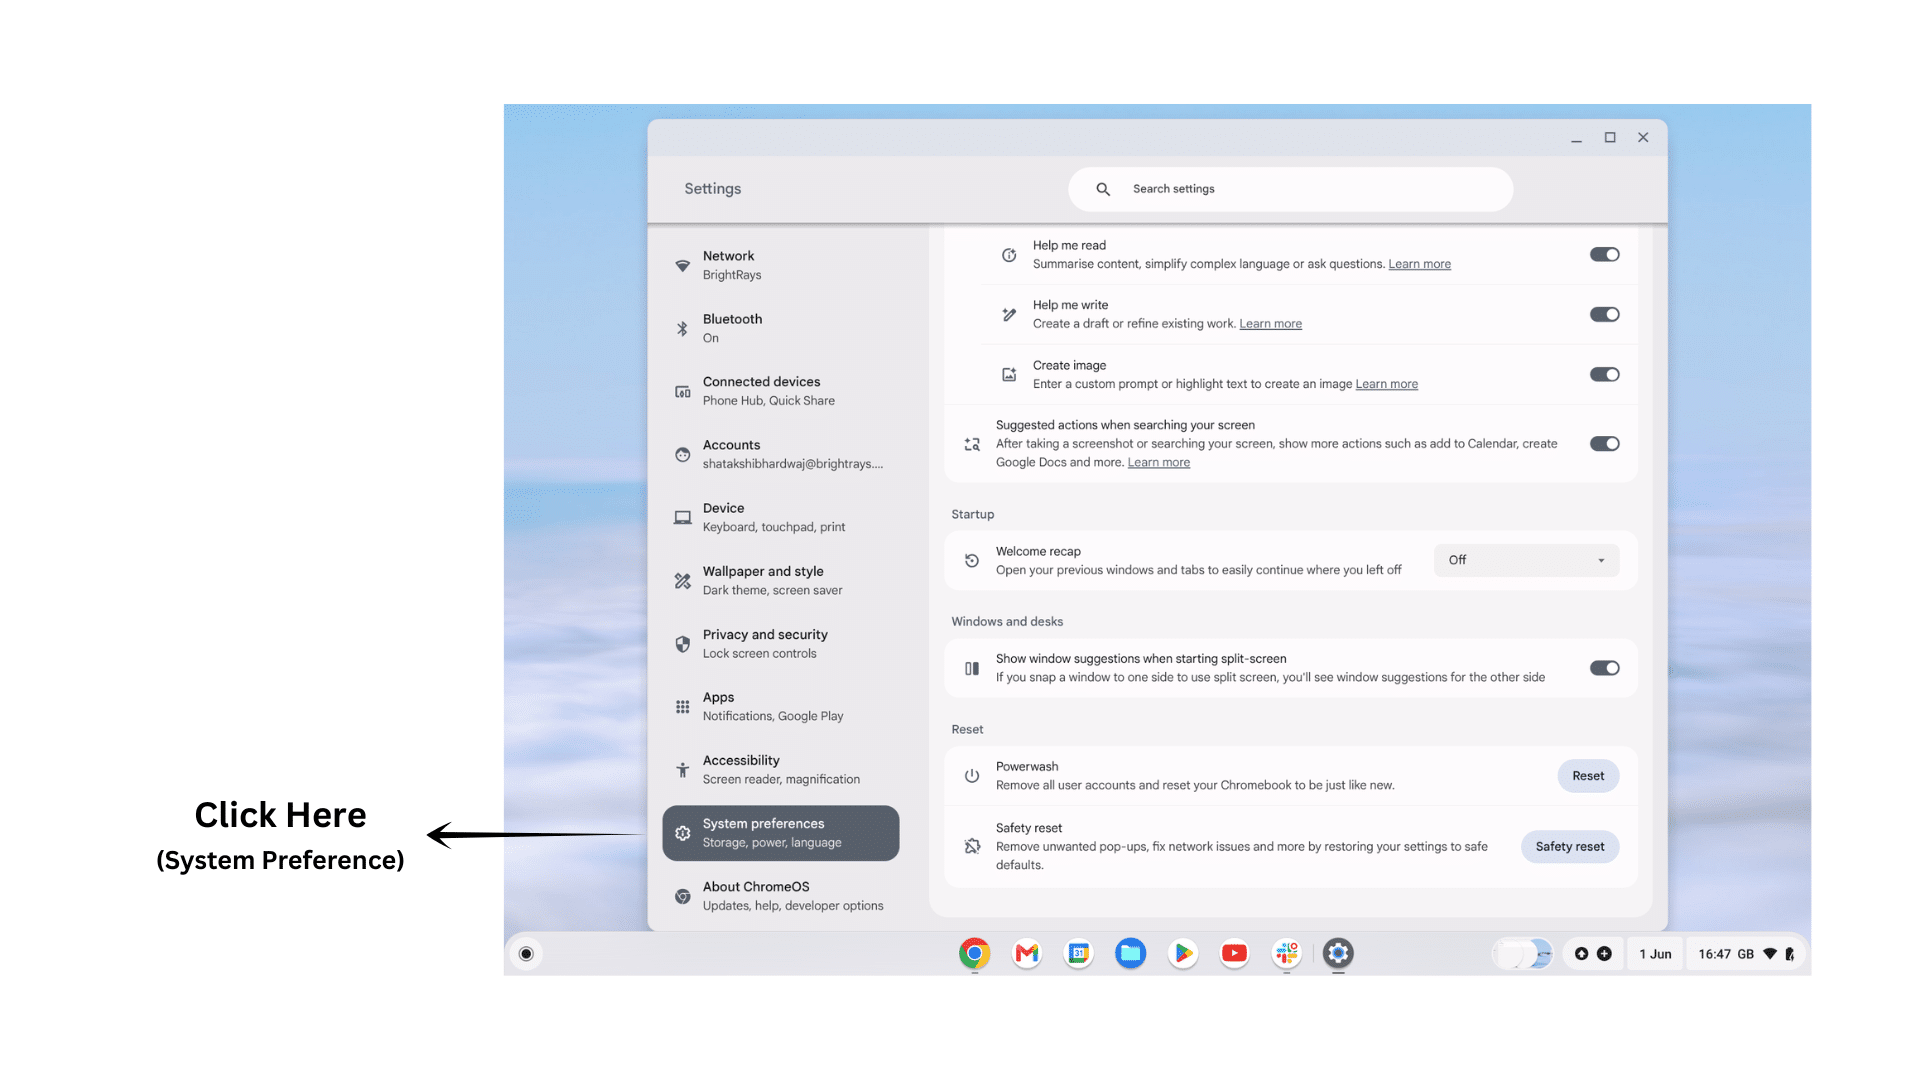
Once you’re in Settings, locate the reset options. Depending on your ChromeOS version, you can either navigate to the system settings or use the search bar to find Powerwash.
When the relevant results appear, open the reset section. This area contains options for Chromebook recovery and reset that allow you to restore the device to its factory-default state.
Step 3: Select Powerwash
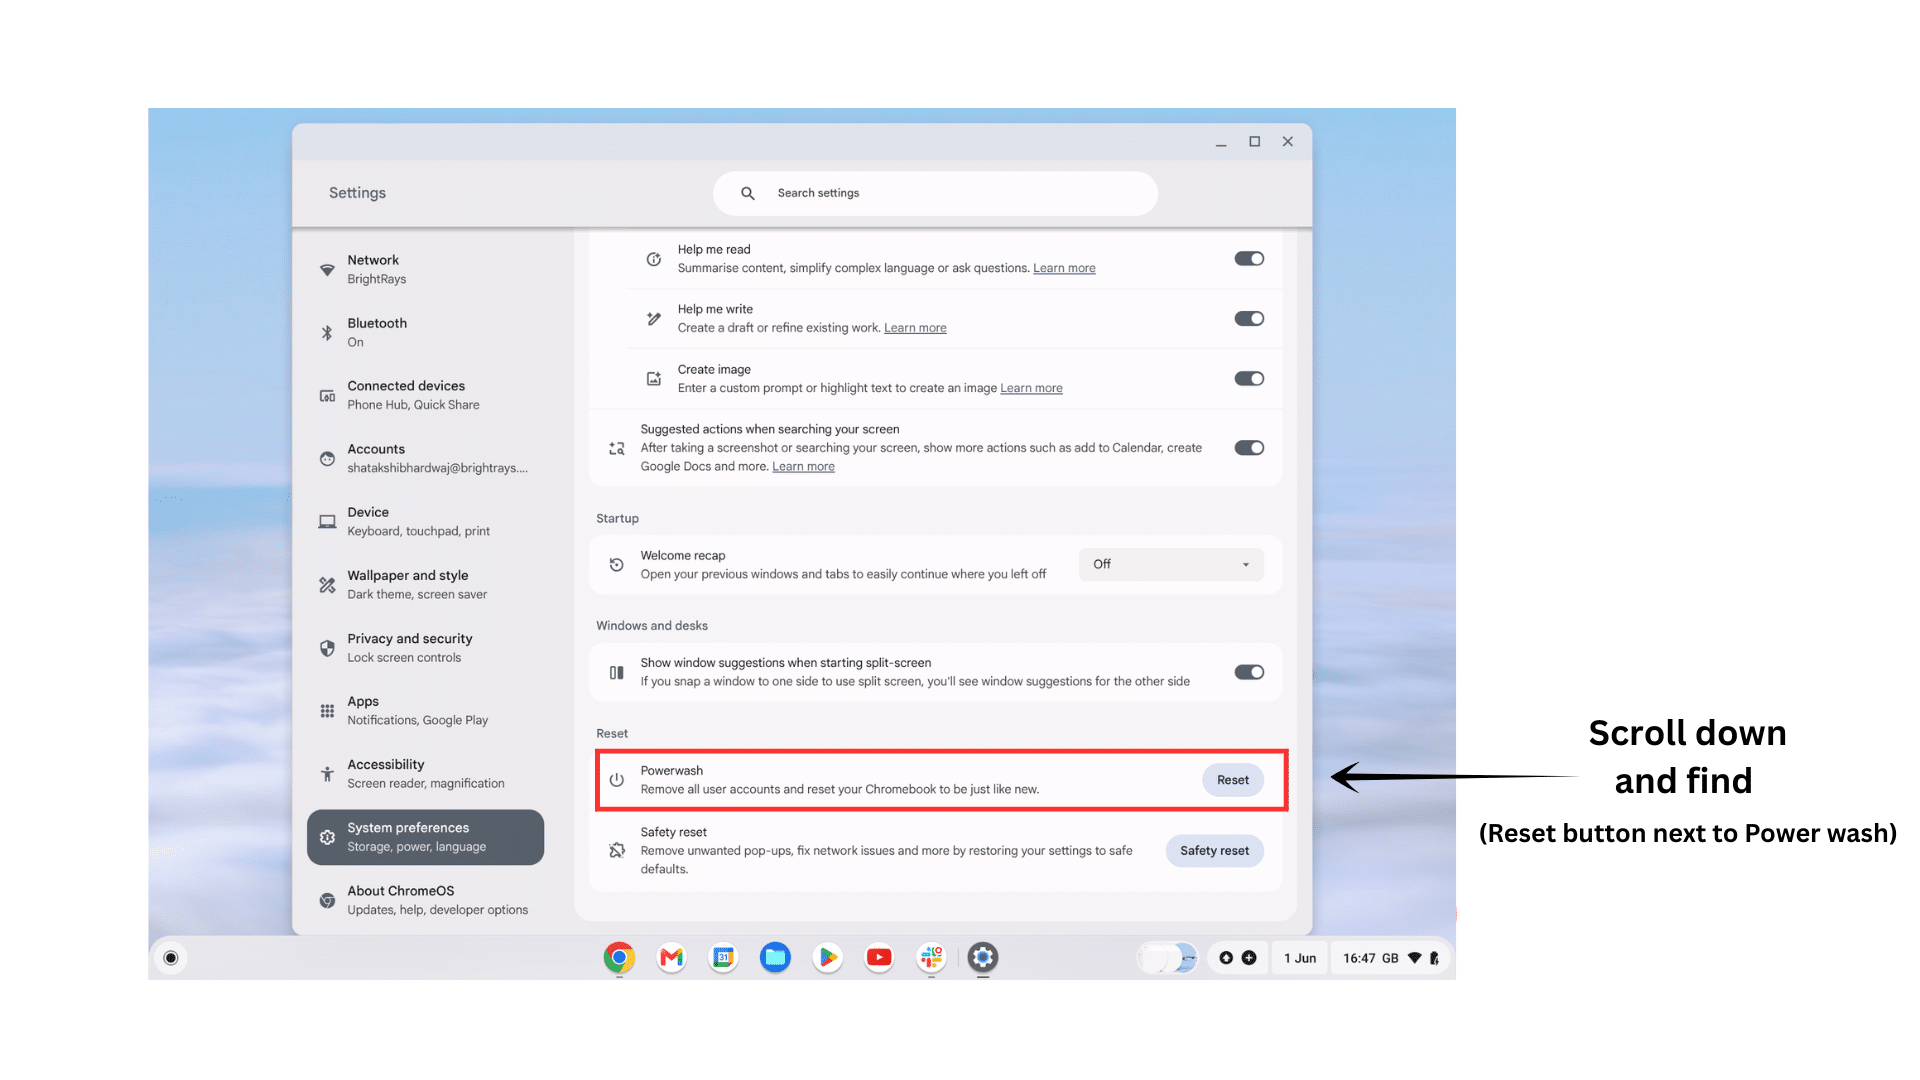
In the reset section, locate the Powerwash option and select it. Powerwash is ChromeOS’s built-in factory reset feature that removes local accounts, settings, downloaded files, and other data stored on the device.
Before proceeding, review any information displayed on the screen to understand what will be removed. Once you’re ready, continue to the next step to begin the reset process.
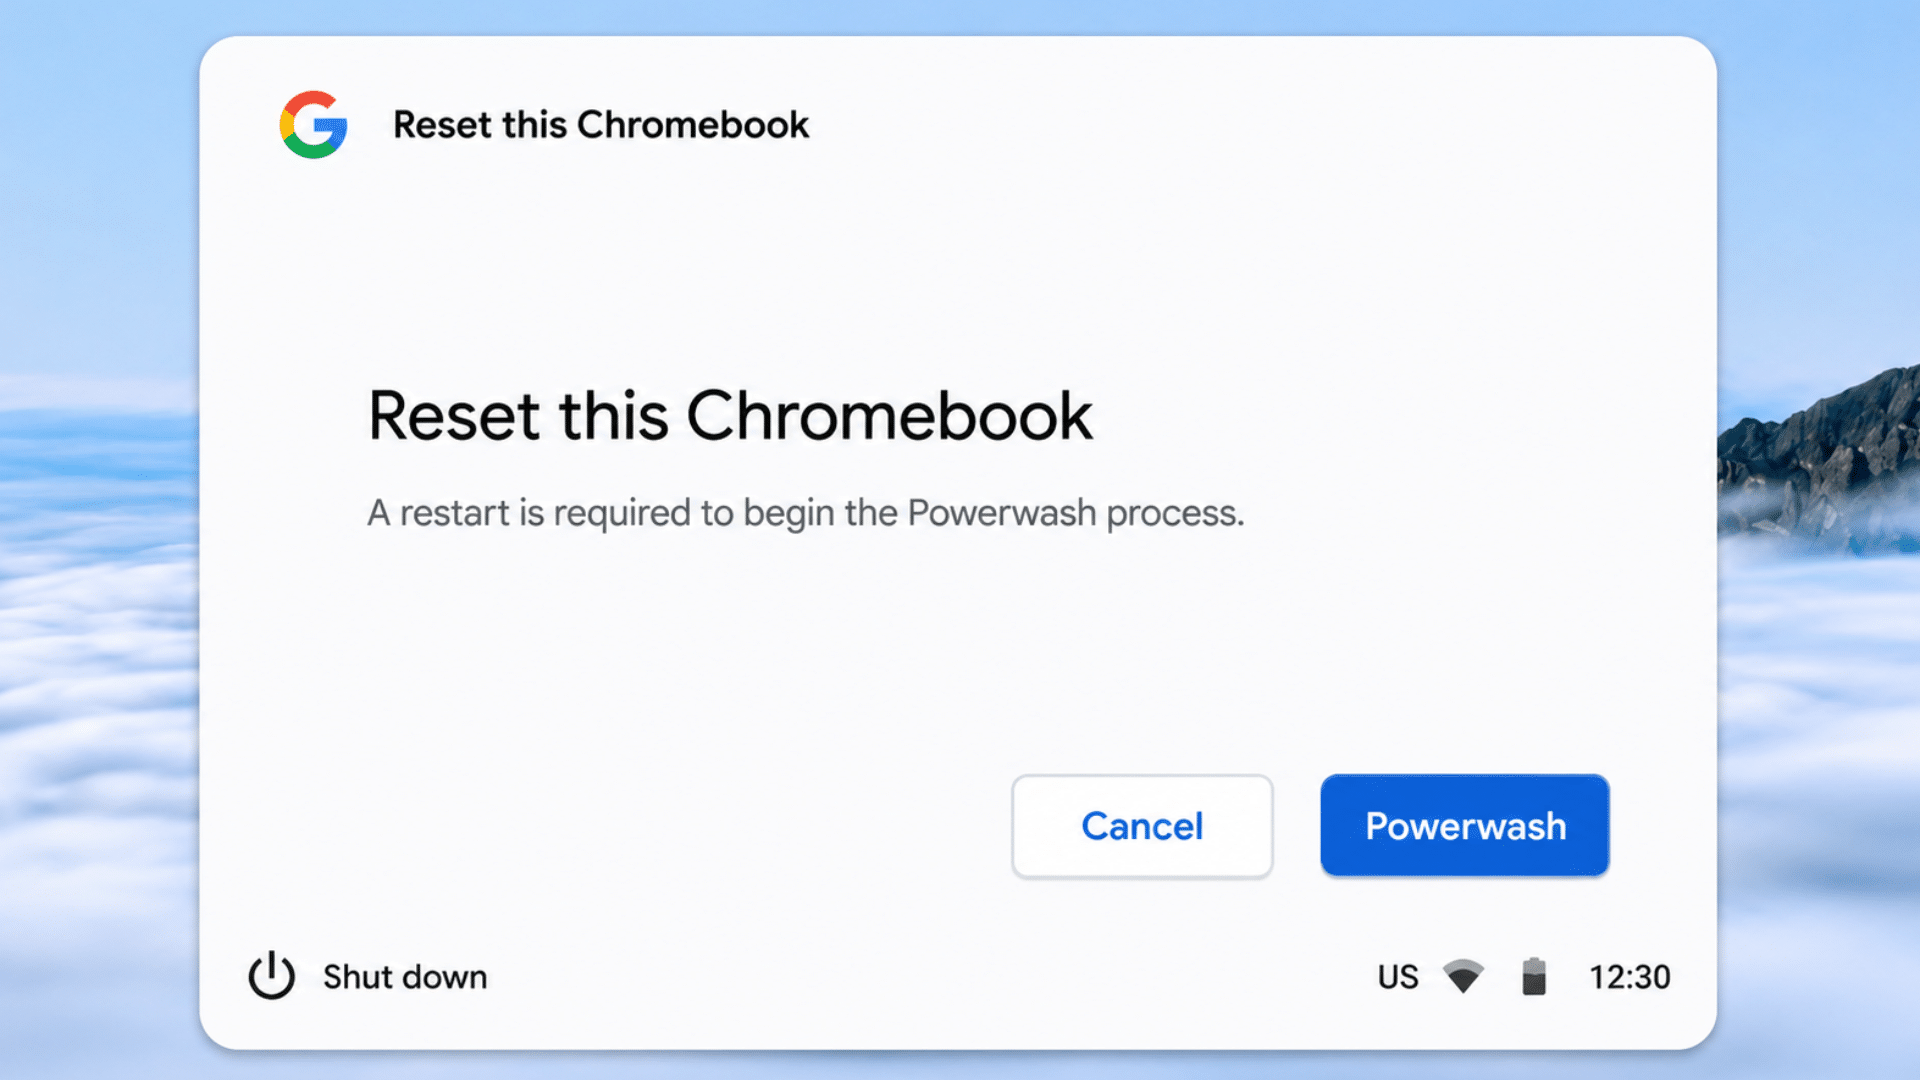
Step 4: Click Restart
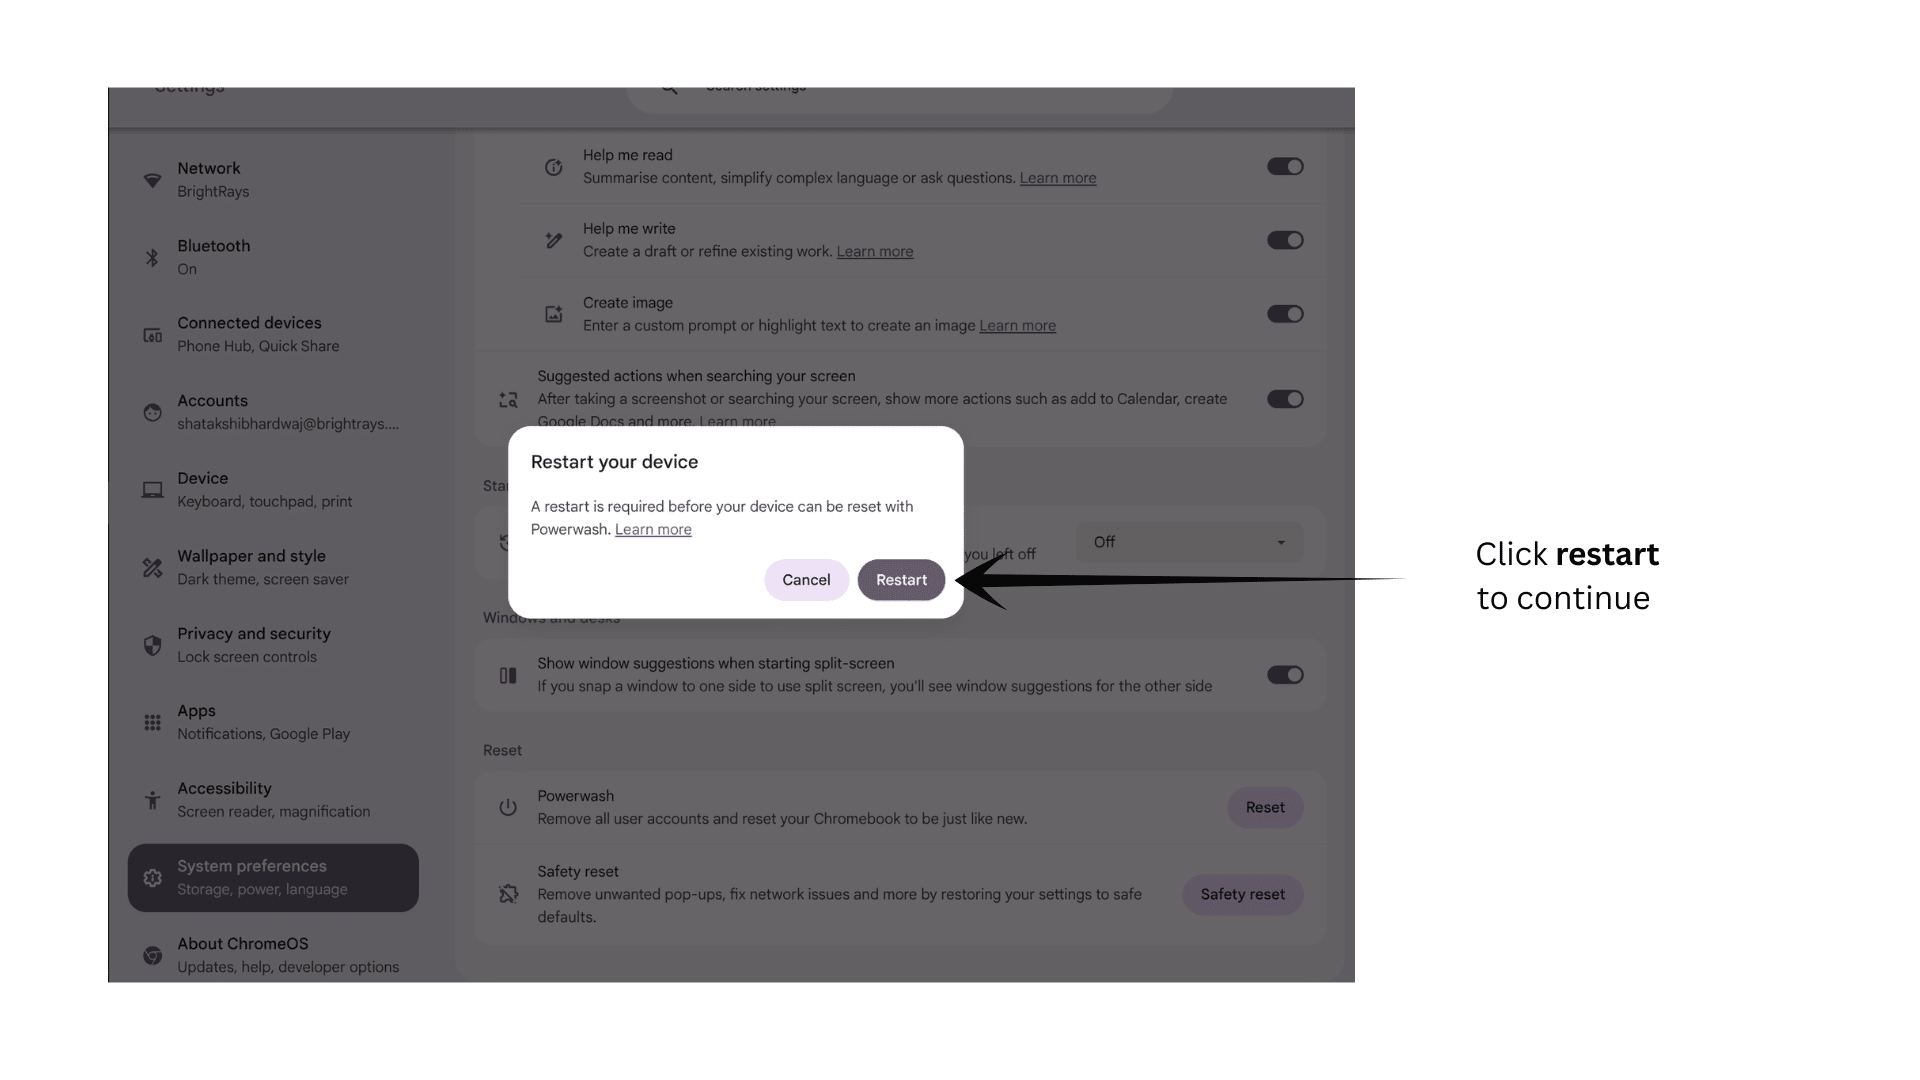
After selecting Powerwash, ChromeOS displays a confirmation window explaining what will happen during the reset. Review the information carefully and click Restart to continue.
The Chromebook will reboot and prepare the system for the factory reset process. At this stage, no data has been erased yet, giving you one final opportunity to cancel if you need to back up additional files.
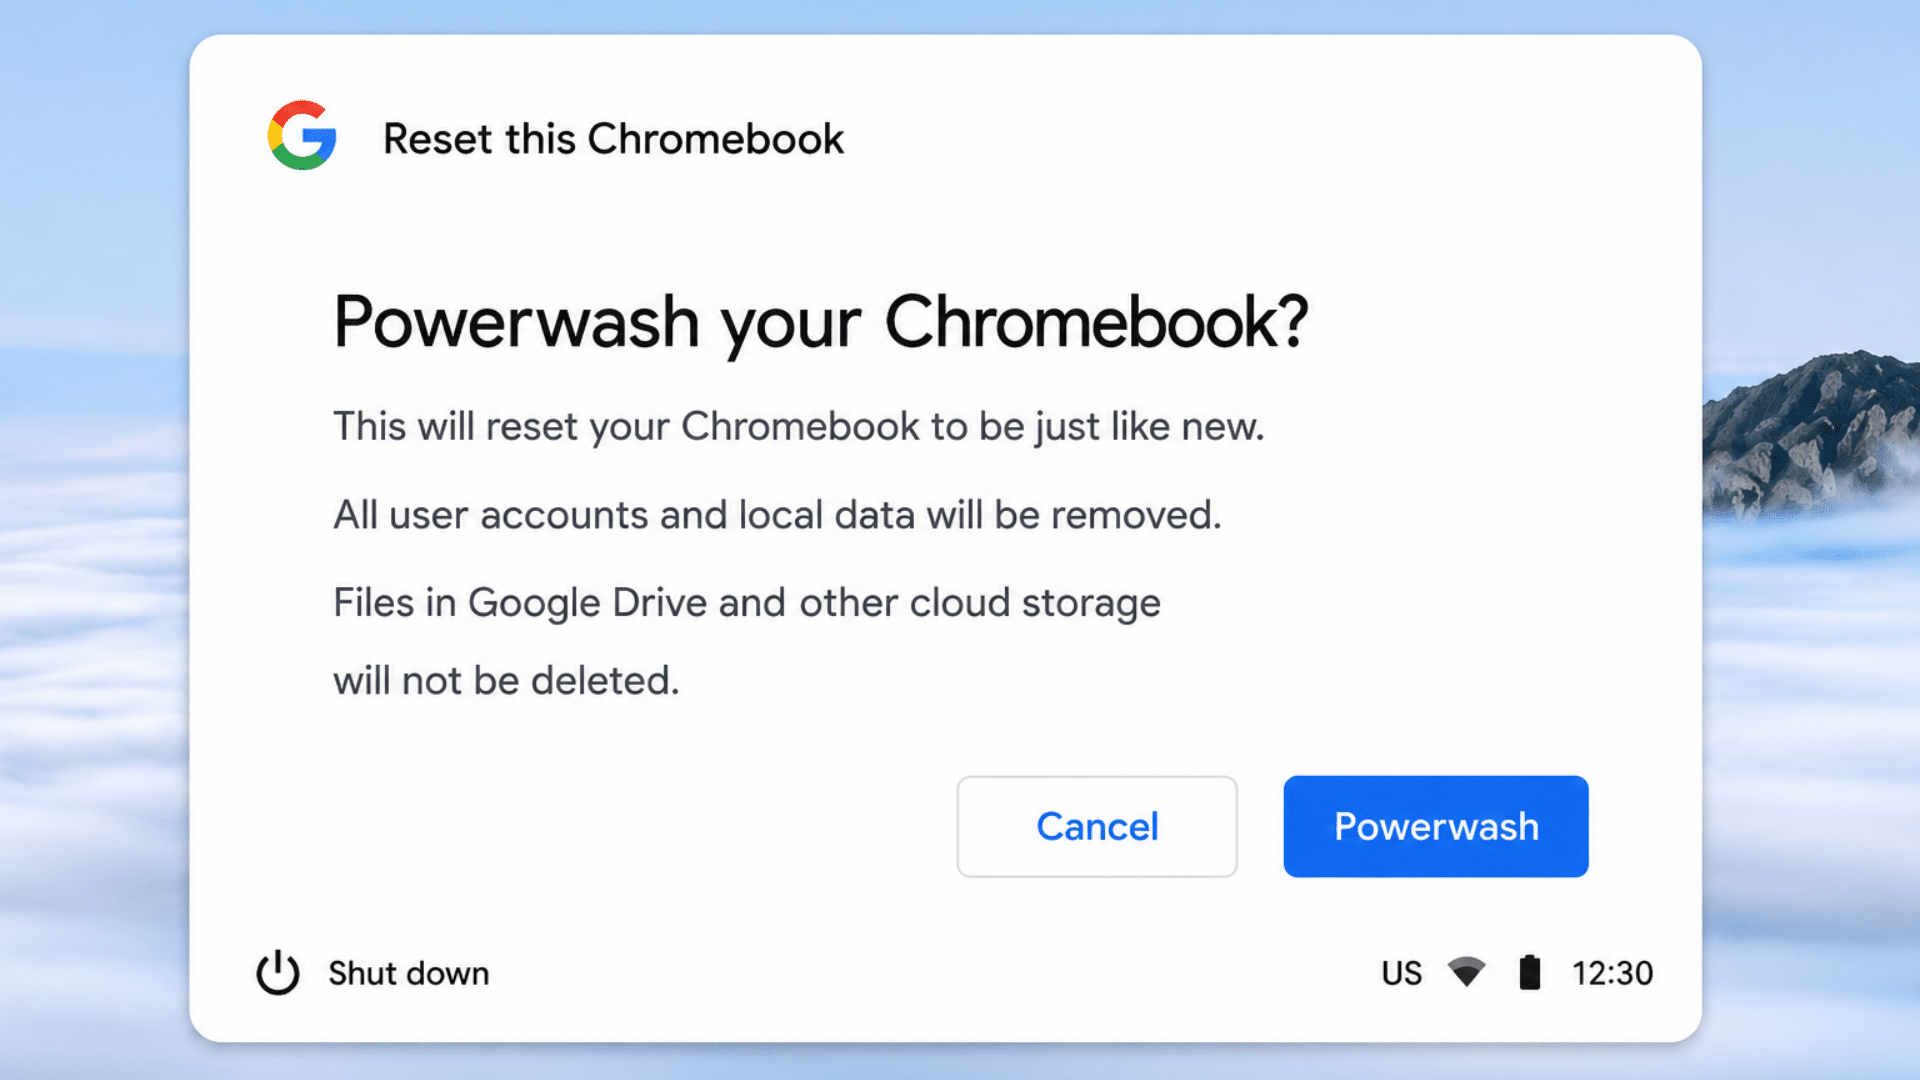
Step 5: Confirm Powerwash
After the Chromebook restarts, a Powerwash confirmation screen will appear. Select Powerwash, then confirm you want to proceed with the factory reset.
This action permanently removes local user accounts, downloaded files, settings, and other data stored on the device.
Once confirmed, ChromeOS begins erasing local information and restoring the Chromebook to its original factory configuration.
Step 6: Complete Chromebook Setup
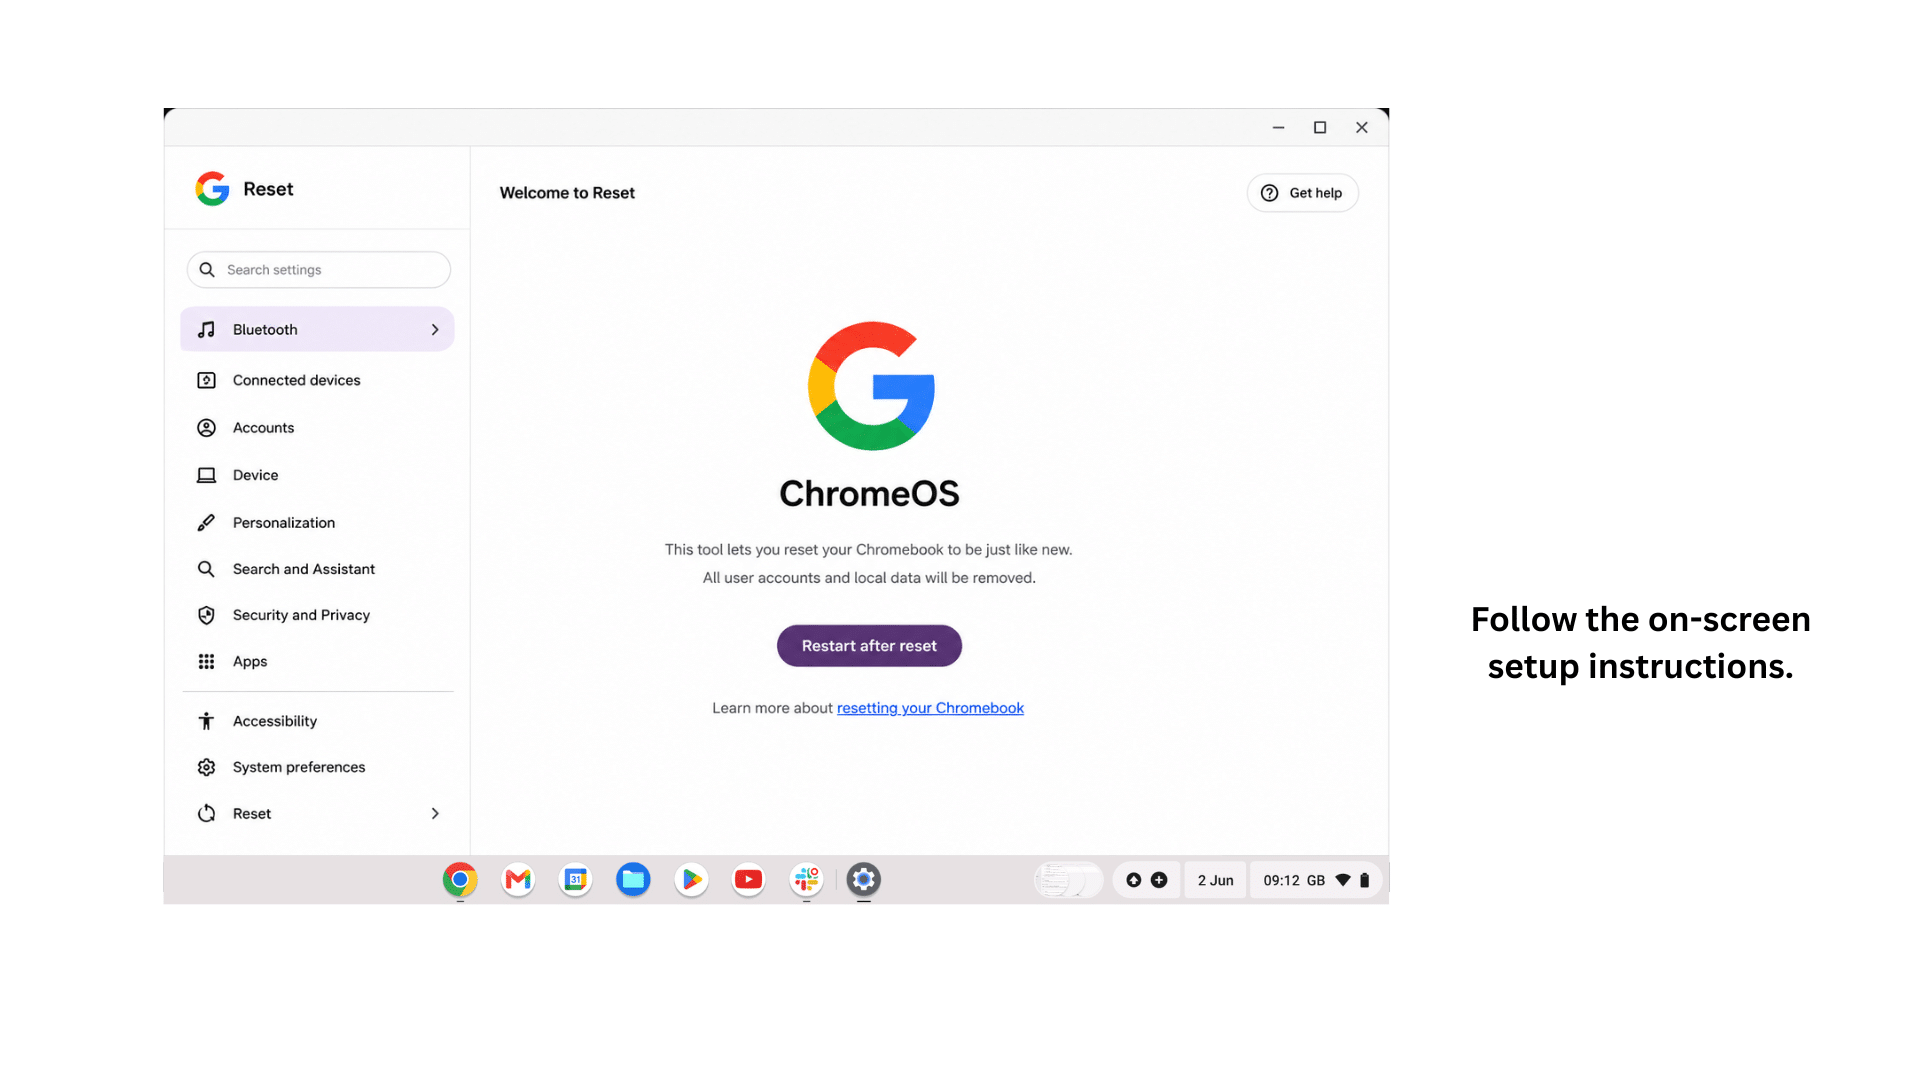
When the reset process finishes, the Chromebook will display the ChromeOS welcome screen. Follow the on-screen instructions to set up the device, connect to a Wi-Fi network, and sign in with your Google account.
After signing in, ChromeOS can restore synced settings, bookmarks, and other cloud-based data. You can then reinstall any required apps and verify that the Chromebook is functioning correctly.
How Long does a Powerwash Take?
In most cases, a Chromebook Powerwash takes between 5 and 10 minutes to complete.
The exact time may vary depending on the device model and the amount of local data stored on the Chromebook.
What to Do After the Reset
After the reset is complete:
- Sign in with your Google account.
- Restore files from Google Drive or external backups.
- Reinstall any apps you need.
- Verify that your settings and synced data have been restored correctly.
- Check for ChromeOS updates and install them if available.
- Your Chromebook should now be running with a fresh installation and default settings.
Method 2: Reset a Chromebook Without Logging In
If you can’t access your Chromebook because you’ve forgotten your password or can’t log in, you can still perform a factory reset directly from the sign-in screen.
ChromeOS includes a built-in keyboard shortcut that launches the Powerwash process without requiring account access.
Step 1: Go to the Login Screen

Turn on or restart your Chromebook and wait for the sign-in screen to appear. If you’re already signed in, sign out of your account first.
The Powerwash shortcut can only be accessed from the login screen, so make sure no user account is currently active before proceeding.
Step 2: Press Keyboard Shortcut
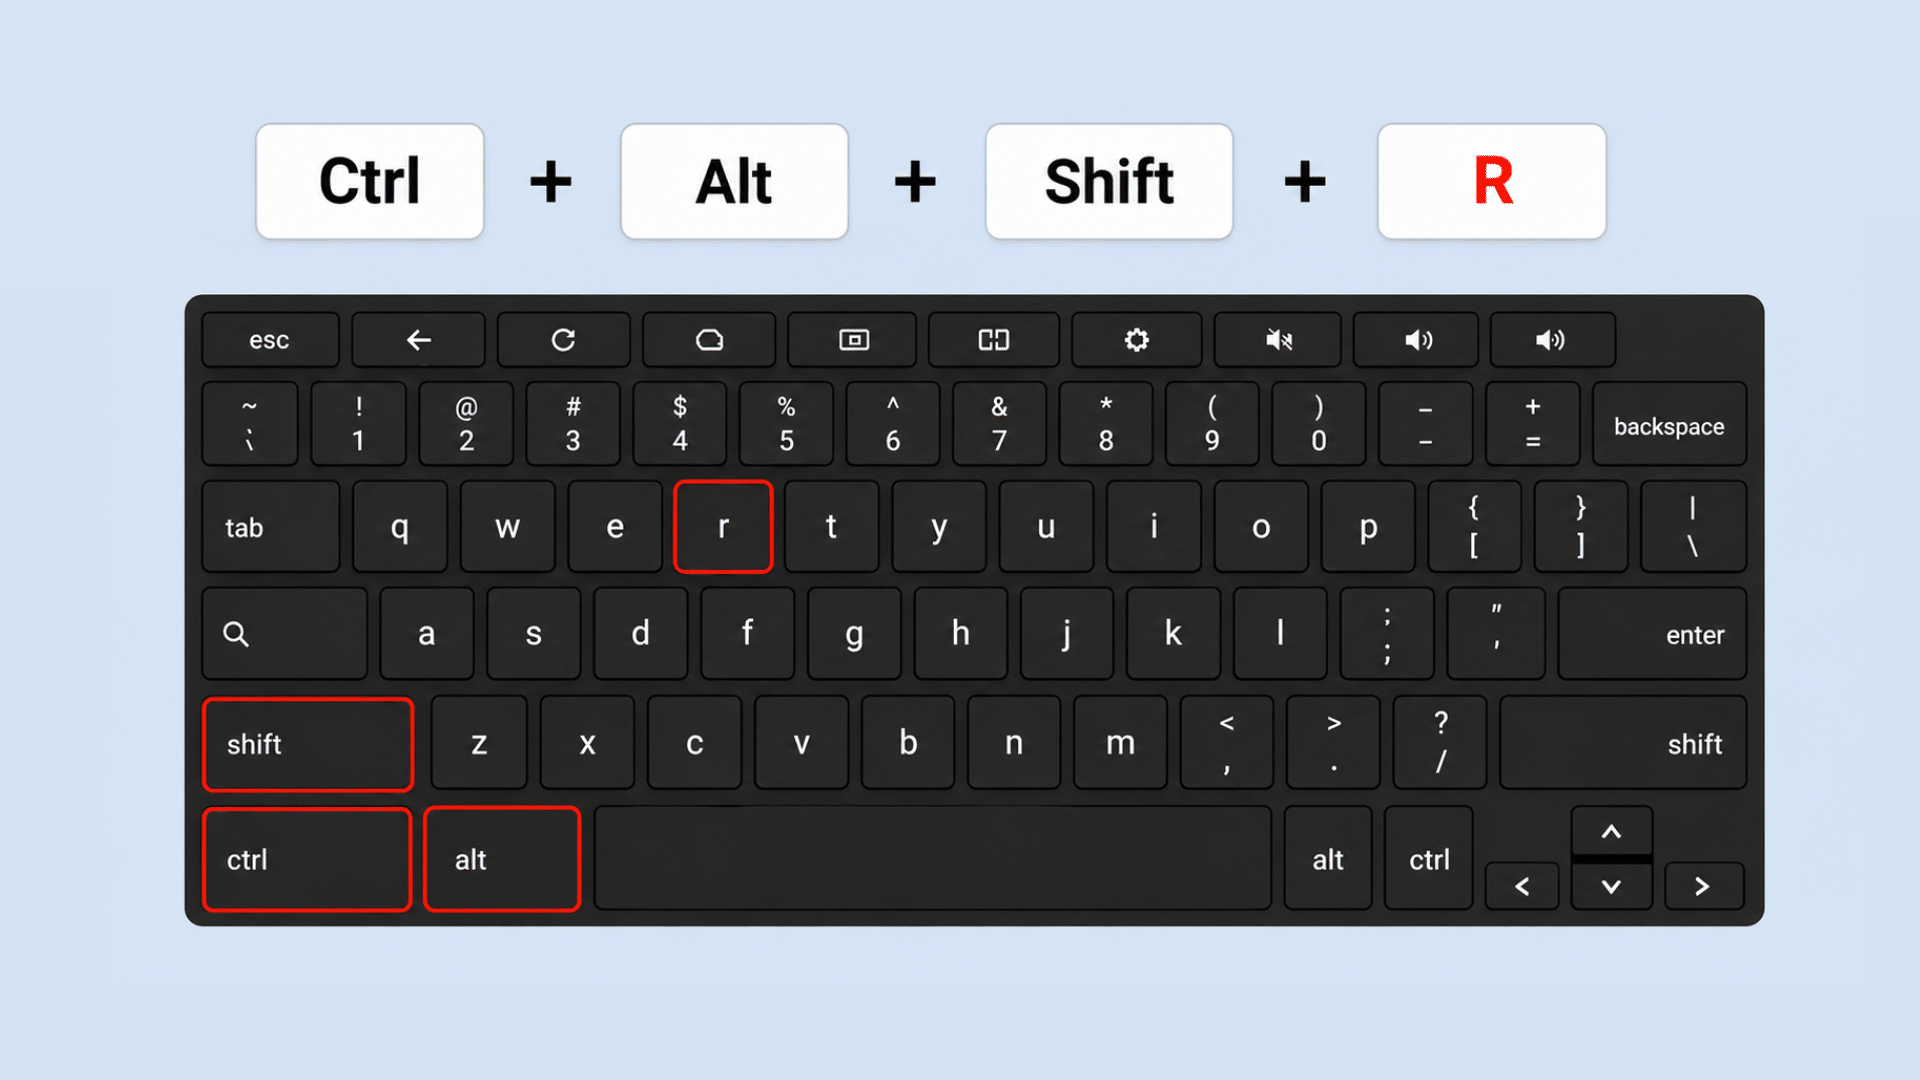
On the sign-in screen, press Ctrl + Alt + Shift + R simultaneously. This keyboard shortcut opens the Chromebook reset menu and provides access to the Powerwash feature.
If entered correctly, a reset window will appear, allowing you to continue with the factory reset process.
Step 3: Select Powerwash
When the reset window appears, click Powerwash to begin the reset process. ChromeOS may display information about what will be removed from the device.
Review the details and proceed only if you’ve backed up any important files stored locally on the Chromebook.
Step 4: Confirm the Reset
Follow the on-screen prompts to confirm the Powerwash.
Once confirmed, the Chromebook will erase local user accounts, settings, and files before restoring the device to its factory-default state.
The reset process usually takes a few minutes to complete.
When this Method is Useful
This method is useful when you cannot sign in to your Chromebook, have forgotten your password, are preparing the device for a new user, or need to remove multiple accounts from the device without accessing existing profiles.
Method 3: Reset a Managed Chromebook
First, let’s look at what a managed Chromebook is and how organizational controls affect the reset process.
What is a Managed Chromebook?
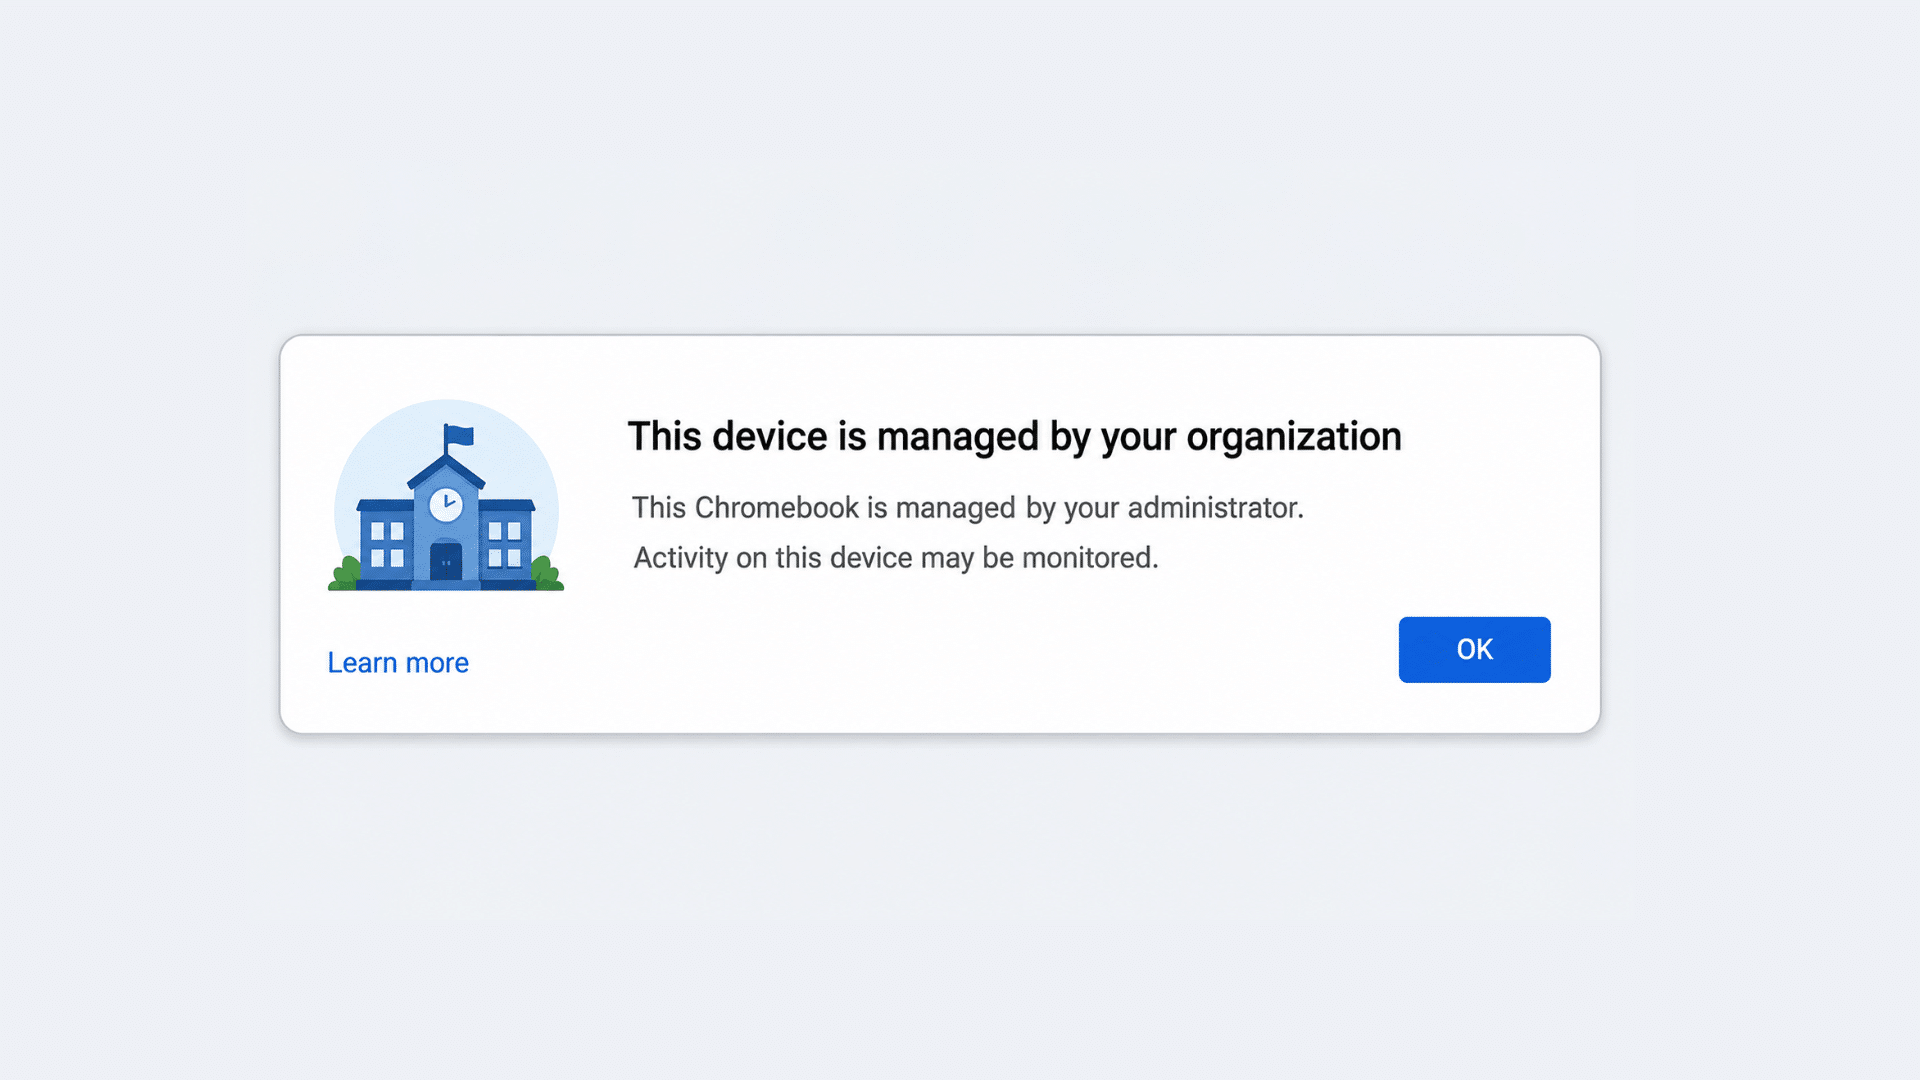
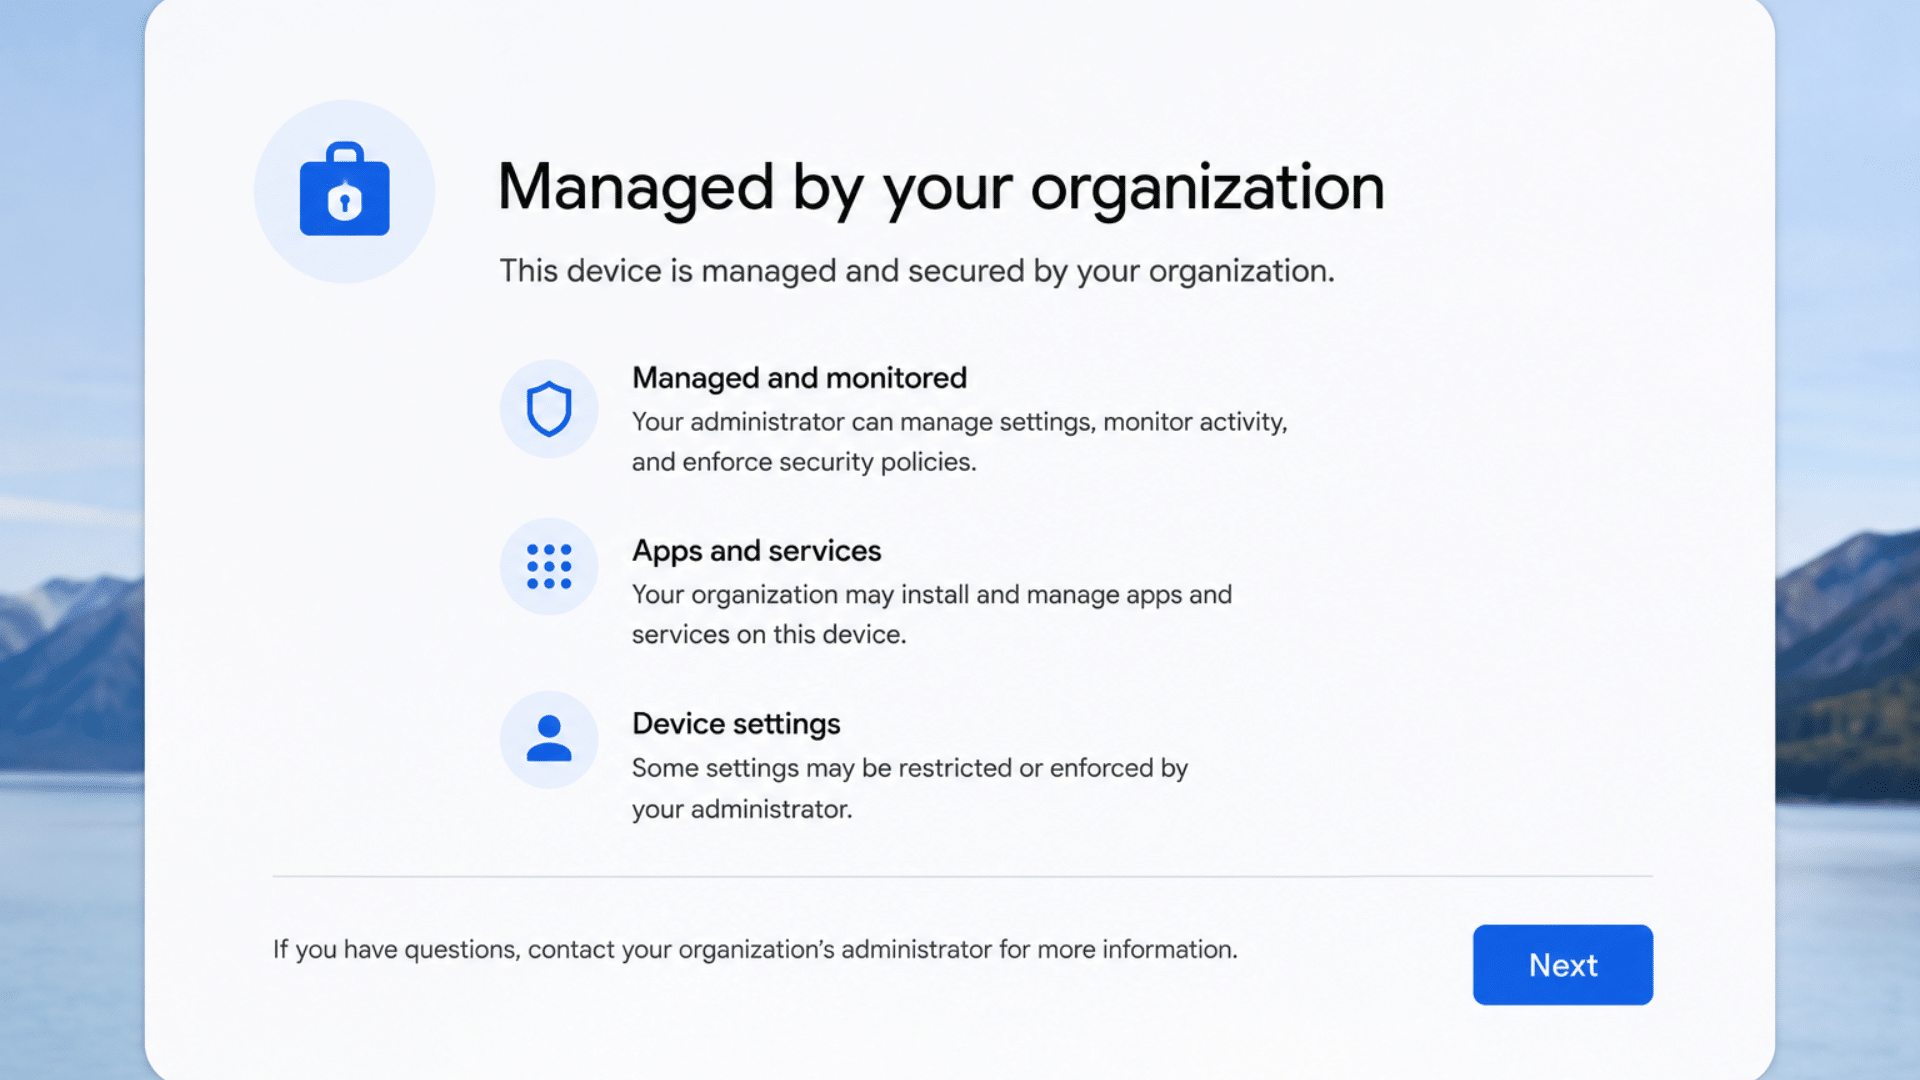
A managed Chromebook is a device that is controlled by an organization, such as a school, university, or business.
These devices are enrolled in a management system that allows administrators to apply policies, install apps, manage security settings, and restrict certain features.
Even if a managed Chromebook is reset, the management settings typically remain associated with the device.
School vs. Business Managed Chromebooks
| Feature | School-Issued Chromebook | Business Chromebook |
|---|---|---|
| Used By | Students | Employees |
| Managed By | School IT Department | Company IT Team |
| Purpose | Learning and education | Work and business tasks |
| Restrictions | School policies and app controls | Company security and access controls |
| After Reset | Re-enrolls in school management | Re-enrolls in enterprise management |
Can You Factory Reset a Managed Chromebook?
Yes, a managed Chromebook can be factory reset using the Powerwash feature. However, resetting the device does not usually remove its management status.
Once the Chromebook reconnects to the internet, it can automatically re-enroll under the organization’s management system.
What Happens After a Reset?
A factory reset removes local user accounts, downloaded files, and device settings stored on the Chromebook.
The device returns to its default setup screen, but the management information associated with the hardware remains intact.
Why the Device Remains Managed?
Management settings are associated with the Chromebook through enterprise or school enrollment records.
As a result, the device automatically recognizes its management status during setup and restores the organization’s policies after connecting to the internet.
How to Reset a Managed Chromebook
If you have permission to reset a managed Chromebook, follow these steps:
Step 1: Open Settings

If you have permission to manage the device, begin by opening the Chromebook’s Settings menu. Click the clock in the bottom-right corner of the screen to access the Quick Settings panel, then select Settings.
On some managed Chromebooks, you may notice organization-related messages or management information within the settings menu.
This confirms that the device is controlled by a school, business, or other organization and may be subject to certain restrictions.
Step 2: Start Powerwash
Within the Settings menu, navigate to the reset options and locate Powerwash.
This feature starts the factory reset process and removes local user accounts, downloaded files, and device settings stored on the Chromebook.
Before continuing, ensure that any important data has been backed up. Starting a Powerwash does not usually remove organizational management, but it does erase local information from the device.
Step 3: Confirm Reset

After selecting Powerwash, ChromeOS displays information about what will be removed during the reset. Review the details carefully and confirm that you want to continue.
Once confirmed, the Chromebook restarts and begins erasing locally stored accounts, settings, and files.
Depending on the device and the amount of local data stored, this process may take several minutes to complete.
Step 4: Connect to the Internet
After the reset is complete, the Chromebook returns to the setup screen. Follow the on-screen instructions and connect the device to a Wi-Fi network.
An active internet connection is required because ChromeOS must verify the Chromebook’s enrollment status with the organization’s management system.
Without internet access, the device may not be able to complete setup or apply the required management policies.
Step 5: Device Automatically Re-Enrolls
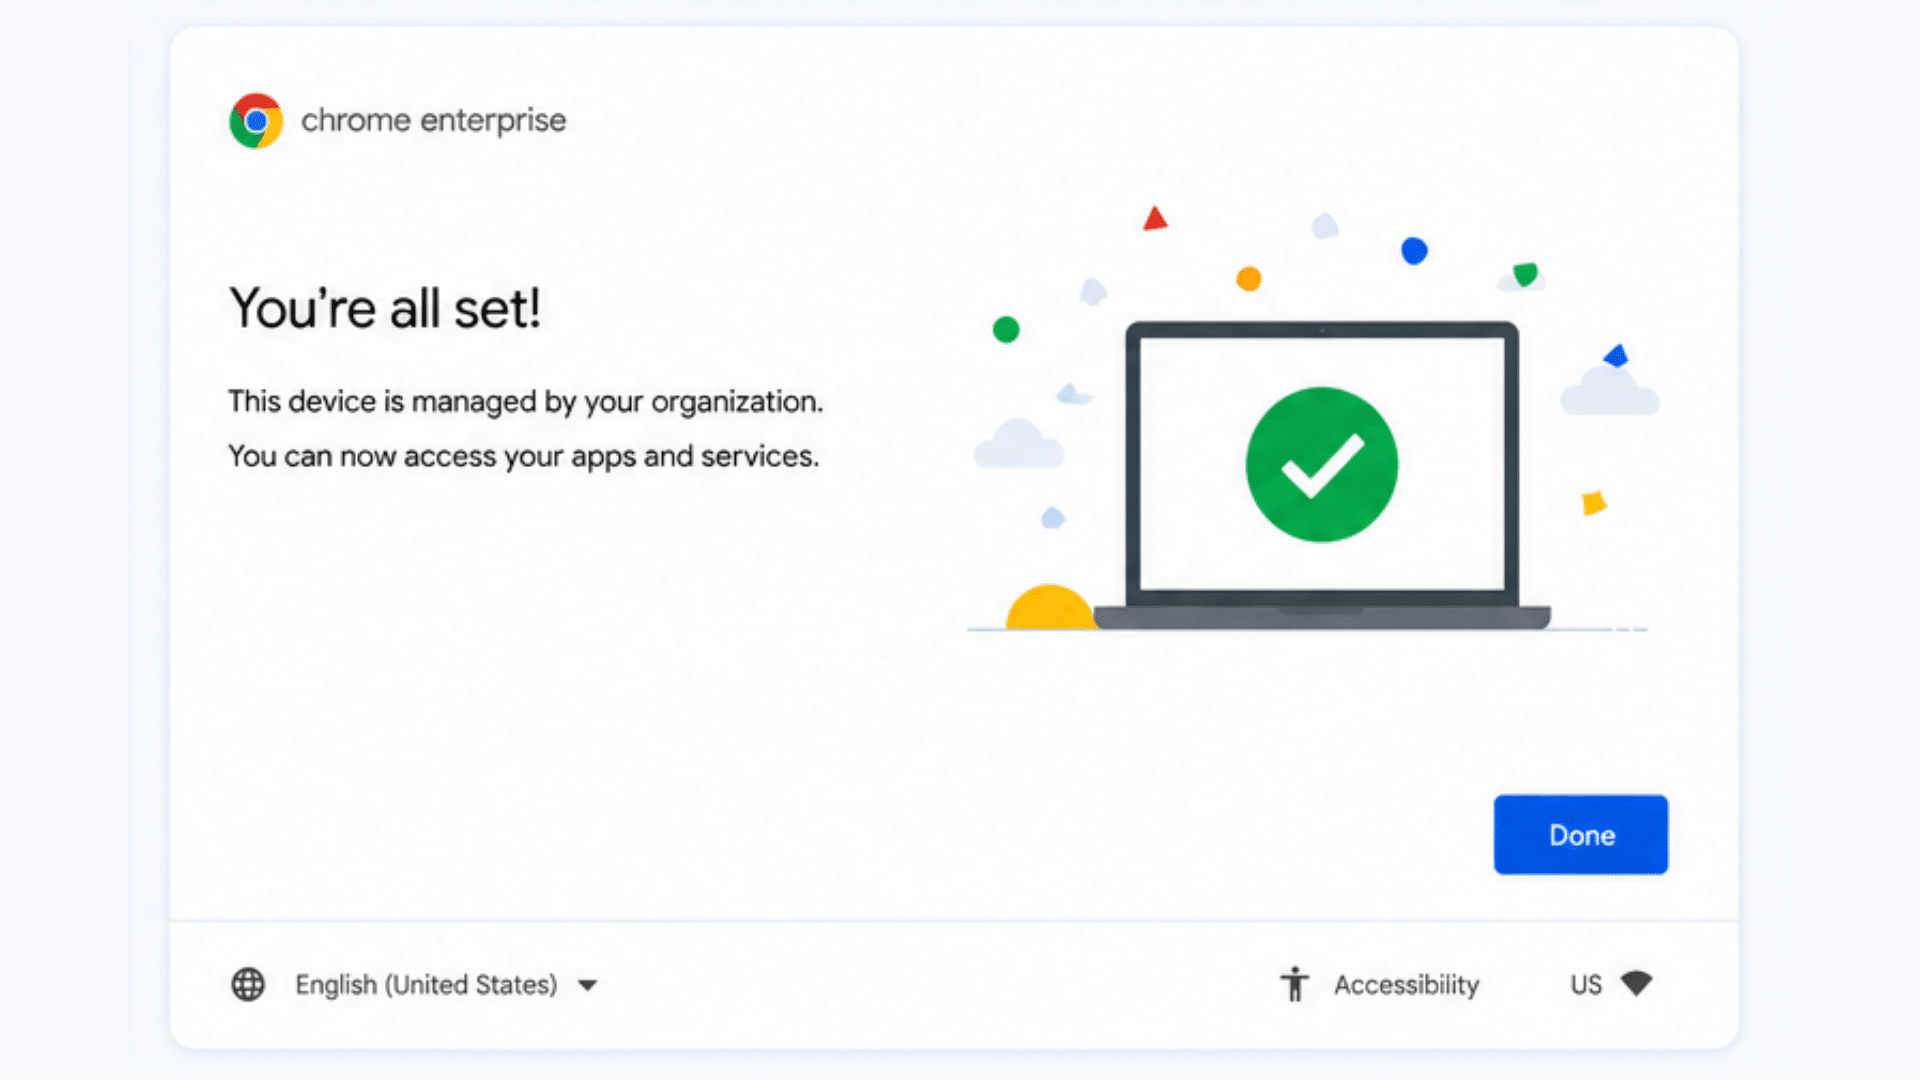
Once connected to the internet, the Chromebook may automatically recognize its enrollment status and reconnect to the school’s or organization’s management system.
Management policies, security settings, and required applications are typically restored at this stage.
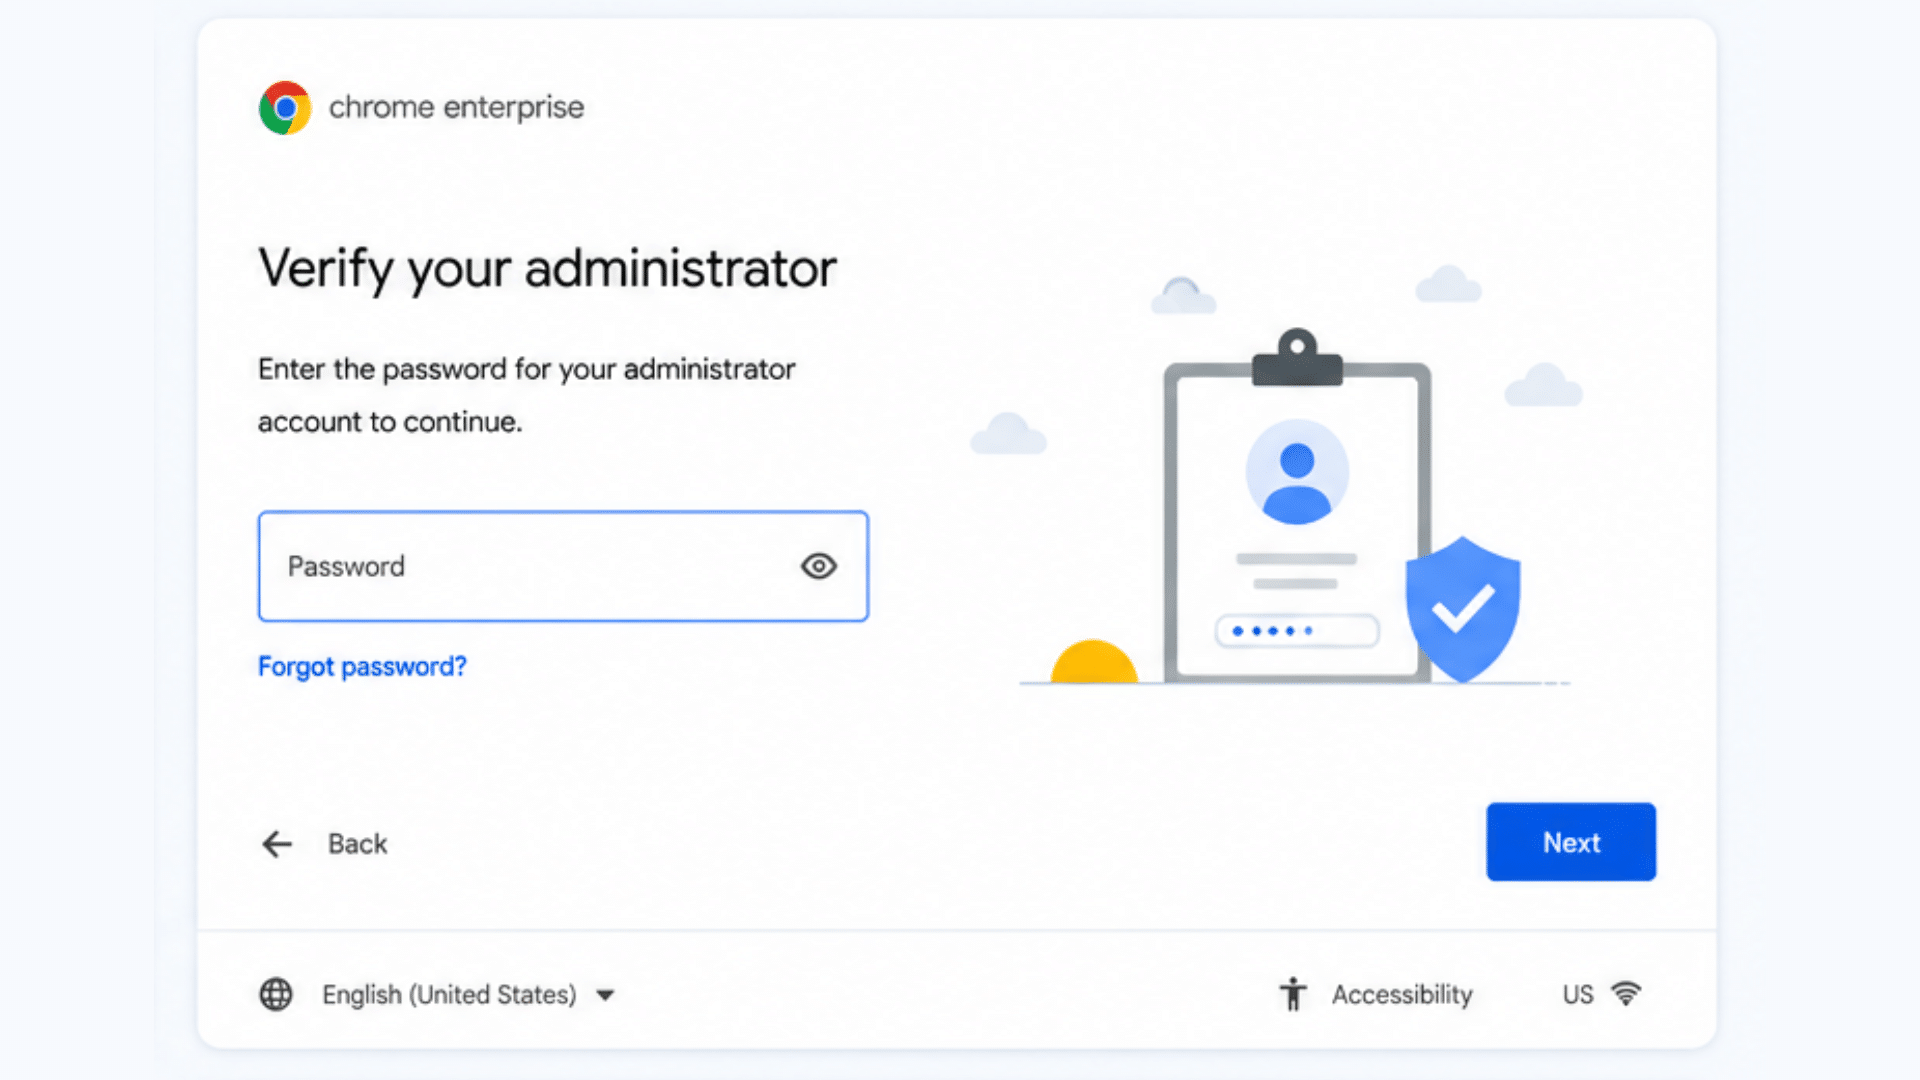
Depending on how the organization has configured the device, you may see an enterprise enrollment screen or be asked to sign in with an authorized administrator or organizational account.
When You Need Administrator Assistance
In some situations, resetting a managed Chromebook may not resolve the issue.
You may need assistance from the organization’s administrator to complete setup, remove restrictions, or troubleshoot enrollment problems.
School-Owned Devices: Contact the school’s IT department or administrator for help with enrollment issues, login problems, or device restrictions.
Company-Owned Devices: Reach out to your organization’s IT team. They can assist with enterprise enrollment, account access, security policies, and any issues that occur after the reset process.
Method 4: Reinstall ChromeOS Using Recovery Mode
Use Recovery Mode when your Chromebook cannot start properly or when Chrome OS needs to be reinstalled.
When Recovery Mode Is Necessary
Recovery Mode is used when a standard Chromebook reset cannot fix the problem. It reinstalls ChromeOS using recovery media and can resolve serious system issues, startup failures, and operating system corruption. Before you start, you’ll need a USB flash drive or an SD card to create Chromebook recovery media.
Recovery Mode is commonly required in the following situations:
Chromebook Won’t Start
If the Chromebook freezes during startup, restarts repeatedly, shows a blank screen, or fails to boot, Recovery Mode may help restore normal operation by reinstalling Chrome OS and repairing damaged system files.
Chrome OS Is Missing or Damaged
If you see a message stating that ChromeOS is missing or damaged, important operating system files have become corrupted. Recovery Mode allows you to reinstall ChromeOS and restore the device to a working state.
Powerwash Doesn’t Work
Sometimes a Powerwash fails to complete or does not resolve persistent software problems. In these cases, Recovery Mode provides a deeper repair option by reinstalling the entire ChromeOS operating system from recovery media.
How to Enter Chromebook Recovery Mode
Recovery Mode allows you to reinstall ChromeOS when a Chromebook cannot start properly or has serious system issues.
Before beginning, make sure you have a USB flash drive or SD card available to create recovery media and ensure the Chromebook has sufficient battery power.
Step 1: Turn Off the Chromebook
Completely power down the Chromebook before attempting to enter Recovery Mode.
Disconnect any unnecessary accessories, such as USB devices or external displays, to prevent interference during the recovery process.
Step 2: Press Esc + Refresh + Power
Press and hold the Esc and Refresh keys simultaneously, then briefly press the Power button. Continue holding the keys until the recovery screen appears.
This key combination launches the Chromebook’s built-in Recovery Mode and allows you to begin the operating system repair or reinstallation process.
Step 3: Create Recovery Media
Using another computer, install and open the Chromebook Recovery Utility. Follow the prompts to select your Chromebook model and create recovery media on a USB flash drive or SD card.
The utility downloads the appropriate ChromeOS version and prepares the storage device for the recovery process.
Step 4: Insert Recovery USB or SD Card
Once the recovery screen is displayed, insert the prepared USB drive or SD card into the Chromebook.
The device should automatically detect the recovery media and verify its contents. If recognized successfully, the Chromebook will begin preparing for the ChromeOS reinstallation process.
Step 5: Reinstall ChromeOS
Follow the on-screen instructions to reinstall ChromeOS. The Chromebook will erase existing system data and install a fresh copy of the operating system from the recovery media.
After the process is complete, remove the USB drive or SD card and restart the device to begin setup.
Chromebook Reset Troubleshooting
Although Chromebook resets are usually straightforward, some users may encounter issues during or after the process.
Understanding the cause of these problems can help you identify the appropriate solution and avoid unnecessary troubleshooting steps.
The sections below cover some of the most common Chromebook reset issues and provide guidance on resolving them.
1. Chromebook Won’t Powerwash
If the Powerwash option is unavailable or fails to launch, restart the Chromebook and try again. Make sure ChromeOS is fully updated and that you have permission to reset the device.
If you are using a school or work Chromebook, the reset option may be restricted by an administrator. Also, check your internet connection before trying again.
2. Chromebook Stuck During Reset
A Chromebook that becomes stuck during the reset process may be experiencing software corruption or hardware-related issues.
Wait several minutes to ensure the process has not simply slowed down. If the reset remains frozen, perform a forced restart and attempt the reset again.
3. Managed Chromebook Keeps Re-Enrolling
School-issued and enterprise-managed Chromebooks are designed to automatically reconnect to their management system after a reset.
This behavior is normal and cannot usually be bypassed by performing a Powerwash. If the device should no longer be managed, you’ll need assistance from the administrator responsible for the enrollment.
4. Forgot Google Account After Reset
After a factory reset, you’ll need to sign in with a Google account to complete the Chromebook setup process.
If you cannot remember your login credentials, recover your account before proceeding. Google may require identity verification to confirm ownership and restore access to the account.
5. Recovery Media Not Working
If the Chromebook fails to recognize the recovery USB drive or SD card, recreate the recovery media using the Chromebook Recovery Utility.
Make sure the correct Chromebook model was selected during creation and verify that the storage device is functioning properly.
Conclusion
Resetting a Chromebook is a practical way to resolve software issues, improve performance, remove unwanted accounts, or prepare the device for a new owner.
ChromeOS offers several reset methods, each designed for a specific situation. For most users, Powerwash is the quickest way to restore factory settings and remove local data.
If you cannot access your account, the sign-in screen reset provides an alternative without requiring a password.
Managed Chromebooks can also be reset, although organizational policies and restrictions typically remain in place after setup.
For more serious issues, such as startup failures, system corruption, or failed Powerwash attempts, Recovery Mode allows you to reinstall ChromeOS completely.
By selecting the right reset method and backing up important files beforehand, you can restore your Chromebook safely and efficiently.
Frequently Asked Questions
Does Powerwash Delete Everything on a Chromebook?
No. Powerwash removes local accounts, files, apps, and settings, but data synced to your Google account, such as Drive files, Gmail, and bookmarks, remains available.
How Long Does It Take to Reset a Chromebook?
A Chromebook Powerwash typically takes 5–10 minutes. Recovery Mode may take longer because ChromeOS must be downloaded and reinstalled from recovery media.
Can I Reset a Chromebook Without a Password?
Yes. From the sign-in screen, press Ctrl + Alt + Shift + R to open the Powerwash menu and reset the Chromebook without logging in.
Can a Managed Chromebook Be Unmanaged?
Usually not. Managed Chromebooks automatically re-enroll after a reset. Only the school’s or organization’s administrator can remove device management.
Will a Factory Reset Remove School Restrictions?
No. A factory reset removes local data but does not remove school or enterprise management policies. Restrictions are typically restored during setup.